UVM: The Value of Flexibility
Having been deeply involved with Universal Verification Methodology (UVM) from its inception, and before that, with OVM from its secret-meetings-in-a-hidden-hotel-room beginnings, I must admit that sometimes I forget some of the truly innovative and valuable aspects of what has become the leading verification methodology for both ASIC (see here) and FPGA (see here) verification teams. So I thought it might be helpful to all of us if I took a moment to review some of the key concepts in UVM. Perhaps it will help even those of us who may have become a bit jaded over the years just how cool UVM really is.
I have long preached that UVM allows engineers to create modular, reusable, randomized self-checking testbenches. Of course, these qualities are all inter-related. For example, modularity is the key to reuse. UVM promotes this through the use of transation-level modeling (TLM) interfaces. By abstracting the connections using ports on the “calling” side and exports on the “implementation” side, every component in a UVM testbench is blissfully unaware of the internal details of the component(s) to which it is connected. One of the most important places where this abstraction comes in handy is between sequences and drivers.
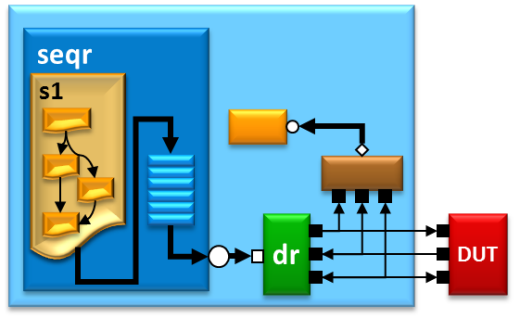
 Figure 1: Sequence-to-Driver Connection(s)
Much of the “mechanical” details are, of course, hidden by the implementation of the sequencer, and the user view of the interaction is therefore rather straightforward:
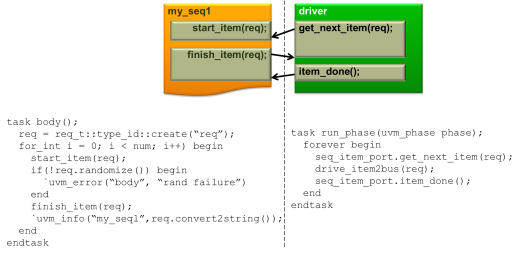
 Figure 2: The Sequence-Driver API
Here’s the key: That “drive_item2bus(req)” call inside the driver can be anything. In many cases, it will be a task call inside the driver that manipulates signals inside the virtual interface, or the calls could be inline:
task run_phase(uvm_phase phase); forever begin my_transaction tx; @(posedge dut_vi.clock); seq_item_port.get_next_item(tx); dut_vi.cmd = tx.cmd; dut_vi.addr = tx.addr; dut_vi.data = tx.data; @(posedge dut_vi.clock) seq_item_port.item_done(); endendtask: run_phaseAs long as the get_next_item() and item_done() calls are present in the driver, everything else is hidden from the rest of the environment, including the sequence. This opens up a world of possibilities.
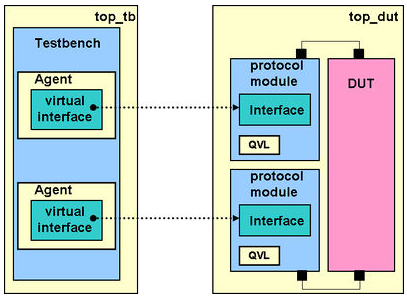
One example of the value of this setup is when emulation is a consideration. In this case, the task can exist inside the interface, which can itself exist anywhere. For emulation, the interface often will be instantiated inside a protocol module, which includes other protocol-specific information:
 Figure 3: Dual Top Architecture
You can find out more about how to set up your environment like this in the UVM Cookbook. And if you’re interested in learning more about setting up your testbench to facilitate emulation, you can download a very interesting paper here.
The flexibility of the TLM interface between the sequence and the driver gives UVM users the flexibility to reuse the same tests and sequences as the project progresses from block-level simulation through emulation. All that’s needed is a mechanism to allow a single environment to instantiate different components with the same interfaces without having to change the code. That’s what the factory is for, and we’ll cover that in our next session.
I’m looking forward to hearing from the new and advanced UVM users out there!
Comments
Leave a Reply
You must be logged in to post a comment.


hi… i’m looking for a tutorial on how register model adaptors work.