Shake it and drop it! Testing for laptop reliability
Curious to see the webinar on this same topic? click here.
Did your laptop ever let you down right before an important presentation or customer demo? Although laptop failures are rare, if that in fact happened to you, I am sure you still remember the exact moment, location, and stress it caused you. When you use a laptop, you expect it to be rugged enough to withstand everyday tasks. So how do manufacturers test for better laptop reliability?
Well, today’s laptop reliability is as high as a PC’s and they are consciously tested for their resistance to different environmental factors, such as humidity, extreme temperatures, and vibrations. We can see this procedure illustrated in below video.
So how do you make sure that the sensitive electronics inside your laptop survive regular use, or as we engineers like to call it, operational vibrations? Perhaps an even more fundamental question to ask is: What are the exact vibrations that your laptop undergoes during its lifetime?
Asking the right questions
If you think about it, we are not always that nice to our laptops: we take them everywhere, back and forth between our homes and the office, in our hand luggage in the airplane; maybe we throw them on the passenger seat in our car, or sometimes accidentally drop them on the floor. All of those vibrations might damage the electronics inside. But even typing, opening and closing the lid or simply transporting them in the laptop bag causes vibrations that might be lower in absolute levels, but that can still cause damage in the long haul. This is a big concern for PC manufacturers.
In addition, not every person is the same: a student might mainly use it for taking notes in lectures or to play video games, while a sales person is rather on the road, visiting customers and giving presentations, and maybe a manager uses the same type of laptop mainly to answer e-mails.
All user profiles result in vibrations that need to be considered when designing for laptop reliability.
Classical approach? Or is there something better?
The classical approach is the easiest one for manufacturers and uses vibration standards, such as the ASTM (American Society for Testing and Materials), ISO (International Standard Organization) or often MIL (military) standards. These type of standards define an “average” vibration excitation. Using this method, manufacturers simply take the shaker profile from the standard, run the corresponding vibration test, and check afterwards if the laptop is still working properly.
Needless to say, this approach does not represent the real usage of any specific laptop model. What’s more, there is a big risk of over-testing, which might lead to a higher material cost to make the laptop rugged enough; or under-testing, which might lead to early failure, customer dissatisfaction, product recalls, and brand damage.
Luckily, there is a more realistic method that includes the damage potential of real-life vibrations in combination with the different target user profiles: the “mission synthesis” (or test tailoring) method.
Mission Synthesis
The process of mission synthesis can be done with Simtenter Testlab Mission Synthesis and it involves the following steps:
- The definition and measurement of the real-life vibrations or “missions”
- The calculation and combination of their damage potential
- The definition of a damage-equivalent, accelerated test that can be run on a shaker system
The whole process of mission synthesis is summarized in the video below:
Defining the missions
Let’s imagine different target users for the next laptop model: a student, a sales person and a manager.
The student probably drives around on a bike, mainly uses the laptop for taking notes during lectures, and then to study in the evening. Each of those activities (riding the bike, following a lecture, and studying) will cause specific vibrations to the laptop. The student most likely transports his laptop in the bag of his bike. When going to his lecture by bike, there is a mix of Belgian blocks (cobble stones) and smoother road surfaces. During the lecture, the student mainly uses the keyboard to take notes, closes the lid at the end of the course, and jumps back on his bike.
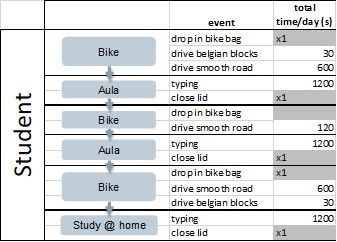
As a next step, we can define how many times each of those events occur. Here is a further detailing of the example of the student:
- each time he takes his bike, the laptop is dropped (1x) in the bag
- biking to the aula takes 10 minutes (600s) on a smooth road and half a minute (30s) on the Belgian blocks
- In the classroom, the student takes notes for 2 hours and types them into his laptop for a total of 20 minutes
- at the end of the lecture, he closes the lid of the laptop (1x)
- he drives to the next lecture, which is only a 2-minutes bike ride
- after the last lecture, where the steps are repeated, the student rides back home
- during his evening study time, he types for another 20 minutes before closing the laptop and calling it a day
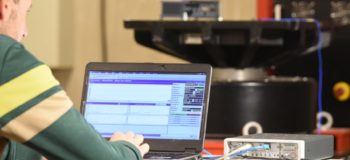
Measuring real-life laptop vibration data
Using a triax accelerometer, connected to the laptop and to the Simcenter SCADAS XS, we measured the laptop’s real-life vibration data for all of those missions. For stationary events, such as riding on a smooth road, we took 10 to 20 seconds of data. For transient events, such as dropping the laptop or closing the lid, we made sure to capture it as a single event, which was about 4 seconds of data.
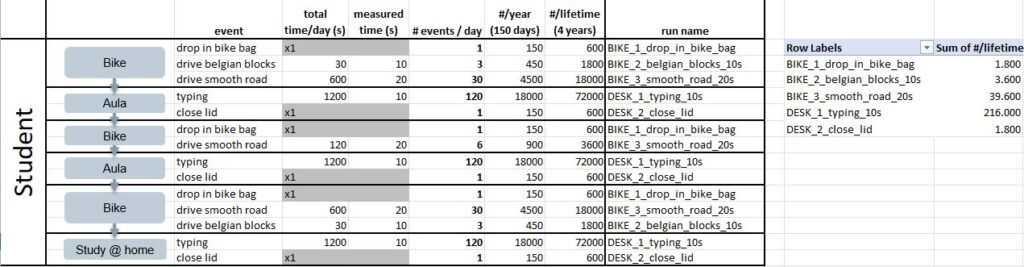
The measured time series now need to be extrapolated to the full day exposure. As for the example, biking on the smooth road takes 10 minutes (or 600 seconds), but we only measured 20 seconds. We just need to repeat this event 30 times (because 600:20=30), as the data does not change much over time. Assuming the student has a total of 150 days of lectures per year, and designing the laptop to last a lifetime of 4 years, this builds up to a total of 30 x 150 x 4 = 18.000 events (of 20 seconds) biking on smooth roads.
In the same way, we can use a table like the one below to calculate the number of repetitions for each event:
Calculating the damage
Different methods exist to convert the measured missions (time data) into their contribution to the total damage and the laptop’s reliability.
- the FDS (fatigue damage spectrum) uses, for example, rainflow counting to assess the long-term fatigue damage that will occur
- the MRS (maximum response spectrum) looks more at the damage by the excess of a threshold stress value in the acceleration data
- the SRS (shock response spectrum) technique is used for more extreme shock events
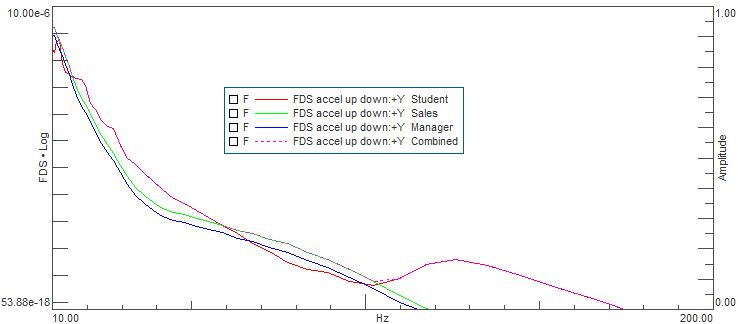
With a single process step in Simcenter Testlab Neo, FDS and MRS functions are calculated based on the time data in the Input Basket. Notice we only take the +Y direction as this is the main axis of vibration.
In the resulting FDS function we see that:
- up to 95Hz the Belgian Blocks are the most damaging
- from 100Hz to 450Hz dropping the laptop in the bike bag contributes more to the damage
- above 450Hz, closing the laptop lid has the biggest influence on the total lifetime
Combining the missions
As a next processing step, we combine the calculated FDS and MRS spectra, and define them as consecutive events (in series) during the full lifetime. Entering the repetition factors can be done manually or by simply importing this info from an Excel file.
Combining student, sales and manager profiles
Remember that our student is not the only target person for using this laptop. There was also a sales person and a manager, each with their own missions.
Similarly to the student, the sales person takes his car to visit two or three customers a day, mostly presenting PowerPoint presentations to his clients. The manager, on the other hand, spends most of his time in the office answering e-mails.
In a similar way as for the student, we define parallel branches that calculate the damage for the specific events that apply for the sales person and the manager, automatically taking the repetition factors from an Excel based input.
Combining the 3 user profiles is done by defining them as parallel events. As a result, we can compare the individual use cases to the worst-case fatigue scenario for all the three users combined.
Overlaying the combined missions for the 3 target users allows to compare them to the overall (combined) profile.
Defining the shaker test
Assume that we design a specific laptop model so it can be used by the student and the sales person and the manager. Using this real-life damage spectra of all users combined, we now can define a vibration test for the shaker which is much more realistic than just relying on a standard. Of course, we do not want to shake the laptop for 4 years, so now we need to define an accelerated test.
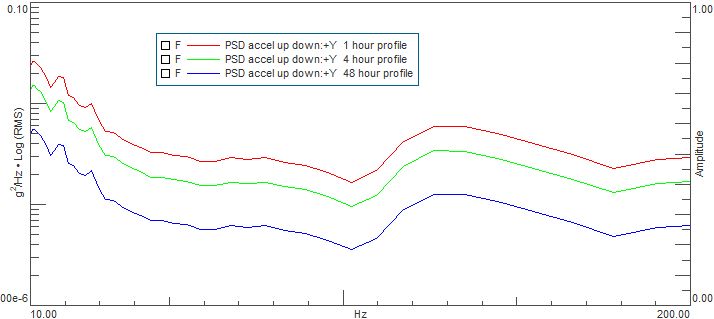
Such test will only take a few hours but should bring the same damage to the laptop as a 4-year usage in real-life. Based on the total FDS, Simcenter Testlab Mission Synthesis calculates the PSD (power spectral density) profile that can directly be used on the shaker. This calculation takes into account the material properties and desired duration of the accelerated test.
Comparing 1-hour, 4-hour and 48-hour tests shows us the following PSD profiles. The shorter the accelerated test, the higher the amplitudes will be in order to obtain the same fatigue damage.
Guidelines on the test duration (and thus on the test acceleration) can be found in the book of Christian Lalanne (“Mechanical Environment Test Specification Development Method”). To avoid under-testing, it is recommended that the shaker MRS is (slightly) above the real-life MRS. To avoid over-testing, it is recommended that the shaker test MRS stays below the real-life SRS, based on the most extreme shocks in the missions. This guarantees that the accelerated fatigue test does not cause an immediate non-fatigue based failure of the electronic components.
Shake it!
As a final step in the process, we mount the laptop on a single axis shaker. We fix it in the same direction as it will undergo the main vibrations in real-life. We load the PSD for the 4-hour accelerated test as calculated in the Simcenter Testlab Mission Synthesis software, and start the vibration control test using the Simcenter Testlab Random Control application.
After the shaker test, we can take off the laptop and verify whether it is still functioning properly.
Conclusions
As we illustrated, the whole process of mission synthesis allows us to:
- do an accelerated test
- base it on more realistic, real-life data
- take into account the influence on the fatigue life
- avoid over-testing and under-testing
All in all, mission synthesis will ensure the best laptop reliability. Hopefully, the manufacturer of your PC has used this mission synthesis approach so you can be confident your laptop will never let you down… again.
For more information on vibration control testing, click here.
Curious to see the webinar on this same topic? click here.


