Mission: Physical Testing Automation – How can Simcenter Testlab 2506 make you more efficient?
When my manager asked me to “improve automation in operational testing,” it sounded pretty straightforward. After all, we’ve been already delivering customized solutions for our customers in this space for over 25 years. But as anyone in testing knows, reality rarely follows a script.
To kick things off, I reached out to our users with a simple question: How do you currently plan your measurement campaigns? The responses were sometimes surprising. From handwritten lists passed to drivers, to Excel sheets, OneNote files, and even sophisticated in-house test request tools—everyone had their own methodology. Handwritten notes can easily be lost or even be unreadable, spreadsheets or note files might not be up to date, and in-house tools require development effort to maintain which the team usually doesn’t have.
These discussions became the foundation for a new automation tool in Simcenter Testlab 2506, the Schedule Designer. Designed to frontload test campaign preparation, it helps operators and drivers focus on what truly matters: capturing high-quality measurements. In this blog, I’ll show you how Simcenter Testlab 2506 can help automate many of the repetitive tasks in operational testing—from acquisition all the way to reporting—so you can spend more time on what really matters – engineering innovation.
A measurement automation tool for free – does it get any better?
Creating a list of tests you’d like to perform is such a common thing to do, that we’ve decided to release a free tool to help you design test measurement campaigns that you can clearly document and communicate to team members, track and maintain.
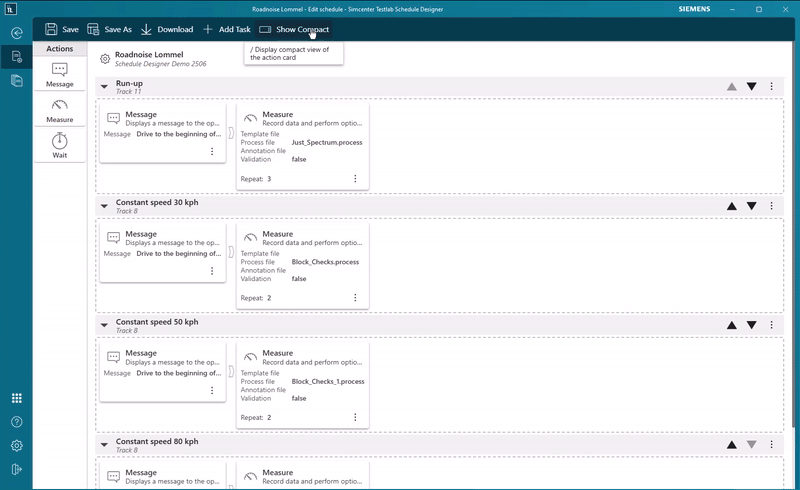
Within the Schedule Designer, you simply create a list of measurement tasks and start populating them with actions, such as measure, message or wait. Here’s where you can save a tremendous amount of time:
- Write down all required maneuvers or conditions – constant speed at 20, 40, 80 km/h? Different road surface types? Everything is fully configurable and documented leaving no doubt what the requirements are.
- Assign the instrumentation and measurement templates to each task upfront. The downstream test hardware can also see the test instructions from Schedule Designer and will automatically adjust its settings when it’s time to measure the specific task
- Add the required number of measurement repetitions and optionally assign a <*.process> file from Process Designer, in case you already know how each measurement should be analyzed. This can kick off the automated data processing and validation even before the operator is done with the whole test campaign. If the data is bad, the operator can repeat the test before shutting everything down
- Fill-in all required metadata upfront and assign it to each measurement
- Impose a wait action with a countdown, which can be interesting in case your tests require a specific cooldown time
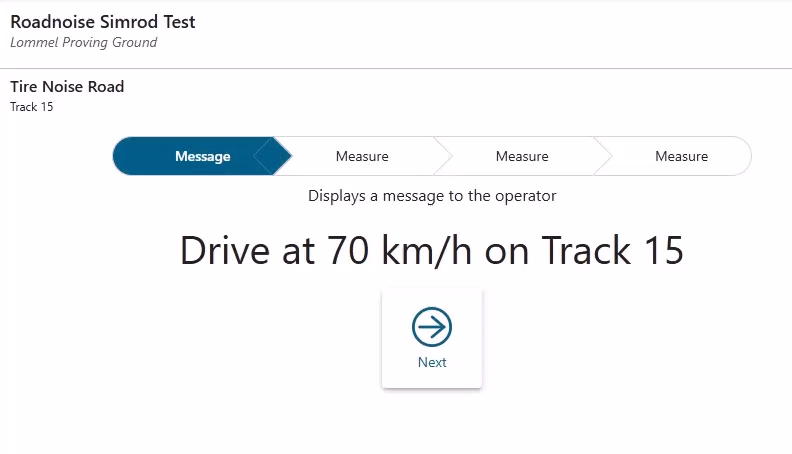
- Create messages to show instructions to your operator

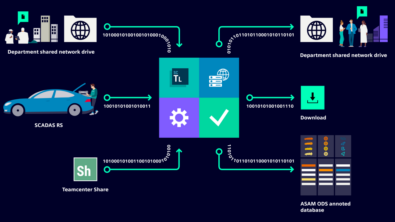
All those normally required steps are now stored in a single schedule file that you can store along and trace to your test campaign data. This allows you to frontload the measurement campaign preparation and minimize the time that operators would have to spend in-between tests.
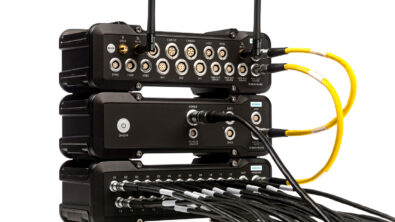
SCADAS RS – DAQ system with a to-do list
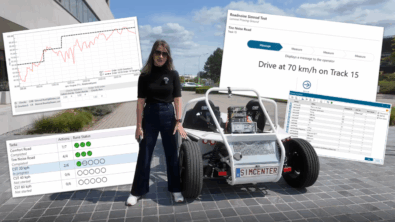
The schedule that you defined seamlessly transfers to the Simcenter SCADAS RS system, which means it’s time to measure! This gives the operator a clear list of all measurement tasks as well as their status that the operator can view on any device with a screen: a PC, an Android or iOS phone or tablet – whatever fits your needs!

The operator can also preview all the measured channels and, depending on the schedule settings, be required to manually accept or reject each measurement and complete the annotation.
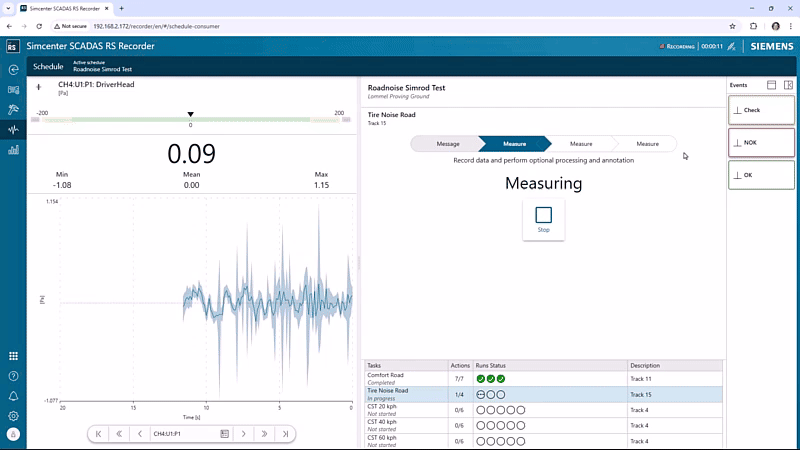
When designing the schedule, you can include additional messages. These need to be acknowledged by the operator for the schedule to proceed to the next step.
Automation all the way – from instrumentation up until reporting
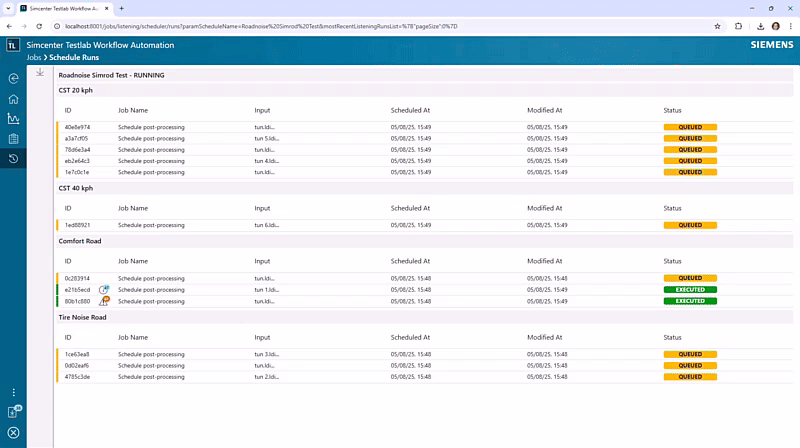
While streamlining measurement campaign preparation and execution can be sufficient to make many organizations much more efficient, you can still take improvements a step further. Additional automation of data post-processing and reporting can save you significant more time and eliminate expensive retests. To achieve this level of automation, you can seamlessly connect the Schedule Designer with Simcenter Testlab Workflow Automation (TWA).
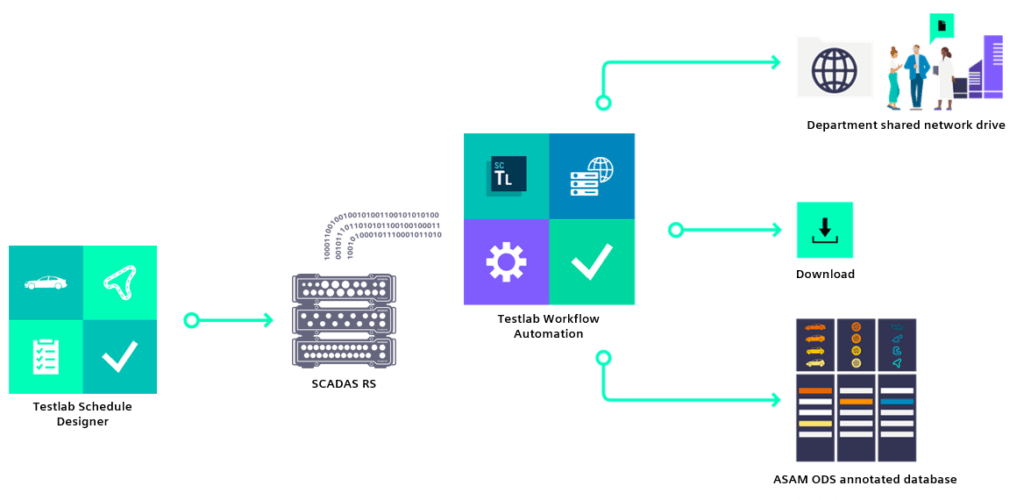
If the measure actions defined in your schedule included a <*.process> file definition, TWA will make sure to process all of that data automatically, consolidating all results into a single project.
If your <*.process> file was created with Simcenter Testlab 2506, it can also include a report definition. With the right use of queries, the acquired and processed data can also automatically be written to a pre-defined report.

It does not get better than this.. or does it? The final, optional but powerful step could be an automated publishing of your measured and processed results into Simcenter Testlab Data Management. This means you have saved the time of having to manually process the results after the operator has returned with the data to the office, and you didn’t even have to write the report yourself!
Automated data validation in Process Designer
Automating measurement campaigns can increase your efficiency tremendously, but what if your main focus on is data analysis and processing? In this release, we’ve added a number of fantastic features that will help to automate the tedious task of data validation and process creation.
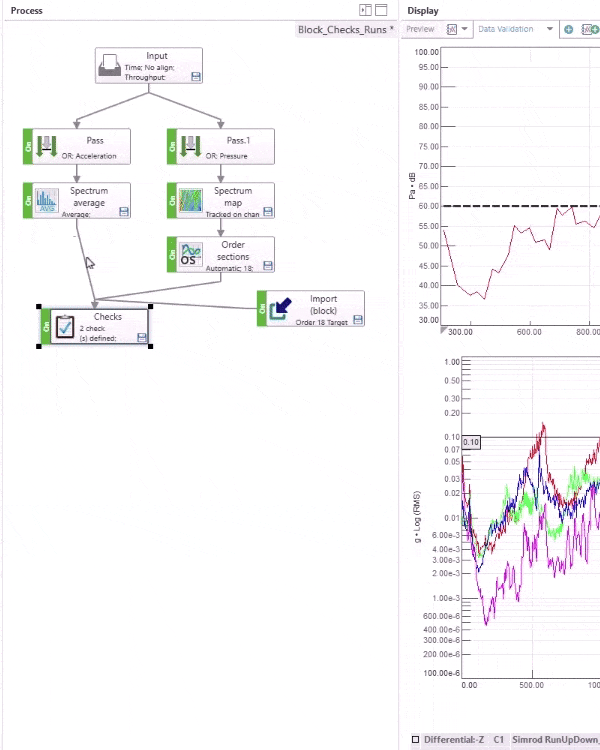
One of my personal favorites it the extension of the Checks method. It was already one of our most popular methods (remember this brilliant blog from Tristan?), but now it can help you to automatically check your block results (spectra, SPL levels, order sections or FRFs) against a specific value or even target curve.
Conditional process variables read Microsoft Excel on the fly
Last year, we introduced the concept of process variables in Process Designer—making it easier to control method parameters from a single, centralized location. These variables allow you to define values like filter cutoff frequencies, scaling factors, or tracking settings globally across your entire process.
This year, we’re taking it a step further. With the Simcenter Testlab 2506 release, variables can now adapt dynamically based on metadata such as Channel ID, DOF ID, or run name. Imagine using a single filter method where the cutoff frequency automatically adjusts per channel—no manual tweaking required. Even better, you can now pull in metadata like tire pressure, humidity, or declared vehicle speed and use those values directly in your process logic.
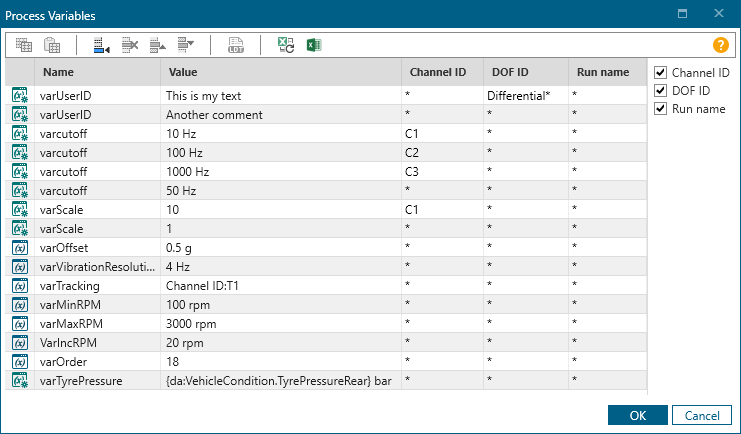
Last year, we encouraged you to stop developing your cars in Excel. But let’s be honest—Excel remains a powerful and familiar tool, so it only made sense to connect it with process variables. With Simcenter Testlab 2506, you can now store all your variables in a spreadsheet, and they’ll be automatically read and applied whenever you run the process. This works brilliantly if you’re, for an example, distilling vibration data that a product experiences in the field to an equivalent laboratory-based test with Mission Synthesis.
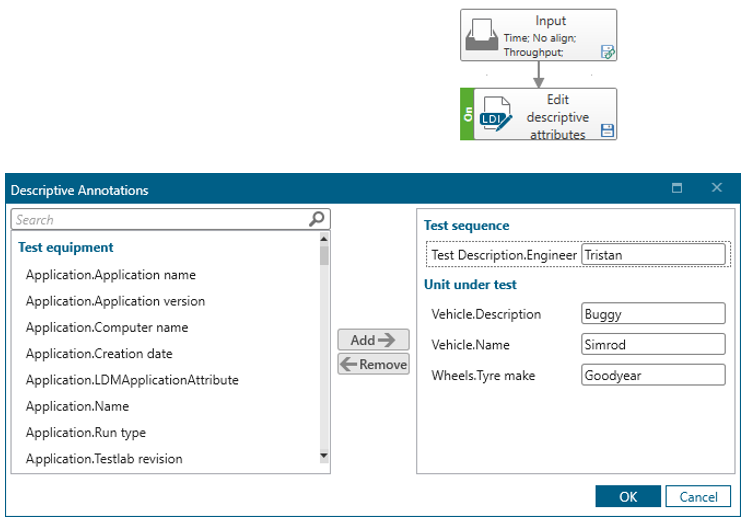
Modify descriptive annotation while processing
Last but certainly not least, the latest extension in Process Designer focuses on data annotation. We’ve long emphasized the importance of acquiring high-quality data—but understanding what you measured and how you measured it takes your testing to the next level. Raw data is valuable, but annotated data? That’s where the real insight lies.
As of the 2506 release, you can now use this information to guide your data through a process. All blue cars get a multi-reference FRF while red ones get a histogram? Easy-peasy.
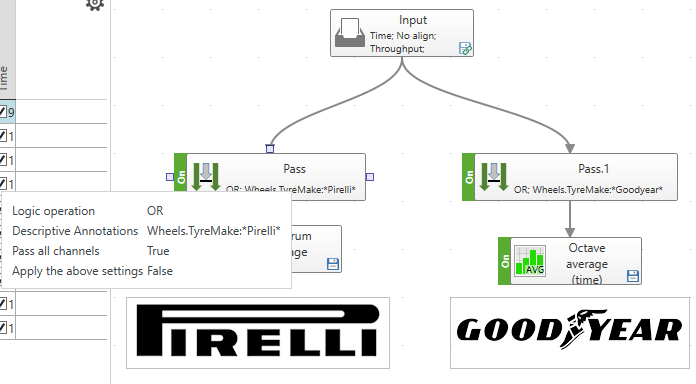
You can even further automate the annotation process by using the new Edit descriptive annotation method. For an example, automatically annotate your data as Quality OK ✅ if the result of your Checks method looks good.
Where else can automation accelerate and simplify your testing?
Automation is one of our key focus areas for this release. Beyond what we’ve already discussed, we’re introducing other exciting functionalities designed to make your life easier and help you get things done automatically. For instance, if you want to perform modal testing, the new smart hit selection now automatically monitors hit quality for you, eliminating the need to manually check them one by one. In addition, the new AI-assisted modal analysis automates mode selection and validation, enabling users of all experience levels to perform modal analysis like a pro.
Last but not least, we are releasing a new solution that fully automates component blocked force measurements via an automated test bench, removing inconsistencies and operator dependency in applications such as cTPA and VPA.
We hope this gives you plenty of reasons to get excited, and to start counting down to download the new 2506 release and integrate it into your workflows. Here’s to automation in testing!