KineoWorks step-by-step #4: pick & place

KineoWorks is a software component that automatically computes collision-free motion, solving complex path-planning problems in applications such as robotic collision-free trajectory optimization. In this series of articles, Etienne Ferré, Development Director of Kineo components, describes some of the key steps that you can easily implement to develop a sophisticated robotics simulation.
Part 4: Pick & Place
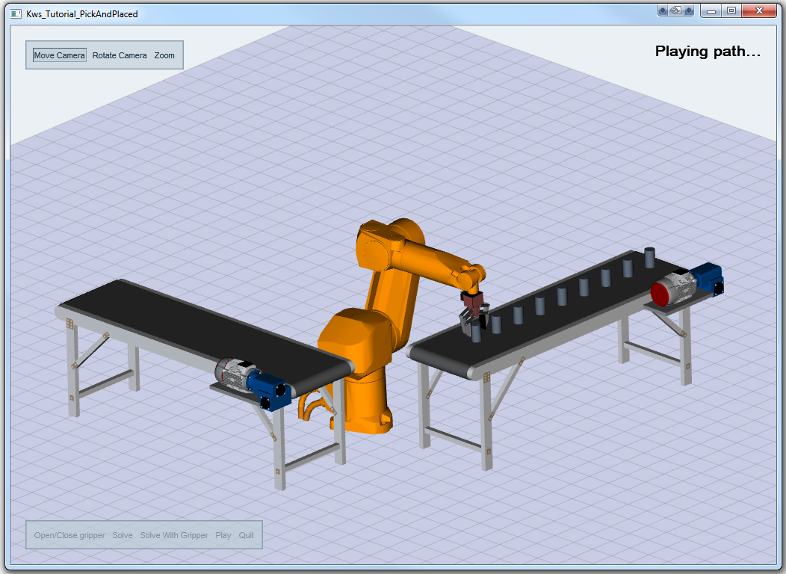
So far in this series, we have described processes for path planning, building a robot and working with trajectories. The final post of this series walks you through a simple pick-and-place scenario in which a robot moves objects from one conveyor to another. It also illustrates the use of the Robot Factory library to create a 6-DOF robot with a gripper tool.
The solution consists of two tasks:
- Creating the system and configuring the collision scene.
- Defining the problem and its stages.
Creating the Main System
The main system is just an empty container that will allow us to group the robot and the part together in a common system.
Self-collision testing for the robot is configured in the robot factory library for the robot, so no such configuration is needed here for creating the standard system.
Creating the Robot
You can create a 6-DOF robot and gripper tool with our Robot Factory library using the following code:
void CkttPickAndPlace::makeRobot()
{
  // Make the robot
  CkwsRobotShPtr robot = CkttRobotFactory::makeRobot();
  m_system->attachSystem("systemBase", robot, "robot");
  // Move flange position with tcp geometry at the middle of the gripper clamps.
  robot->flange()->currentRigidPosition(robot->flange()->currentPosition() *
CkitMat4::fromTranslation(0, 0, 170));
  robot->flange()->mountingMode(CkwsHandler::STICKY);
  // Make the gripper
  CkwsSystemShPtr gripper = CkttToolFactory::makeGripper();
  CkitMat4 gripperPosition = robot->flange()->currentPosition() * CkitMat4::fromBryantDegrees(0, 0, -170, 0, 0, 90);
  gripper->rootJoint()->setCurrentRigidPosition(gripperPosition);
  robot->attachSystem("flange", gripper, "gripper");
  // Add collision tests between robot and gripper
  robot->addCollisionTestsForJointAndSystem("base", "gripper", CkwsScene::FAIL_ON_EXISTING_TEST, true) KIT_MUST_SUCCEED;
  robot->addCollisionTestsForJointAndSystem("joint1", "gripper", CkwsScene::FAIL_ON_EXISTING_TEST, true) KIT_MUST_SUCCEED;
  robot->addCollisionTestsForJointAndSystem("joint2", "gripper", CkwsScene::FAIL_ON_EXISTING_TEST, true) KIT_MUST_SUCCEED;
}
Creating the Pick-and-Place Scenario
Next, define the preliminary settings to obtain the start and end configurations of the main system:
- Define the pick and place positions
- Compute the optimal gripper opening
- Create the part to be moved
- Create any obstacles in the scene
void CkttPickAndPlace::makePickAndPlaceScenario()
{
  // Pick and place pos
  m_pickPos = CkitMat4::fromBryantDegrees(485, 120, 476, -180, 0.0, 0.0);
  m_placePos = CkitMat4::fromBryantDegrees(120, -485, 476, 180, 0.0, 0.0);
  // Retrieve the rank of the gripper control dof for later use
  m_system->getRankOfDof(m_system->jointWithName("robot.gripper.gripperControl")->dof(0), m_ctrlGripperDofRank);
  // Search for the gripper opening value
  searchForBestGripperOpening();
  // Make the movable part
  makeMovablePart();
  // Make Obstacles
  makeObstacles();

  // Get start configuration
  m_startConfig = CkwsConfig(m_system);
  m_system->getCurrentConfig(m_startConfig);
  m_startConfig.dofValue(m_ctrlGripperDofRank, GRIPPER_OPEN);
  // Get end configuration
  size_t positionerRank = 0;
  m_endConfig = CkwsConfig(m_system);
  m_system->getCurrentConfig(m_endConfig);
  m_system->getRankOfDof(m_system->system("movablePart")->positioner()->dof(0), positionerRank);
  m_endConfig.dofValue(positionerRank,   m_placePos.translation()[0] - m_pickPos.translation()[0]);
  m_endConfig.dofValue(positionerRank+1, m_placePos.translation()[1] - m_pickPos.translation()[1]);
  m_endConfig.dofValue(positionerRank+2, m_placePos.translation()[2] - m_pickPos.translation()[2]);
  m_endConfig.dofValue(m_ctrlGripperDofRank, GRIPPER_OPEN);
}
Configuring the Stages
Stages of the problem are all based on variants of our initial system.
Here are the variants you will be using:
- Configuration m_startConfig: the initial position
- System
m_system:robot in joint motion; everything else frozen - System
m_systemWithPartAttached:robot in joint motion; gripper frozen; part attached to robot - Configuration
m_endConfig:variant of the system that represents the permitted final states
Initial Position
The initial configuration is defined as the robot in candle position, the gripper open and the movable part on the input conveyor.
  // Get start configuration
  m_startConfig = CkwsConfig(m_system);
  m_system->getCurrentConfig(m_startConfig);
  m_startConfig.dofValue(m_ctrlGripperDofRank, GRIPPER_OPEN);
System without Attached Part
For this case you can use a system that is specially configured with a robot that can move freely from one position to another. Here, the system is represented by the m_system variable.
void CkttPickAndPlace::makeMainSystem()
{
  // Make the main system
  m_system = CkwsSystem::create();
  CkwsJointShPtr systemBase = CkwsJoint::create(CkwsKEAnchor::create());
  m_system->setRootJoint(systemBase);
  systemBase->name("systemBase");
}
System with Attached Part
Next, create a copy of the system in which the robot can move freely from one position to another and the part is already picked using the function below. You will use it later in the construction of the problem for moving the part from the pick position to the place position. The robot will be in joint motion. To attach the objects and move them from one conveyor to the other, CkwsPositioner, CkwsHandle and CkwsHandler objects are used
void CkttPickAndPlace::makeSystemWithPartAttached()
{
  m_systemWithPartAttached = CkwsSystem::createCopy(m_system);
  CkwsHandlerShPtr robotHandler = m_systemWithPartAttached->robot("robot")->flange();
  CkwsHandleShPtr movablePartHandle = m_systemWithPartAttached->system("movablePart")->positioner()->handle(0);
  applyPickConfig(m_systemWithPartAttached);
  KIT_ASSERT_SUCCESS(robotHandler->mountHandle(movablePartHandle));
  KIT_ASSERT_SUCCESS(m_systemWithPartAttached->removeCollisionTestsForSystems("robot.gripper", "movablePart"));
}
Final Position
The end position is defined as the robot in candle position, with the gripper open and the movable part on the output conveyor.
  // Get end configuration
  size_t positionerRank = 0;
  m_endConfig = CkwsConfig(m_system);
  m_system->getCurrentConfig(m_endConfig);
  m_system->getRankOfDof(m_system->system("movablePart")->positioner()->dof(0), positionerRank);
  m_endConfig.dofValue(positionerRank,   m_placePos.translation()[0] - m_pickPos.translation()[0]);
  m_endConfig.dofValue(positionerRank+1, m_placePos.translation()[1] - m_pickPos.translation()[1]);
  m_endConfig.dofValue(positionerRank+2, m_placePos.translation()[2] - m_pickPos.translation()[2]);
  m_endConfig.dofValue(m_ctrlGripperDofRank, GRIPPER_OPEN);
Solving the Problem
In KineoWorks, a problem is a complex task that is described and solved in a sequence of stages. Each stage is a stage of the system, plus additional constraints that are specific to problem stages and not part of the system itself.
In this section the opening and closing of the tool is not considered. You will use the configuration and clones of the system that you obtained previously. The problem will be created and each stage of the resolution will be configured as shown in the following subsections.
Initial Position
Start position is defined as the robot in candle position, with the gripper open and the movable part on the input conveyor.
mainProblem->addStage(m_startConfig);Moving to the Pick Position
In this stage, there is no particular configuration and the robot can move freely from start to pick position. Since neither the part nor the gripper should move, you will need to freeze them. Freezing a system or joint locks it to the current value: since the previous step defined the part position, it will stay where it is.
You do not need to explicitly create a step for the moment the robot picks the part, since this step will be automatically deduced by KineoWorks as the intersection of the stage where the robot approaches the part and the stage where the robot moves it.
  mainProblem->addStage()
    ->freezeSystem("movablePart")
    ->freezeJoint("robot.gripper.gripperControl");
Moving the Part to the Place Position
In this stage the robot must move freely in order to move the part from the Pick position to the Place position. The robot in this system already has the part attached. In addition, since the gripper should not move while carrying the part, you will need to freeze the gripper motion.
As in the previous step, the moment the robot drops the part will be computed as the intersection of this stage and the next one.
  mainProblem->addStageFromSystem(m_systemWithPartAttached)
    ->freezeJoint("robot.gripper.gripperControl");
Moving to back to Home Position
Once the part has arrived on the output conveyor, the robot must return to its home position. This means that everything except the robot should remain still. So in this stage you will allow the robot to move freely from the place position to the end position, freezing the part and the gripper.
  mainProblem->addStage()
    ->freezeSystem("movablePart")
    ->freezeJoint("robot.gripper.gripperControl");
Final Position
Here, you simply use the final state that was previously defined.
mainProblem->addStage(m_endConfig);Running the Problem
In order to find the path described above, you can apply the problem to a path planning operation. Moreover, it is possible to run this operation either in a blocking or in a non-blocking way, in terms of user interaction. Both options are described below.
Blocking Path Planning
This is the easiest way to solve a problem. However, the call is blocking and if there is no solution, it will never return. It is not recommended for production code; however, it is useful in the prototyping stage:
CkwsHybridPathShPtr solution = problem->solve();Non-Blocking Path Planning
In order to perform atomic computations, it is possible to control the flow of path planning steps. This procedure is the recommended procedure when integrating path planning into an application in order to keep the application responsive. In other words, this technique works the same as the blocking procedure, but allows the user to keep control.
In practice, you will use the fact that problems are operations. An operation is an iterative process that takes some input and generates some output.
You may refer to the example below.
bool userWantsToStop = false;
CkitParameterMapShPtr inputParams;
CkitParameterMapShPtr outputParams = CkitParameterMap::create();
ktStatus success = problem->start(inputParams, outputParams);
if(KD_OK == success)
{
  bool goOn = true;
  do
  {
    if(userWantsToStop) // can be set to true by a Cancel button
    {
      problem->abort();
    }
    success = problem->step(goOn);
  }
  while(goOn);
}
CkwsHybridPathShPtr solution;
if(KD_OK == success)
{
  outputParams->getShPtr< CkwsHybridPath >("com.kineocam.problem.result-hybrid-path", solution);
}
This allows you to keep the UI responsive without using threads and enables you to implement a Cancel button, to retrieve information like the completion ratio for displaying a progress bar, etc…