NX Render Blog Series: The Visualization Process for Heavy Equipment – part four

Introduction
We’re pleased to bring you part four of our NX Render series, where we are taking a close look at the different steps needed to take complex CAD data through to final render. We’ve already looked at model setup and how a visualization expert would consider applying materials to a model. Part 3 explored how lighting works within NX Render, whilst part 4 will focus on cameras and the optimal camera placement within NX Render. Furthermore, we’ll be taking a look at the different approaches you can take to ensure cameras are set up to enhance the quality of your final render. Similar to the previous entries in the series, the focus of the blog will be on the JCB Fastrac 8250. Our resident visualization expert Gavin McCambridge will be providing his expert insight into the visualization process.
Considering rough camera positions to make the model look natural
Like many parts of the visualization process, camera placement can be iterative; It helps to explore the model from various positions and place a camera each time you find an angle you like. Approximating the placement for your ideal camera position gives you the opportunity to see whether your model will look natural in the final render, as indicated by Gavin;
Top Tip: “At this point, what you’re doing is placing the JCB in the scene with the back plate. As well as that, you’re also roughly positioning a camera in and doing a test render. You don’t have to be too worried about getting the perfect render. Just look to get a feel for the composition for now”
In addition, you may discover that the first camera placement results in the model poorly positioned in relation to the backplate. By identifying this at an early stage of camera placement, you give yourself the opportunity to tweak until you find an angle where the model looks positioned naturally. It’s an important activity to implement into any rendering workflow; without it you may only notice at final render stage that the model doesn’t sit naturally. Inevitably, you’ll have to rectify this, wasting precious man hours in the process.
Camera workflow settings and lenses
Experts can use a workflow approach whereby they create several test renders of a model. They’ll then use different angles to see how it sits in a scene with the correct lighting settings implemented. An issue to this workflow approach is that you can end up wasting precious time waiting for an image to render. This becomes more of an issue if you’re in a photo-real setting like the ray-traced studio option in NX.
Visualization experts need to focus on having an understanding of the different lens’ used for camera work and what works best for them. It’s essential to bear in mind the rough position of the camera that you’ve already settled on. Doing this gives you greater control over the lens size you’ll eventually use, which will allow you to more accurately replicate the desired render.
For the JCB model in question through this blog, we asked Gavin which settings he used:
“So the way I set the camera up when roughly placing it in was using a 28 mm lens. You can see a breakdown of the details for each lens which usually have a lot of information in them. As well as the lens, I set the focal length to 17mm too. That also gives us more information on exact camera placement too. Setting the camera up is so important because we can start to focus on other aspects of the model to make it start looking real and resembling the physical JCB Fastrac 8250.”
Adding human perspective
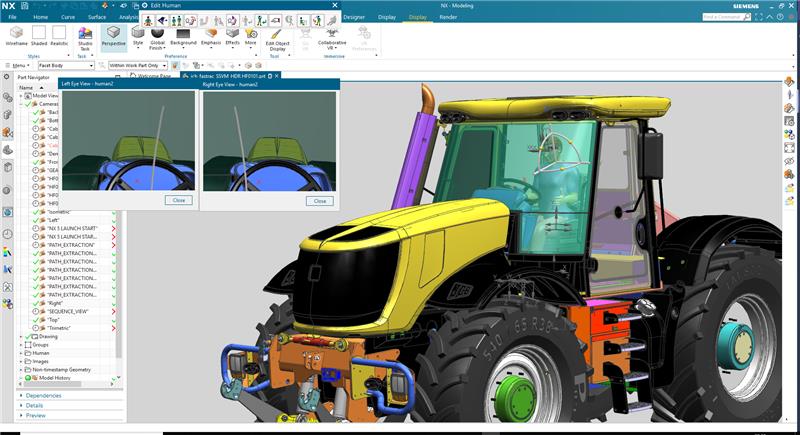
With a basic understanding of camera placement, there’s an approach experts’ can take to take their render workflow to the next level. Visualization experts can place cameras in a scene to replicate human perspective. This is a unique approach which has its added benefits, especially for a model like the JCB Fastrac. Adding human perspective into a scene gives you the opportunity to capture a model’s true scale. Additionally, you’ll also elevate the final renders immersion through a first person perspective approach. How do you go about setting up a camera to replicate human perspective?
“To achieve a human’s point of view, we started by placing the NX human model in the scene at various locations, including the cab of the JCB. By placing our cameras between the eyes of the NX human model, we ensure that this is exactly the view a person would have.
Field of View
Implementing cameras to replicate a human perspective is also an effective approach. To achieve a realistic look is something that you have to do correctly. This is where the power of field of view comes into play. It’s a tricky process to setup the correct field of view parameters to match how the human brain works.
Not only does the natural field of view need to be considered, but also ones’ peripheral vision and how this changes when looking at something new. Setting the parameters slightly out of canter may result in the final camera placement looking un-natural. This can dramatically affect the quality of your final render. Bearing this in mind, what parameters should you use to make sure your field of view settings look real?
“I originally used a field of view of 100 degrees; I realized straight away that that was too wide for the human eye. It created a bit of disconnect because our normal field of view is 55 degrees. What you’ve also got to consider is our perihpheral vision. The good news is that whenever you start experimenting with field of view is that you don’t have to touch or tweak the model. I just put the camera in and hit render.
Summary
Each step throughout this series is building up a picture of the JCB Fastrac 8250. We’ve looked at data optimization, applying materials to the model and setting the correct lighting parameters. Although an advanced step, setting up cameras to achieve the desired outcome is a critical stage in the workflow. In the final part of this NX Render series for heavy equipment, we’ll be looking render optimization. Stay tuned for the final instalment of the series.