NX Render Blog Series: The visualization process for Consumer Products – Render Setup

Introduction
Welcome back to the final instalment of the visualization process for Consumer Products. We’ve dived headfirst into the different stages of the process right the way through. These stages included model setup, material application, lighting your scene and settling on the perfect camera angles. As always, Gavin McCambridge will be providing his expertise in the field. For this stage, he’ll be talking through his typical approach to setting up the final render, ready for use.
ICYMI: NX Render Talk Series
We’ve created something a little different; introducing the NX Render Talk Series, an interview style video to further explore the visualization process within Consumer Products. If you prefer to digest your information through video, this content is for you. We’re joined again by Gavin McCambridge, and Jamie Tyler, Marketing Co-ordinator. Take a look below:
Let’s recap – Camera angles are your best friend (see part four)
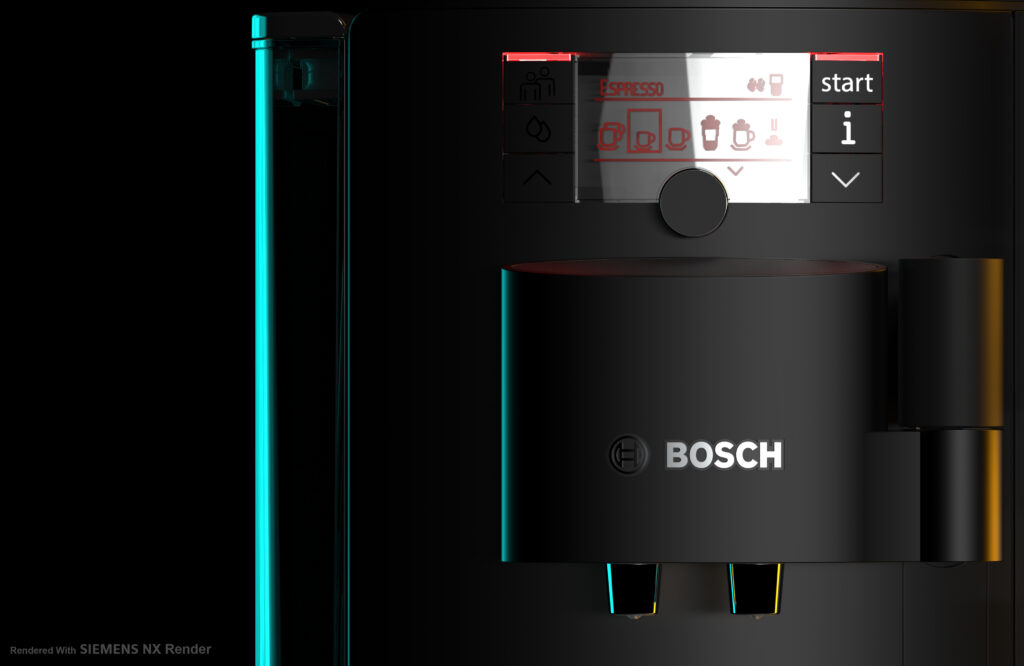
Take a step back; you’ve spent some time pulling together a set of camera angles for the Bosch Coffee Machine. It’s the perfect time to think about the features you’re wanting to showcase on the Coffee Machine and how this ties into your over-arching message for the final render. What angle do I want to use? How close to the model should the camera be positioned? What type of image am I looking to create? Which environments do you typically find a Coffee Machine in? With these factors in mind, you’re ready for the final step in the visualization process…
Render setup for your model
You’ve made it through the visualization process, spending time refining your model, materials used and lighting parameters amongst other things; yet it’s always important to take a look back at everything you’ve done throughout the process as a final check. It’s the perfect opportunity to make sure you’re 100% happy with the choices you’ve made, or whether there’s an element of the model doesn’t feel quite right. Perhaps you’ve changed your mind on a material or want to apply a new lighting scheme to highlight a specific feature in greater detail.
“Always make sure that you’re happy with the model at this stage. Of course, even if you’ve set the final render to go, you’ll waste important time making changes when the image is rendering.
Consider the use case for your render
Before going ahead with your render setup, you need to consider what you are going to use your final render for. Is it going to be used for internal presentations, or will it be used for external facing marketing collateral? Thankfully, there are a range pre-canned features available within NX to select the render mode that you want. The options available are fast interactive, quality interactive and photo real.
Each render setting will provide a different level of visual quality once the final render has been created. Furthermore, it’s essential to understand the final render setting you choose impacts on the total time taken to create the final render. If you’re using your final render for an internal presentation, you can expect a standard 1920 x 1080 px image to take around 10-15 minutes. Whereas if your render will be used for external facing marketing collateral, it can take anywhere between six to eight hours. Plan throughout your workflow to make sure you don’t take any shortcuts and regret any decisions you make when working toward final render setup!
TOP TIP:
Always consider upgrading your hardware to increase your render capabilities whilst reducing total time to render. Using a NVIDIA RTX enterprise graphics cards is one way that will enable you to achieve this, whilst taking your design processes to the next level.
Editing the final render Settings – Quick Setup
There could be occasions where even the most experienced visualization experts are running out of time to create their final render. This may be down to deadlines being tight, or on occasions, being brought forward. Don’t panic! Whilst we previously mentioned that render times for photo-real images can be upward of eight hours, you can essentially put a cap on this, whilst not affecting the quality of the final render. With this in mind, here’s something which Gavin incorporated into his workflow for the Bosch Coffee Machine.
TOP TIP:
“Even if you’re wanting to create the highest quality image possible, always remember you can set a limit on the total render time for the final image. 30 minutes will be enough to give you a good quality image for your external facing collateral.”
Saving the Final image
You’re into the final furlong now with your render, but there’s one more thing that you should consider before you’re done and dusted. It might add a little time to your visualization process, but it will be worthwhile. Firstly, it’s always important to save your image has a TIFF file; since you’re creating photo-real renders, you don’t want to compromise on quality. A TIFF file allows you to achieve exactly that.
That’s not the final step, but what is? Here’s Gavin to take you through it:
“What I would normally do is save a version of the image with a background, and one with a transparent background. Seeing the model with a background that I’ve chosen will really give the model the wow factor that I was looking for at the start of the process. But don’t underestimate using a model without a background; you’ll be able to use this image for your presentations.
Summary
That’s the end of the process for the Bosch Coffee Machine. We really hope you’ve taken some valuable insights from the visualization process that you can implement into your own workflows. That’s not the end; we’ll be moving onto the next series in due course. In the meantime, why not…
Continue your journey with NX Render
.