Introduction to Coroutines
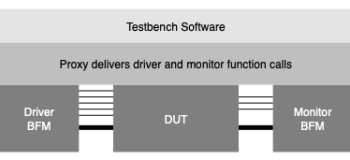
In the first post of this series on Python verification we discussed the proxy-driven testbench and how a proxy-driven architecture enables Python as a verification language.
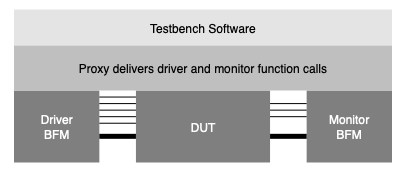
This testbench uses testbench software to create stimulus and analyze monitored input and results. It implements predictions, scoreboards, and functional coverage.
We normally write this testbench software in SystemVerilog using the UVM. But we might have an easier time writing it in Python. If only we could get Python to talk to an RTL device-under-test (DUT).
It turns out we can with an open source project named cocotb. CoCoTB stands for COroutine COsimulation Test Bench.
- Coroutines are a Python feature that was originally designed to implement asynchronous interfaces such as IO protocols. It turns out they are perfect for implementing simulation behavior.
- Cosimulation is running Python from an RTL simulation. cocotb supports Questa and other simulators this way.
- The testbench refers to our Python program that implements the testbench software block in the diagram above.
In this blog post we’ll discuss coroutines and create a simple example. In the next we’ll implement a simple testbench.
Awaiting Coroutines
Coroutines are Python functions that run in an event loop provided by a module such as asyncio or cocotb. They are normal functions defined using the async keyword:
async def traffic():
    for _ in range(2):
        time.sleep(1)
        print ("Button pressed")
        await green()

await traffic()
The traffic() coroutine above is called an awaitable. The async keyword means that we cannot simply call this function. We must await it, for example in a Jupyter notebook as above, or run it using an event loop such as asyncio.run(traffic()).
The traffic() awaitable loops twice (the _ variable is a Pythonic way of saying that a variable is ignored.) Each time it waits one second and then someone presses the traffic button. Now the traffic must await a green light, so we have the await green() statement. Now let’s look at the entire traffic example:
import time

async def green():
    await red()
    print("GREEN: Traffic going")

async def yellow():
    print("YELLOW: Traffic slowing")
    time.sleep(0.5)

async def red():
    await yellow()
    print("RED: Traffic stopped")
    time.sleep(2)

async def traffic():
    for _ in range(2):
        time.sleep(1)
        print ("Button pressed")
        await green()

await traffic()
The traffic() function awaits the green() coroutine. The lights go yellow, red, green. So green() awaits red(), red() awaits yellow(), and yellow() finishes after two seconds ending the loop. This means the coroutines finish in this order twice: yellow(), red(), green(), traffic(). This gives us the following output:
Button pressed
YELLOW: Traffic slowing
RED: Traffic stopped
GREEN: Traffic going
Button pressed
YELLOW: Traffic slowing
RED: Traffic stopped
GREEN: Traffic going
If you have Jupyter Notebook you can copy the code in a notebook to see the delays in action.
Summary
In this post we learned about coroutines, the basis of cocotb. In the next post we’ll use cocotb to create a simple bus functional model and connect it to a testbench.