Simulation, additive manufacturing and an ancient Greek philosopher
Let’s begin with a story.
As with all good stories, this one is also from a long time ago, in ancient Greece, where there once lived a great philosopher. His name was Pythagoras of Samos, the man who gave us the famous Pythagoras Theorem, and many other reasons to love (or hate) mathematics.
Pythagoras was a learned man, and so he had many disciples. Like all good teachers, he kept his students on their toes. But unlike most teachers of today, he wasn’t satisfied with merely testing his students on geometry and number theory. He had a wicked sense of humour. After a hard day of study and learning, Pythagoras and his students would gather together and share a few glasses of wine – or so the story goes. Pythagoras had designed special cups for his students. This cup is the Pythagorean cup, popularly known today as the Greedy Cup. So long as his students took a reasonable quantity of wine, they could drink it without any fuss. But has there ever been a student who wasn’t greedy at the sight of free liquor? As soon as his students filled their cups with more than the usual measure, the wine would drain out completely and the students would be left holding empty vessels – and as the proverb goes, perhaps making a lot of noise.
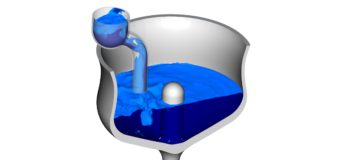
The Pythagorean Cup is an ingenious device and a wonderful demonstration of the physics principle of siphoning. It’s the same principle at work in bathroom flushes and when brewing beer. Like any CFD practitioner with too much time on their hands, this story gave me an idea – why not simulate this device? I’ve always been more excited by simple, physics-based simulations (lid-driven cavity, anyone?). It demonstrates the accuracy of simulation, while also illustrating the effectiveness of numerical modelling. And so, I turned to good old Simcenter STAR-CCM+ to simulate this. I had seen enough pictures to know what a Pythagorean Cup was supposed to look like. So, I created my own design using Simcenter STAR-CCM+’s in-built CAD capabilities. CAD model of the Pythagoras Cup
I then ran this simulation on our in-house cluster. Here’s what my simulation result looks like:
The video looks quite convincing, if I may say so myself. With the latest feature in Simcenter STAR-CCM+ v2019.2 called Screenplay, it has become incredibly easy to make very attractive animations. But this prompted me to think even further – I knew what I expected to see, and I got it. However, the proof of the pudding is in the eating. Why don’t I manufacture this cup and test it out? Validation and verification is the cornerstone of any design process.
With the advent of 3D printing, also known as additive manufacturing, it has become very easy even for non-engineers to create all sorts of objects – from household projects to automotive parts.
This is the path I chose to go down. I approached a local 3D printing shop in Ann Arbor, and that is where I ran into my first issue – the 3D printing operation that fit within my budget was based on a process known as Fused Deposition Modelling (FDM). The nozzle that extruded the plastic material had a diameter of 0.4 mm. The thicknesses of the walls in my geometry was close to that value. I needed it to be more than twice of that limit i.e. 0.8 mm.
Since my geometry was entirely built using 3D-CAD in Simcenter STAR-CCM+, it was very easy to modify my CAD parameters and regenerate the CAD. Just to be safe, I re-ran the simulation – again just a matter of two additional mouse clicks. The results didn’t change by much, as expected. I then provided the modified CAD to the print shop. It took them approximately fourteen hours to generate it. The printing process was followed by fifteen minutes of post-processing – shaving off the support structure and coating the part with a water-proofing aerosol. The final product looked like this:
It was now time to validate my design. I filled it with water and tested it over the kitchen sink, and voila – it worked! After all the years of performing CFD simulations, I shouldn’t be surprised by this. But that thrill never seems to go away. I wanted some concrete data though, with numbers. I set up a mock test rig using a translucent plastic box and a rudimentary camera stand using kitchen utensils. I filled it with water up to the initial starting point in my simulation and tested it –
Time to drain (simulation) = 16 seconds.
Time to drain (test) = 25 seconds (approx.).
That was quite a big deviation, and not what I was expecting. There definitely were enough problems with my test setup (a simulation engineer blaming testing methods, that sounds familiar). For example, the least count of my measuring cup was 25 ml, while the total amount of water I added to initiate siphoning was 13.6 ml, so I was eyeballing a few of my measurements. But that’s when I found a second issue – there was a slow leak in my component. You can see it in this video – there’s a secondary stream of water in addition to the primary stream flowing down the stem.
The cup was made from a standard 3D-printing material called as PLA, which happens to be hygroscopic. Every time I filled the cup with water, it absorbed more and more of it, making it even more leaky. The print shop had applied a water proofing aerosol, but it wasn’t applied along the inside wall of the pipe through which the water drains out. Evidently, my trial runs over the kitchen sink had proved costly. Most of the advice I found online pointed towards re-printing the product with some modified printer settings. Alternatively, I could try using a 2-part epoxy called XTC-3D to coat the outside of the cup – this was the cheaper option, so that’s what I did.
 Application of water proof coating – I
 Application of water proof coating – IIThe process is simple and well documented on the internet. It gave the outside surface a hard, glossy coat which would hopefully contain the water.Here’s the final result from testing prototype number 2:
Time to drain (test) = 21 seconds (approx.).
This was a significant improvement, but not as much as I would have liked. If you look closely at the video, there’s still a leak in the stem, where the walls are thinnest. Water continues to leak from the stem. albeit slower than beforeIn fact, you can even hear the water inside the cup when it’s shaken vigorously after the test. With the geometry I was dealing with, the only viable alternative was to invest in SLA or metal 3D printing and make a more durable product. I had learned a valuable lesson.
The moral of this story is not that we make better engineers by offering them free alcohol, although some of you might be tempted to think that. The key take-away from this story is the synergy between the use of simulation tools and advanced manufacturing processes, to rapidly accelerate product development. It has the potential to significantly reduce design costs, while making it possible to come up with complex, organic designs that can only be manufactured using modern manufacturing processes.


