A smart guide: Step-by-step Durability Engineering based on test data
The durability of a product is important, whether you develop an electric car or a new autonomous vehicle. Can you imagine an autonomous vehicle falling apart right after driving over a single bump? It can happen that the focus falls on the development of the latest technology rather than the engineering of essential aspects, such as durability. To develop a successful product that meets customers’ expectations, long-term quality and durability need to stay under the spotlight.
How to ensure that your developed vehicle will be durable? How to start?
Is it all about executing vehicle durability testing while driving on rough roads before presenting the vehicle to the market? Or is it about performing a CAE-based durability analysis upfront and eliminating the red spots with preventive actions? Well, actually, it requires a bit more. We definitely need durability tests that rely on road load data measurements and processing to guarantee strength efficiently (customer correlated and multi-attribute balanced). Let’s take a look at the entire durability process, based on road loads.

Durability engineering process based on road load data
Step 1: Instrumentation
The vehicle durability testing process starts in the office. The simulation engineer or test engineer defines a list of all points on the vehicle for which he/she would like to have real-life loads. With this list, the technician goes to a lab where he instruments a vehicle with all the sensors required to measure road load data; such as accelerometers, strain gages, displacement sensors, WFTs, etc.

Measuring the loads that act from the suspension onto body
Step 2: Test setup
When the vehicle is completely instrumented, the test engineer connects all sensors to the measurement system and defines the channels in the acquisition software by filling out the parameters for each respective sensor.

Simcenter Testlab: Durability testing – Sensor database lookup
Step 3: Measure and Validate
After that, a durability test driver takes the vehicle and goes to the proving ground, where he drives with it over different durability tracks in order to simulate real-life usage.
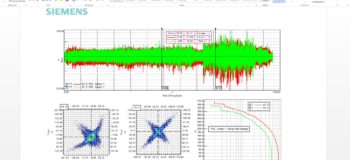
As a next step, the test engineer looks at the data to validate whether they are O.K. before going back to the office.

A test engineer validates the acquired data thanks to Simcenter Testlab Online Processing feature
Step 4: Analysis
The durability test engineer needs to clean the acquired data by removing/correcting anomalies, such as spikes, drifts, and offsets, before sharing the data with other teams.
Once the data is clean, load and fatigue analysis can be conducted. This can be done with either counting methods, such as Rainflow, Range Pair, Time at Level, Level Crossing; or Stress Life and Strain Life experimental fatigue analysis for a better understanding of operational loads.

A test engineer gains understanding about operational loads thanks to Simcenter Testlab Load & Fatigue Analysis solution
Very often, the durability engineer needs to minimize costs or long test durations by creating accelerated life testing profiles for test benches. This new profile can either be random time signals or block cycles, depending on the capabilities of the test benches. It is also vital to keep the same damage by comparing the original and the shortened profile.
Step 5: Report and Share
Finally, the durability test engineer can process the acquired data and share it with the simulation engineer and physical validation engineer. The simulation engineer can now perform a CAE analysis on the component, system or vehicle level. Test engineer can also perform rig testing or proving ground testing as part of the physical testing. In addition to data sharing, reports will enable you to gain a better understanding about the acquired data at first sight.
Simcenter Testlab: Quicker delivery by embedding complete test data in actionable MS Office-based reports
To summarize, executing simulation and psychical validation are duties of other groups within the ‘durability world’. These steps—from the moment the test engineer connects the sensors and the measurement system in the lab and sets up a channel list, and up to reporting and sharing—are part of Test-based Durability engineering.
Discover how Siemens PLM can help execute all these steps in an easier, faster and more advanced way.
END-TO-END DURABILITY TESTING VIDEO


