NX Join | Part Two | NX Tips and Tricks
We’re happy to have you back, as we look at part two on NX Join! As you saw in part one of this, we are talking you through tips and tricks to help improve your productivity. NX Join is a great tool to keep your design organized, and efficiently review any changes you might make. Let’s get started with part two!
Taking advantage of the Transform Join tool
The first tool we’re going to look at is how to utilize the Transform Join tool. The main benefit of properly using this tool is to help our users save time on parts that require uniform fasteners or welds. This tool allows you to mirror or translate your joins across parts and assemblies. In our example video, you will see that our part already has two fasteners attached to the screen, however the bottom is missing its fastener. By utilizing Transform Join, you can efficiently add these fasteners. The tool allows users to select several joins and then either mirror or translate them across the part. In uniform parts this is very useful as it can save loads of time while ensuring that the joins are consistent throughout.
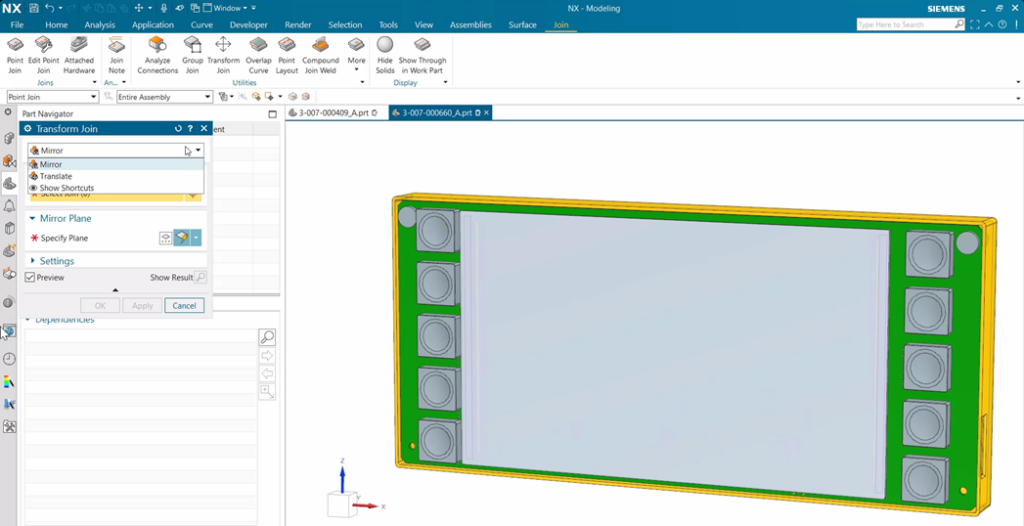
Overall, Transform Join can greatly improve efficiency as it allows repetitive joins to be simplified to a much smoother and succinct process. Additionally, joins created in Transform Join will share both dimensional values and hardware without manual input throughout each step.
You may also notice in our example that under ‘settings’, the boxes are labeled ‘associative’, ‘load hardware’ and ‘create whole’. The’ associative’ part determines whether new joins will change when alterations are made to your original. The ‘load hardware’ and ‘create whole’ options are self-explanatory, but these customization settings can once again greatly improve design efficiency.
Using the Analyze Connections tool in NX Join
An easy way to confirm which bodies a join passes through is to use the Analyze Connections tool. Users simply select one or more joins in their assembly and then select ‘perform’. Once this is done, under the results section each join will populate in, along with the bodies that they pass through.
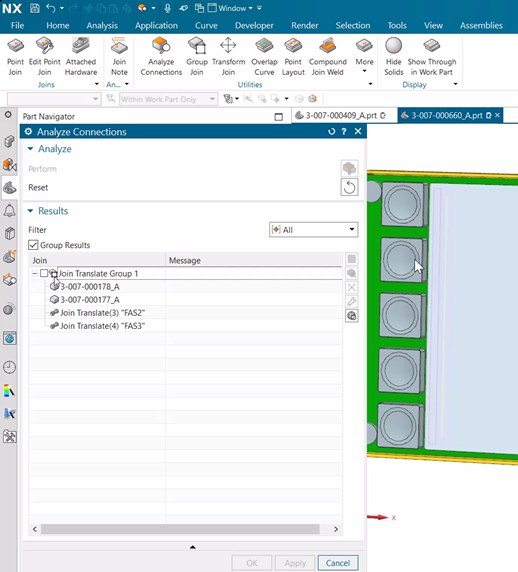
Looking at our video, we are going to use the Analyze Connections tool to see if our fasteners work as we intended them to. As I select our two new joins and click ‘perform’, a new group of joins pops up under ‘results’. When I expand this selection, you can see a list of the bodies joined, as well as which fasteners were a part of this group. Alternatively, if you’d prefer these fasteners to be sorted individually, we can uncheck the group results and each fastener is given its own section, but still shows the bodies they connect.
Using the Analyze Connections tool is a very convenient and useful way to review your work, and a strong tool to organize your joins.
Use Checkmate Tests to verify your Joins are up to standards
The last tool that we will explore in our NX Join instalment is not actually a direct part of NX Join but can be a great instrument for analyzing if your joins will be feasible, given certain standards for production.
Found under the ‘developer’ tab, Check-Mate tests can be utilized to analyze the joins throughout a part while testing a variety of variables. This can help you to quickly assess if your joins are feasible in production. These tests are very easy to read and set up, and can check for items such as edge distances, pitch, and depths. This automates yet another manual task and helps to improve overall efficiency and success rates in identifying joins that aren’t ideal.
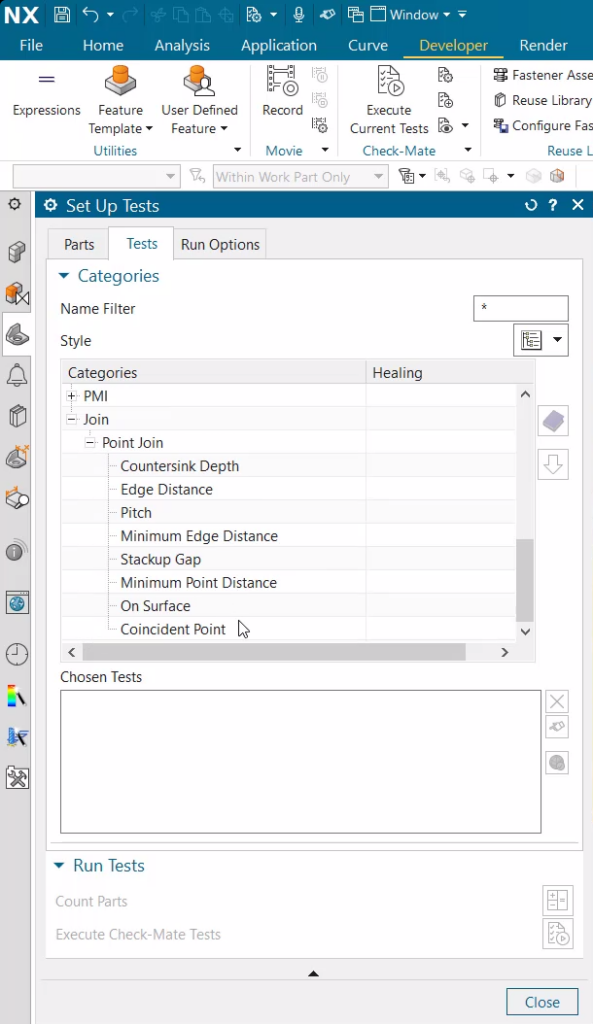
Looking at our example, we’re going to open ‘developer’ from the top of the screen and choose ‘setup tests’ under ‘Check-mate’. There is a wide variety of options, but if you scroll to the bottom of this list, you’ll find a tab specifically for joints. Here you can bind the variety of tests that will analyze different aspects of your joints. Once you have selected these, the next thing you can do is customize your target values for each test. When doing this, please not that you also have the option to choose if your test flags any mistakes as errors, warnings, or info messages. Once complete, remember to click ‘execute Check-mate tests’. Like in our example, you will then see a box pop up that displays how the test performed; hopefully you will see these as successful, like in our demo! To note, once you close this box, the test results are also displayed under ‘HD 3D tools’ on the left of your screen.