Rendering Options | NX Tips and Tricks
Welcome back to another new installment in our Tips and Tricks series for NX™ software. If you are looking for a way to create stunning images of your designs in NX, you might want to try out the Ray Traced Studio visualization tool. This tool allows you to render your models with realistic lighting, materials, and shadows, and adjust various settings to optimize your experience. In this blog post, we will show you how to use the Ray Traced Studio visualization rendering options and some of the features it offers.
Accessing rendering options in Ray Traced Studio
To access the Ray Traced Studio visualization tool, you need to open the render tab at the top of the screen and select Ray Traced Studio. A new window will open up with a higher quality image of your assembly. This image will continuously improve with each iteration, which is counted in the upper left-hand corner of the window.
Adjusting the Dynamic Render settings
The dynamic render settings are the ones that affect the image that is displayed in the Ray Traced Studio window. You can change these settings to suit your preferences and needs. There are two main settings that you can adjust: the render mode and the brightness.
Render mode
The render mode determines the balance between the quality and the performance of the image. There are three render modes that you can choose from:

Photo Real: This mode gives you the highest quality image, but it may slow down the performance of your computer. Use this mode when you want to see the finest details of your model and you don’t mind waiting a bit longer for the image to render.
Quality Interactive: This mode gives you a good balance between quality and performance. Use this mode when you want to see a clear and realistic image of your model and you also want a smooth and responsive interaction with the Ray Traced Studio window.
Fast Interactive: This mode gives you the best performance, but it sacrifices some quality. Use this mode when you want to quickly explore different views and angles of your model and you don’t care much about the accuracy and realism of the image.
You can switch between the render modes by clicking on the icons at the top of the Ray Traced Studio window.
Brightness
The brightness slider allows you to adjust the overall brightness of the image. You can make the image brighter or darker by moving the slider to the right or left, respectively. Use this feature when you want to change the mood and the atmosphere of your image, or when you want to compensate for the lighting conditions of your environment.
You can access the brightness slider by clicking on the sun icon at the bottom of the Ray Traced Studio window.
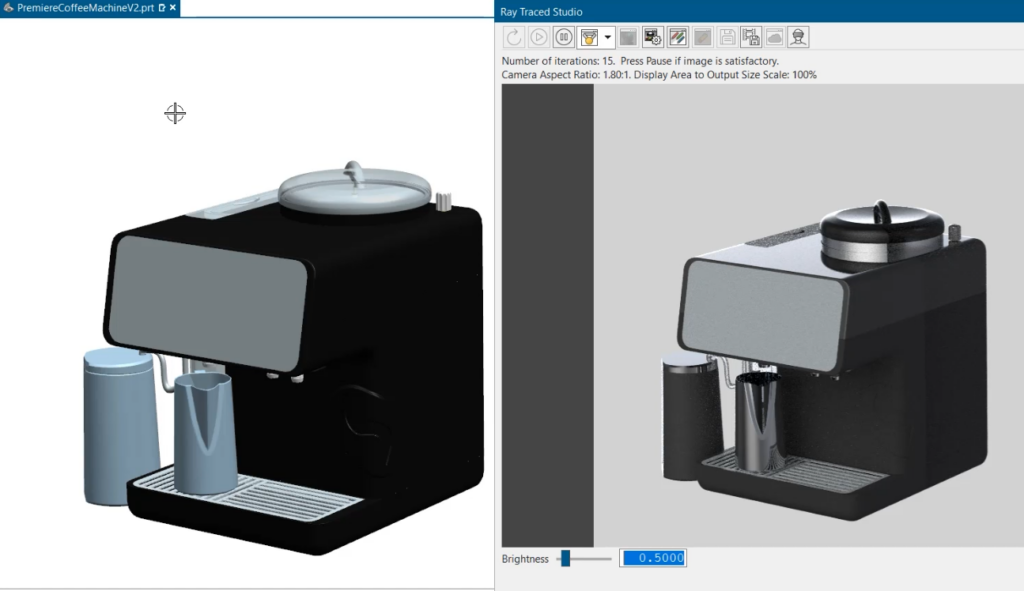
Comparing rendering options with the original model
One of the benefits of using the Ray Traced Studio visualization tool is that you can see the difference between the original model and the rendered image. You can compare the two images by putting the Ray Traced Studio window side by side with the original model window. You will notice that the Ray Traced Studio image has more depth, contrast, and realism than the original model. You will also see how the materials and colors of your model are enhanced by the Ray Traced Studio visualization.
How to create and save a static image
The Ray Traced Studio visualization tool also allows you to create and save a static image of your model. A static image is a high-resolution image that is rendered for a longer duration and saved as a file. You can use a static image to showcase your designs at the final stages of production, or to share them with others.
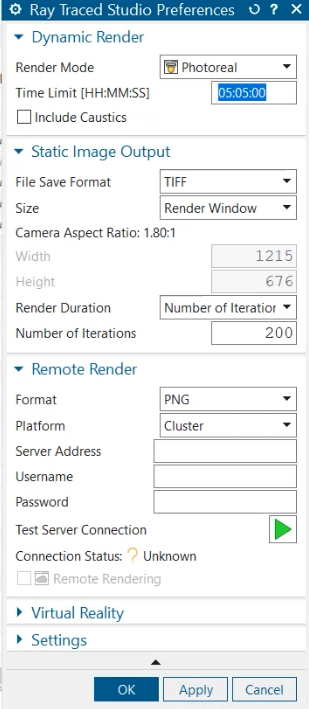
To create a static image, you need to open the Ray Traced Studio Preferences dialog box. You can do this by clicking on the gear icon at the top of the Ray Traced Studio window. In this dialog box, you can select the image file format, size, and length of the render duration. The longer the render duration, the higher the quality of the image. However, this also means that it will take more time for the image to render.
After you have selected your preferences, you can click on OK and start rendering your static image. You will see a progress bar at the top of the Ray Traced Studio window that shows you the status of preferences completed. When the rendering is done, you can save your image by clicking on the save image icon at the top of the Ray Traced Studio window. You can then choose a name and a location for your image file.
Conclusion
The Ray Traced Studio visualization tool is a powerful and easy-to-use tool that can help you create stunning images of your designs in NX. You can adjust the dynamic render settings to optimize your experience, compare the Ray Traced Studio image with the original model to see the difference, and create and save a static image to showcase your designs. We hope that this blog post has given you some useful tips and tricks on how to use the Ray Traced Studio visualization tool in NX.
Continue your journey with NX
Take me to the NX design blog 📚