MBD Feature Templates | Tips and Tricks
We’re back with the latest and greatest when it comes to our NX™ software tips and tricks. In case you have missed it, we continue to bring you a weekly episode of useful workflow tips at your disposal. Head on over to our NX Design Tips and Tricks blog site to read more.
In our latest episode, we take a look at Model Based Definition with Feature Templates. Without further ado, let’s take a look!
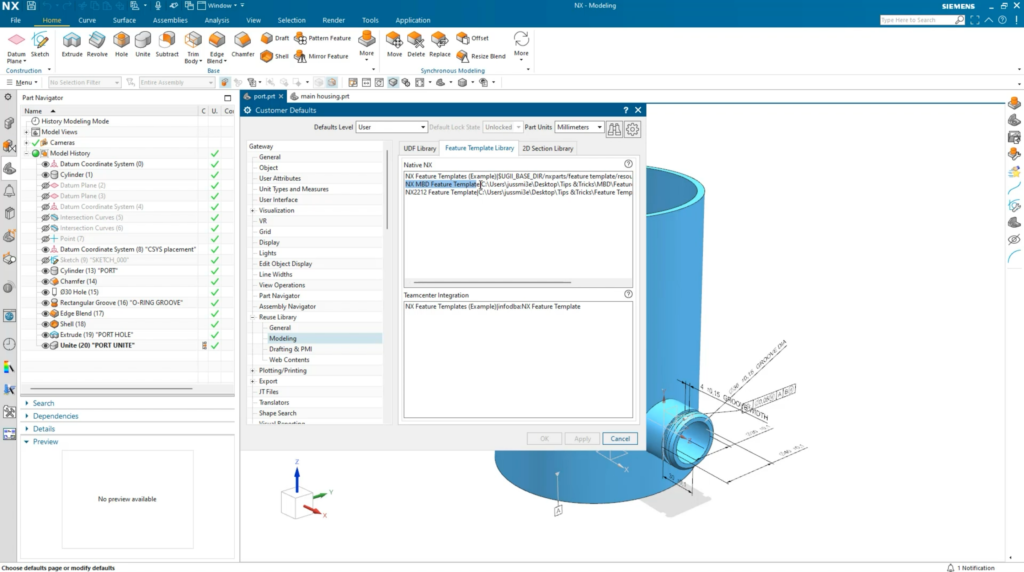
Mapping a Feature Template library and customer defaults
Before starting, it’s important to ensure that you map the Feature Template library you will use, as well as any customer defaults. Ensure that you map and name your libraries within NX in an easy-to-access area. Additionally, if you have a Teamcenter integration, that’s not a problem! You can map to the feature template libraries that are enabled within Teamcenter. A key thing to remember is that you need to restart NX for the changes to take effect. If there are any tweaks you want to make to the feature before making a template, click:
Home > Tools > Parts and Features > Feature Templates
REMEMBER
If you use a dimension that is inherited from sketches, it can be used more effectively with Feature Templates.
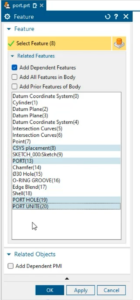
Create your Feature Template
With the your Feature Template Library now prepped, you are ready to start creating the template by selecting the relevant features within NX. There are a range of elements you can include when creating your Feature Templates, but for this example, we’ve selected CSYS (coordinate system) Placement, the port, and finally created a hole and unite. The features that are enabled in this instance are all Add dependent features, meaning they will all be included in the final template.
Additionally, we also recommend you check the ‘Add Dependent PMI’ checkbox at the bottom of the dialog box. By doing so, you will be automatically adding any associated PMI to your template, reducing the need to manually add them at a later date.
Configure your user interface
A vitally important piece to the puzzle is ensuring that you configure your user interface so that it is easier to work with the Feature Template. Whilst it is an incredibly powerful tool to use, they can be complex; so deploying specific workflow aspects to make your life easier is something to consider. Go ahead and change the title to select an existing CSYS. By doing so ,you will be adding a connecting port to the design geometry within NX. On completion of this task, you’ll be able to see the name of the user interface has updated immediately.
WHY SHOULD I MAKE THIS CHANGE?
Changing the template name essentially will change the file name of the save, as well as updating your user interface. Utilizing title name changes are more helpful for anyone using Feature Templates; they enable greater organization of your template and ultimately automate a lot of the processes for you.
Defining your PMI orientation
You’re almost at the point where you can save your template, but there’s one more action we recommend you take before doing so. You want to ensure that you define the orientation of the PMI using existing CSYS which has a similar orientation to your current design. By taking this step, the feature will come in once you have placed it. To do this:
From the Feature Reference dialog box, select your Template Features > Click OK.
With that step now complete, go ahead and save your your template.
Placing your Feature Template into another part
We’re almost there! With the template now ready to use, we’re going to show you the importance of opening another part to add the feature to. Remember the port we created earlier on? Well, that will appear in your reuse library, and can simply be dragged and dropped into your user window. And that’s that! You now have created a part that has Model Based Definition included!
MBD Feature Templates | Tips and Tricks YouTube video
Continue your journey with NX
We hope you have taken some key insights from this latest tips and tricks episode. Be sure to check next week for the next episode!
Meanwhile, why don’t you continue your journey with NX? Take a look at some key call to actions listed below 👇

Comments
Leave a Reply
You must be logged in to post a comment.
This is really good stuff, Is there a tutorial on how to get started with Feature Templates that are not in NX native? I’m struggling to follow the same steps from NX native to the version with Teamcenter integration. Thanks!