Out of the box validation checks | NX Tips and Tricks
Another installment of our Tips and Tricks series is here! This time we will be looking at how you can use some of NX’s out of the box (OOTB) validation tools to perform quality assurance tests on your parts and assemblies. In this example, we will be using our coffee machine model, and taking a deeper look at analyzing the shell casing on the machine’s outside. And with that, let’s get started!
Organize quality assurance tests using Set Up Tests in Check-Mate
The first tip to talk you through is setting up quality assurance tests in Check-mate, which is found under the ‘HD 3D tools’ in the developer tab. From here, as in our example, you can then select the ‘setup test’ icon. The first thing we will be prompted with is to determine the scope of our analysis. We can either choose to look at the current part, all loaded parts; or all of the parts found within a single folder.
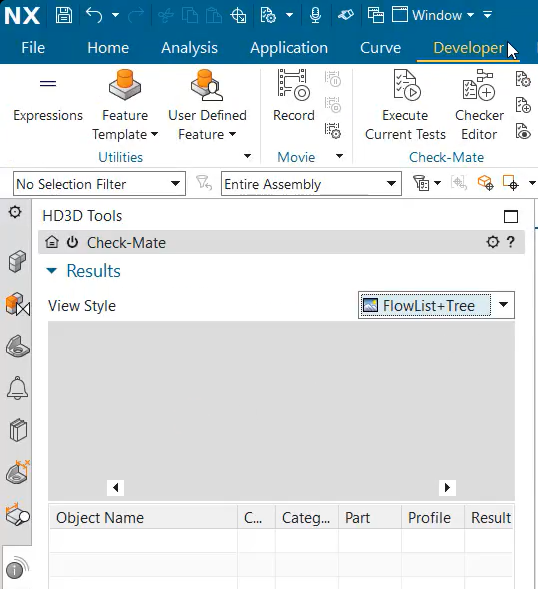
In the video, you can hopefully see that there is a large number of options to choose from, ranging from information checks, modeling, assemblies, PMI, and requirements. This ensures that the majority of frequent use cases are already covered in the out of the box Checkmate tests.
Running Check-Mate tests is a great way to validate that assemblies and parts are created to product standards. With a wide variety of options to choose from out of the box, it is very easy to create a customized approach to testing different products. In addition to the wide variety of tests already available, you can opt to personalize the values each test checks for, as well as if tests result in information messages, warnings, or errors. With this variety of options, using the Set-Up Tests tool is a very convenient tool to produce strong quality assurance tests in an efficient manner.
Top Tip
The blue ‘i’ signifies the test resulted in an information message. The green arrow means the test was skipped, and the green checks mean that tests had a successful result.
Try Show Info View to get a better understanding of what your Check-Mate test results mean
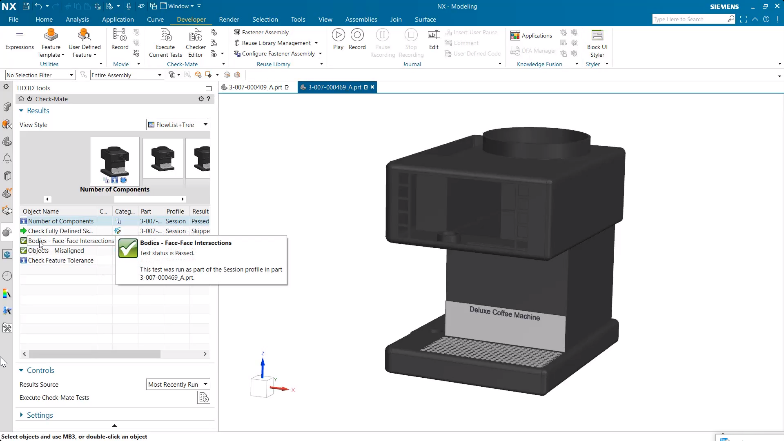
Once you’re in your ‘show info view’, you can access more information on the test results. In our example, you will see there were 12 different parts within the sub-assembly, with a green arrow next to it. This green arrow is telling you that the test was skipped. Don’t worry though, as in our example we have no sketches to be checked. You will then see the other two tests have green ticks, which are letting the user know the checks were performed successfully.
This is a useful tool to be able to give you a better understanding of what your Check-mate results mean in a greater detail. Additionally, the window can also be used to determine which parts pass tests as well as which ones have failed. When the icon results from tests don’t show the full picture of a Check-Mate test, using Show Info View can quickly produce more information. The parts used in the test can be found here as well, which can also be useful when many items are tested in assembly.
Utilize “More Detail…” within Check-Mate Result
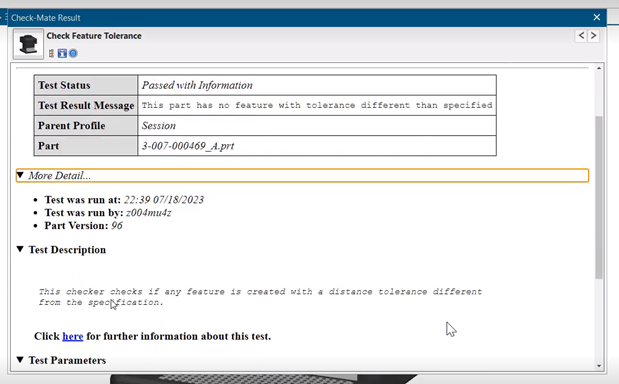
Continuing from the green ticks we just discussed, you can then right click I’m going to right click for ‘more detail’ to learn more on the intended test ran, and the descriptions and parameters. Here you should be able to see a more detailed explanation of what is tested for, as well as the values that were tested.
The last test that we’re going to look at in this example is a ‘check feature tolerance’ test. You can see that when we open the ‘show info view’’ window, we see that our tolerances all passed for acceptable values. To find out a bit more about this, and find your tolerance value limit, you can look under the parameters. You’ve guessed it, found once again under ‘more detail’!
It is nice to have this extended information tucked away, as often it will be easy to see how a test works the way that they do. However, when this isn’t clear, just a few clicks can open a descriptive explanation on what each test performs checks for. Furthermore, when using a predetermined value in your checkmate testing, this is a good avenue to review what values were tested.
To continue your journey with NX…
Hopefully you’ve found this Tips and Tricks helpful, as we’ve looked at how to set up checkmate tests with our OOTB options, how to execute tests and finally, how to review these results in more detail. Please stay tuned for our next blog entry, and in the meantime, enjoy exploring our new release of NX!