Configuring CMM Options for Your Needs
After installing CMM, it is important to set the options so the tool works best for you. In each section of the options, you can select the “Show Help” button at the top right of the window. This will display a text box in the bottom right of the window indicating what each setting does. In most cases, the default options should be appropriate. This blog post will cover the settings that generally require input from the user. Options not covered here are best left in the default state, unless the Siemens migration team has discussed otherwise with the user.

Content Migration>Geometry>Feature
The Translation Mode option is where CMM is set to migrate parts with features or as boundary representations. If you need features in your migrated data, select “FeatureMode”. If migrating boundary representations, select “BrepMode”. An upcoming blog post will discuss the benefits of each method.
Content Migration>Drawing>Options
The Font Name Map option can be set by the user if they use specialized fonts. If this option is not set and the data being migrated contains special fonts, the size and placement of the fonts on the migrated drawing may be impacted and some characters may be unrecognized.
Application>Migration Controls
The Scratch Location is the directory where CMM will create the migrated NX part files and the log files for migration. The Report Location is the directory where CMM will write the migration report files. These directories are commonly set to the same location, to keep the report files with their respective NX part file. The user may wish to create different directories during migration for organization, though parts that are reused will need to be re-migrated if they are not present in the Scratch Location.
Application>Remigration
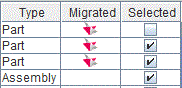
The Remigrate option can be set to “All”, “Selected”, or “Disabled”. In the image below, an assembly loaded in CMM has already had its parts migrated in the same Scratch Location which is why they are marked in the “Migrated” column. If Remigration is set to “All”, all three parts will be migrated again. If set to “Selected”, onlythe second two will be remigrated because the first part has been deselected. If “Disabled” is chosen, no items will be remigrated and CMM will reuse the previously created NX part.

Application>NX Part
Here, template files can be specified for parts, assemblies, and drawings. This allows the user to set default options (such as background color, for a simple example) by creating part files in NX with the desired options and identifying them in these settings. If the template files specify settings that conflict with settings in the source file, CMM will utilize the source settings.
The user should use the Default Target Units setting to identify if the data being migrated is dimensioned in millimeters or inches.
Be sure to check back next week on Migration Monday to learn more! For more information, or to get started migrating to NX with the Content Migration Manager, please contact your local Siemens PLM Software representative!