Digital image correlation (DIC): the why and the how-to
If your mission is to improve designs and develop high-performance products, you need to understand the characteristics of the structural behavior. Unfortunately, standard measurement techniques involving strain gauges might only provide you with limited and local information of the materials and structures under loads. Moreover, sometimes you need to glue or attach physical sensors on very thin material, which is practically impossible.
And it doesn’t stop here. When you test your product under quasi-static conditions (under slowly increasing loads) or during transient events, you need to capture and identify the hotspots. These are the points and locations where the response level is higher, and damages or cracks are more likely to occur. But how can you identify these spots promptly without involving numerical simulation? Or shall you rely on your experience?
Digital image correlation: A new paradigm in material and structural testing
To act on these testing challenges, the latest release of Simcenter Testlab 2021.1 introduces a new solution – digital image correlation (DIC). With this tool, you can identify the hotspots as soon as you have a camera pointing at the tested object. You will get data with incredibly high spatial resolution without any risk of overlooking these critical hotspots or overloading your test structure with sensors.
And if this is not enough, you can use it for vibration testing as well. This is possible thanks to high-resolution, high-speed cameras and a comprehensive processing algorithm.
A practical example
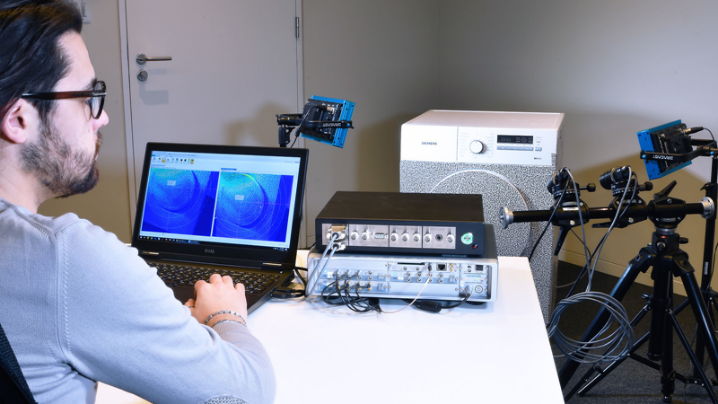
Think about the number of sensors, cabling, and the complex setup you would need to obtain a decent visualization of the modes of a drying machine. Here, we simply used two cameras and prepared the surface accordingly. We got experimental shapes with the same spatial resolution of a finite element model.
In few words, digital image correlation is an optical-numerical measurement technique. It extracts full-field information of the tested object from digital images applied from digital cameras. From the object shape, its displacement and deformation, you can easily extract strains, velocity, accelerations. And on top of that, if the material properties are known, you can also calculate the stresses.
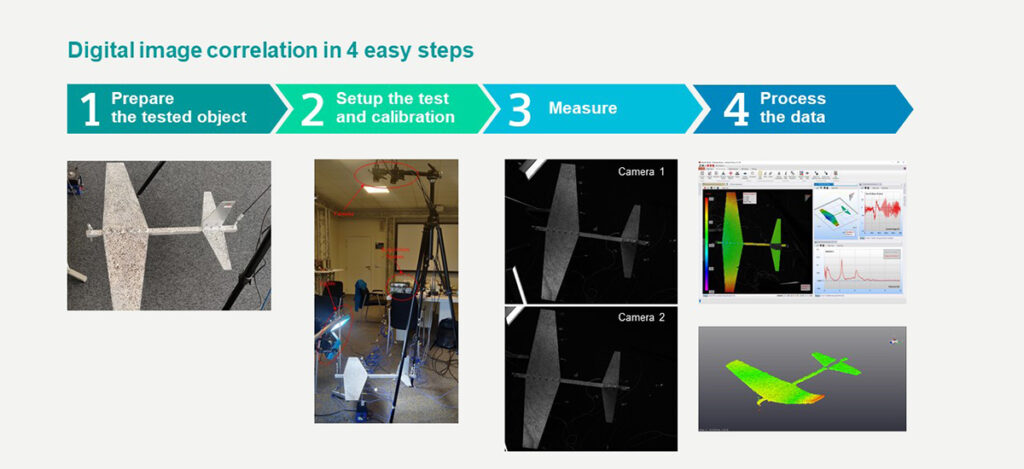
Digital image correlation in four easy steps
Firstly, prepare the area you want to test with a high-contrast random pattern. Secondly, set up your cameras, add some artificial light, and calibrate your setup with a reference target. Thirdly, record the images of the structure under load. And finally, process the images and enjoy the results!
Using a single camera for DIC is entirely possible. However, utilizing two (or more) cameras in a stereo setup has several advantages. You won’t only accurately reconstruct the object shapes and measure 3D displacements and strains, but you also will extract the results more accurately and robustly.
And don’t worry. If you have large structures that don’t fit in your image or want to have a full 360 degrees view around the objects, you can put together as many cameras as you want.
We’re very excited to roll out the digital image correlation with this Simcenter Testlab release. We believe that this tool will increase your testing efficiency. And also, it will provide unique insights into the actual behavior of your test object.
Stay tuned!
Comments
Comments are closed.
Which workbook do I need to correlate the digital image? Do you have a guide on how to connect cameras to the LMS TestLab and how to process data?
correction of the previous question
– Which workbook do I need to use for the digital image correlation? Do you have a guide on how to connect cameras to the LMS TestLab (via fronted or via USB) and how to process data?
Dominik,
When conducting a DIC test there are essentially two separate tasks that are done in sequence. The first step is a full-field acquisition using the DIC system with a dual camera configuration for acquiring images during a shaker excitation of the structure, and a second step is the processing of the data acquired from the first step. The DIC system and Testlab/Scadas system are used together and in parallel for structural excitation and data acquisition as part of the first step. The MIMO FRF workbook in Testlab is used to generate the excitation signal and synchronized to simultaneously acquire any other sensors that are used, such as accelerometers and load cells to measure the input forces. The camera image acquisition of the DIC system is synchronized with the Testlab system using a sinusoidal signal which is output from the Scadas hardware, and at the same time the structural excitation signal is output to the shaker/amplifier. Once the camera images are captured, as the second step, the DIC data is processed on the DIC system to generate a time history of X-Y-Z displacements at the DIC points. The data is converted to LDSF format and then is read directly into Testlab. Then in Testlab the time histories are Spectral processed into FRF data and the displacement and acceleration based FRF data are combined and used with PolyMAX for modal processing in Testlab.
I hope this answers your question and clarifies the operation.
Bill
Thank for your reply.
It’s clearer now.