NX | Tips and Tricks | Creating a sketch

Our latest NX™ software Tips and Tricks video discusses how to use NX Sketch to implement new design changes. The sketch function is fundamental for creating 2D profiles that serve as the basis for 3D modeling.
More specifically, in this video we investigate how to create sketches on desired planes, fully define our sketches and take our sketches into actionable design changes. Take a look below to watch the latest video or scroll down to read about NX Sketch in more detail.
What is NX Sketch?
NX Sketch is a tool specifically designed for creating and editing 2D sketches that are essential for building 3D models. We can use it to draw geometric shapes, lines and curves to define the basic contours of our 3D models.
Beyond simple drawing, NX Sketch provides advanced features for precision and control. We can apply dimensions to our sketches, ensuring that geometric relationships and sizes are consistent and accurate. This parametric design capability allows for dynamic updates, where changes in one part of the sketch automatically propagate throughout the model.
NX Sketch also integrates seamlessly with other NX functionalities, enabling you to convert 2D sketches into 3D features like extrusions, revolutions and sweeps. It supports complex operations such as sketch patterns, mirroring and projection, which enhance modeling efficiency. Additionally, the tool offers robust editing options, facilitating easy modifications and refinements as designs evolve.
By using NX Sketch’s comprehensive toolset, engineers and designers can achieve greater precision in their models, streamline their design workflows and reduce the time needed to transition from conceptual sketches to fully realized 3D components.
Creating a sketch on your desired plane
Choosing the right plane to sketch on is one focus for our latest Tips and Tricks video. It’s important to do this to maximize efficiency when creating new features, and overall it can promote faster workflows.
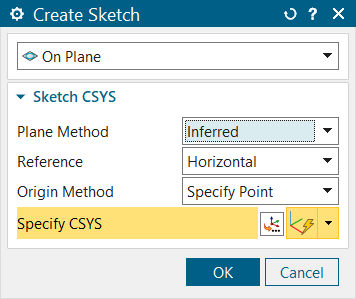
To begin, NX starts by offering an inferred plane option. Here, we can select any existing planar faces on our model, and the coordinate system will snap to a corner of the chosen face. This makes putting together a quick sketch an easy and simple process. For most scenarios, this is all we will need.
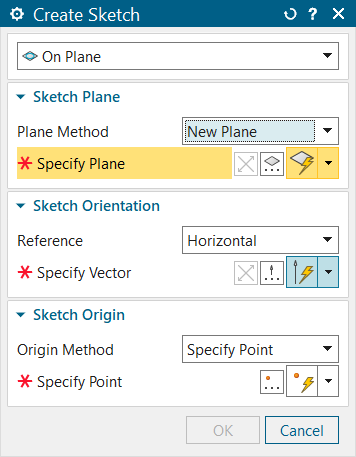
If we would like to use a more complex plane than the one that NX can determine from the existing parts, we can change our plane method from “Inferred” to “New Plane”. This new window will offer the ability to customize plane location and sketch orientation, as well as the sketch’s origin.
More specifically, some of the new planes that we can create can be at a distance or an angle from existing planar faces. These are probably the two most common use cases, but we can also choose planes as bisectors, tangents, or even just simply planes in the x, y, and z directions.
The range of plane options available ensures that we can easily implement any design idea into a 2D sketch and then later a 3D concept. The customization of sketch orientation and origin is more for personal preference and dimensioning technique, but again, the customization can help tailor your experience to your needs.
Fully defining your sketch
One of the other key focuses in this Tips and Tricks episode is on how we can dimension our sketch and produce a fully defined model. To dimension lines, we can simply click on the line we would like to parameterize and NX will recognize we are ready to dimension. Similarly, for circles and filets, we can apply the radius by clicking on the targeted curve. And the last important trick for dimensioning between two points, curves or lines is to select both consecutively. Again, NX will recognize we are dimensioning between both locations, giving us a value we can parameterize to control the dimensions of the sketch.
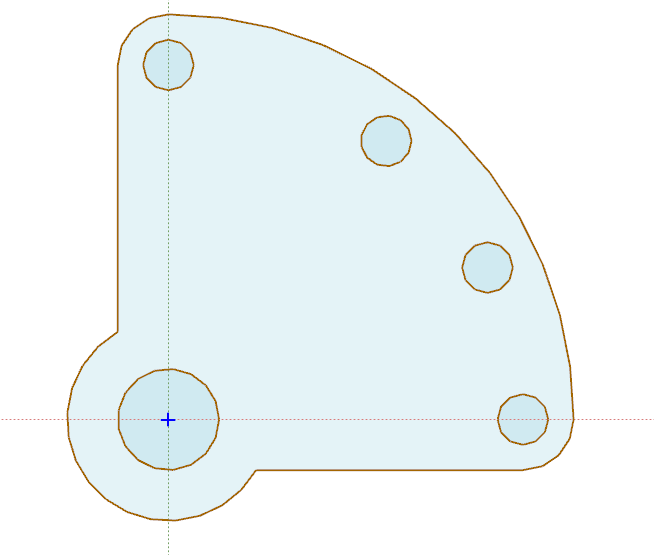
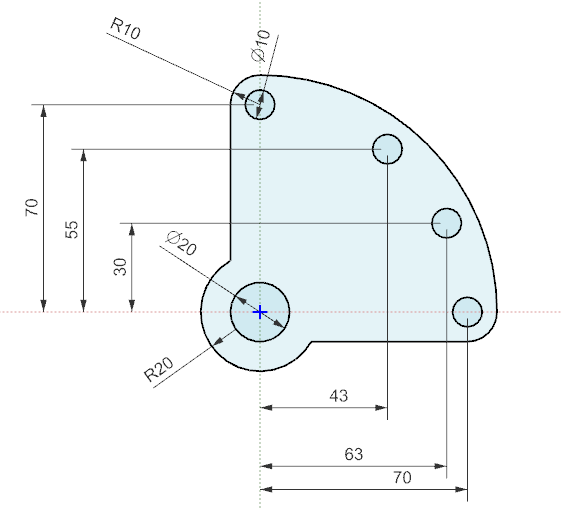
One of the most important parts of creating a sketch is understanding when we have dimensioned enough to fully define our part. Below we can see a sketch that has not been dimensioned, and the same sketch after it has been fully defined. The key difference to note is that once the sketch is fully defined, it will turn from a brown color to a black to signify it is completely defined. You can customize these colors in preferences, but brown and black are the colors NX will show out of the box.
What’s next after finishing our sketch
Once we’ve completed our sketch in NX, we are now ready to begin creating 3D geometry. We can use the extrude feature to extend the 2D sketch into a three-dimensional solid by pushing or pulling it along a specified axis. Alternatively, we might apply the revolve function to spin our sketch around an axis, forming a symmetrical solid, or use the sweep tool to move the sketch along a defined path, creating more complex shapes. These steps transform the 2D design into a detailed 3D model, setting the stage for further refinement and development down the road.
Continue your journey with NX
Watch the Revising a design Tips and Tricks video here ▶️
Watch the Creating new parts and drawings Tips and Tricks video here ▶️
Take me to the NX design blog 📚