Compare Body | NX Tips and Tricks

Welcome back to another installment of the Tips and Tricks series for NX™ software. Today, we will be checking out functionality around the Compare Body command. If you work with different versions of the same part, you might want to know what changes have been made between them. This can help you avoid errors, track modifications, and communicate better with your team. In this week’s tips and tricks post, I will show you how to use the Compare Body command in NX to easily compare and visualize the differences between two bodies.
What is Compare Body
Compare Body is a command that allows you to compare two bodies and see the changes in color, shape, and position. You can use it to compare bodies from different files, different versions, or different configurations. You can also save the comparison results as a linked body that updates automatically when the original bodies change.
How to use Compare Body
To use Compare Body, you need to have two bodies that you want to compare. They can be in the same file or in different files. For this example, I have an original version and a modified version of a model.
To start the comparison, go to Tools > Compare > Compare Body. In the dialog box, select the Control Body and the Sample Body. The Control Body is the reference body that you want to compare against, and the Sample Body is the body that has been changed. You can also choose the color settings for the comparison results.
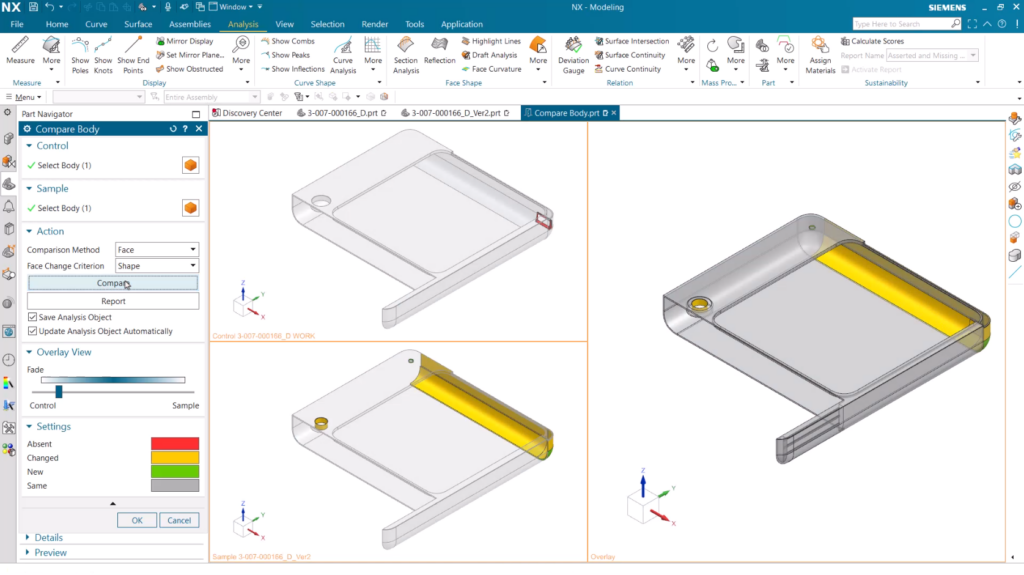
After clicking Compare, you will see three windows: one showing the Control Body, one showing the Sample Body, and one showing an Overlay of both bodies. The Overlay window shows the changes in color according to your settings. For example, red means absent (the feature exists in the Control Body but not in the Sample Body), green means new (the feature exists in the Sample Body but not in the Control Body), and yellow means changed (the feature exists in both bodies but has a different shape or position).
You can use the slider at the bottom of the Overlay window to fade between the Control Body and the Sample Body and see how they differ. You can also rotate, zoom, and pan in any of the windows to inspect the changes more closely.
How to analyze changes
One of the powerful features of Compare Body is that it allows you to analyze the changes in more detail using different criteria. You can access these criteria by clicking on the Face Change Criteria button in the dialog box.
The default criterion is Color Only, which shows only the color differences between the bodies. However, you can also choose Deviation, which shows how much each face has moved or changed shape from the Control Body to the Sample Body. This can help you measure and quantify the changes more precisely.
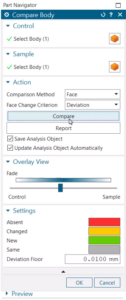
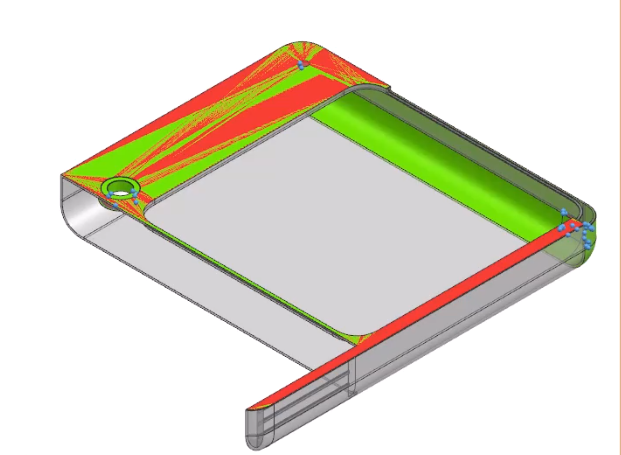
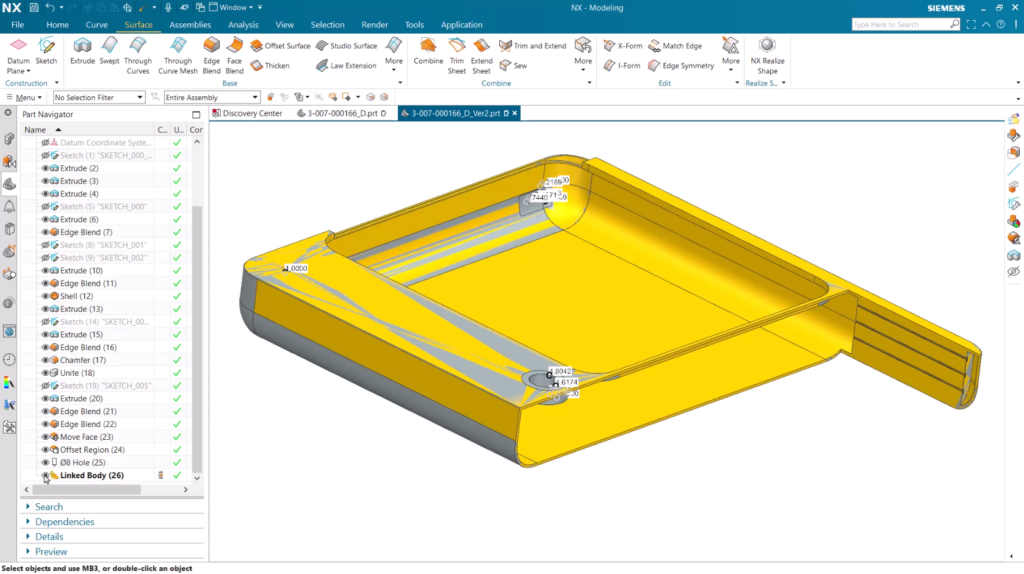
When you choose Deviation, you will see numbers and points on the faces that have changed. The numbers indicate the distance between corresponding points on the Control Body and the Sample Body. The points are referenced from the Sample Body to the Control Body. You can also see more faces highlighted in yellow, which means they are affected by the changes.
How to save comparison results
If you want to save your comparison results for future reference or communication, you can do so by creating a Linked Body. A Linked Body is a special type of body that contains only the faces that have changed between the Control Body and the Sample Body. It also updates automatically when either of the original bodies changes.
To create a Linked Body, make sure you check the Save Analysis Object option in the dialog box before clicking Compare. This will create a new body under your Part Navigator with a link icon next to it.
You can then show or hide this body as you wish. You can also rename it or change its color for clarity.
Continue your journey with NX
Compare Body is a useful command that can help you compare and visualize changes between two bodies in NX. It can help you avoid errors, track modifications, and communicate better with your team. You can also analyze changes using different criteria and save comparison results as a Linked Body that updates automatically. If you have enjoyed this installment, there is an entire series dedicated to providing Tips and Tricks within NX.