TLM 1.0 in pyuvm
This blog post is part of a continuing series discussing Python as a verification language. You can find links to all the previous blog posts on the Python for Verification Series page.
Our previous blog post, Python and the UVM introduced the new version of pyuvm that builds upon cocotb. We focused on the differences between Python and SystemVerilog and how those differences affect the way one writes UVM tests in Python. In this post we will continue examining pyuvm by looking at its implementation of TLM 1.0.
The developers of the SystemVerilog UVM took on the challenge of implementing SystemC transaction-level modeling using SystemVerilog. SystemVerilog at that time had no concept of interface classes and so the UVM got a set of port and export classes that fulfilled the behavior of interface classes. Port classes such as blocking_put_port defined the behavior the port demanded (a put() task) and the export classes, such as uvm_tlm_fifo.blocking_put_export fulfilled the demand.
pyuvm simplifies and refactors the UVM TLM system to take advantage of the fact that Python has multiple inheritance and no typing. It did not need the *_imp classes to create classes that provided implementations of tasks such as put() and get() and so they’ve been removed. The lack of typing means a lack of parameterized ports, exports, and uvm_tlm_fifos. Instances of these classes can pass any object.
We’ll examine pyuvm’s implementation TLM 1.0 using simple producer/consumer examples. First we’ll handle blocking operations
Blocking operations
Blocking operations ensure synchronization between coroutines by blocking when they are unable to put data into a port or get data out of a port.
Blocking put
Here is a blocking producer component. The component instantiates a uvm_put_port in its build_phase(). Then it uses the port to send the numbers from 0 to 2. Notice that it uses the await keyword to call put().
class BlockingProducer(uvm_component):
    def build_phase(self):
        self.pp = uvm_put_port("pp", self)

    async def run_phase(self):
        self.raise_objection()
        for nn in range(3):
            await self.pp.put(nn)
            print(f"Put {nn}", end=" ")
        self.drop_objection()
The await keyword is a nice syntactic feature of coroutines. SystemVerilog has no obvious tag to say that a call is a task call or a function call, other than only the functions can return a value.
Blocking get
The blocking consumer also uses await but it places it on the right side of the = to show that it is awaiting the returned data:
class BlockingConsumer(uvm_component):
    def build_phase(self):
        self.gp = uvm_get_port("gp", self)

    async def run_phase(self):
        while True:
            nn = await self.gp.get()
            print(f"Got {nn}", end=" ")
The above code highlights a difference between SystemVerilog and Python. Whereas SystemVerilog can only return a value from a time-consuming task through the argument list, Python can only return values through the return statement. So get() has no arguments, which is different than SystemVerilog, and it returns the value through the await statement. This has implications in the non-blocking operations.
Non-blocking operations
Implementing non-blocking TLM operations in Python raised some design questions because of Python’s ability to raise exceptions. As we saw in the blog post cocotb Bus Functional Models, Python uses exceptions to implement non-blocking queue operations. Here we see a loop on the negative edge of clock that reads the driver_queue without blocking and catches the QueueEmpty exception to handle an empty queue.
        while True:
            await FallingEdge(self.dut.clk)
            if self.dut.start.value == 0 and self.dut.done.value == 0:
                try:
                    (aa, bb, op) = self.driver_queue.get_nowait()
                    self.dut.A = aa
                    self.dut.B = bb
                    self.dut.op = op
                    self.dut.start = 1
                except QueueEmpty:
                    pass
            elif self.dut.start == 1:
                if self.dut.done.value == 1:
                    self.dut.start = 0
Since SystemVerilog has no exception mechanism, the UVM developers needed the nonblocking version of put and get to return a bit that told us whether the operation had succeeded.
Given the choice between following Python style and the UVM spec, I chose to follow the spec as closely as possible. As we’ll see, this resulted in an interesting wrinkle that used a different non-SystemVerilog feature.
Non-blocking put
We’ll now implement the producer using a non-blocking put port. Notice that we instantiated the put_port again. This is because the put_port provides both blocking and non-blocking put operations. This was easy to implement in Python because of multiple inheritance:
class uvm_put_port(uvm_blocking_put_port, uvm_nonblocking_put_port):
    ...
The NonBlockingProducer creates the same numbers and sends them to the consumer, however this time it checks a return variable named success. If success is True then we can move on to the next number, otherwise we await the Timer and try again:
class NonBlockingProducer(uvm_component):
    def build_phase(self):
        self.pp = uvm_put_port("pp", self)

    async def run_phase(self):
        self.raise_objection()
        for nn in range(3):
            success = False
            while not success:
                success = self.pp.try_put(nn)
                if success:
                    print(f"Put {nn}")
                else:
                    sleep_time = random.randint(1, 10)
                    print(f"Failed to put {nn}. Sleep {sleep_time}")
                    await Timer(sleep_time)
        await Timer(1)
        self.drop_objection()
We await the Timer one more time at the end to let the consumer read the final value.
Non-blocking get
Implementing a non-blocking get in Python required a bit of innovation. The SystemVerilog non-blocking get returned the value in the argument list and a success bit as the return value. We can’t do that in Python. Also, one cannot return a “failure” value in Python since even None could be a valid value in some applications.
The solution is to return a Python tuple. A tuple is an object that contains multiple values. In this case we return (success, value) as a tuple pair. We check success before using value. The NonBlockingConsumer uses try_get() which returns success and nn. If success is True we print nn, otherwise we await the Timer and try again.
class NonBlockingConsumer(uvm_component):
    def build_phase(self):
        self.gp = uvm_get_port("gp", self)

    async def run_phase(self):
        while True:
            success = False
            while not success:
                success, nn = self.gp.try_get()
                if success:
                    print(f"Got {nn}")
                else:
                    sleep_time = random.randint(1, 10)
                    print(f"Failed to get. Sleep {sleep_time}")
                    await Timer(sleep_time)
Python’s tuple data type has saved the day.
Connecting the producer and consumer
Up until now we’ve focused on the ways that the pyuvm TLM is different than SystemVerilog TLM, but much is the same. We instantiate put and get ports the same way and the method names are identical. We also connect ports the same way.
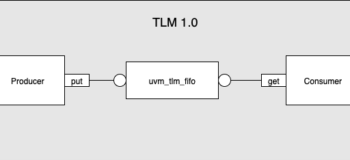
Here is a UVM test that instantiates a BlockingProducer and BlockingConsumer and connects them using classic UVM function calls. The uvm_tlm_fifo class provides a put_export and get_export that we connect to the ports in the connect phase:
class BlockingFIFOTest(uvm_test):
    def build_phase(self):
        self.prod = BlockingProducer("prod", self)
        self.cons = BlockingConsumer("cons", self)
        self.fifo = uvm_tlm_fifo("fifo", self)

    def connect_phase(self):
        self.prod.pp.connect(self.fifo.put_export)
        self.cons.gp.connect(self.fifo.get_export)
The big simplification here is that we created the ports and FIFO with no typing information. We could swap producers and consumers in and out of this test with no concern as to what they are producing or consuming.
Summary
In this blog post we examined pyuvm’s implementation of the UVM TLM 1.0 interface. We saw that Python does not need to worry about the type of the data moving through the system.
We saw how the await statement signifies that we are
We also saw how Python’s requirement to return all data using the return statement (as opposed to SystemVerilog’s ability to return data through the argument list) required slight modifications to the try_put and try_get functions.
New examples repository
The examples in this, the other blog posts in this series have been tested. You can download the examples from Github at https://github.com/raysalemi/vh_blog_examples.