Cocotb Bus Functional Models
In this series we’re talking about using Python as the testbench software in this testbench diagram:
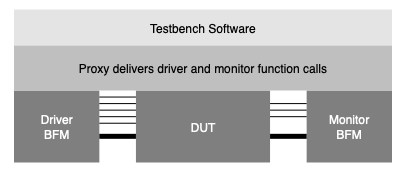
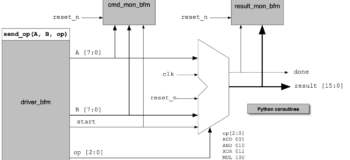
The testbench software uses blocking Python function calls to interact with the bfm and eventually the bus functional models (BFMs). In this example we’re going to look at a testbench for a simple design: the TinyALU.
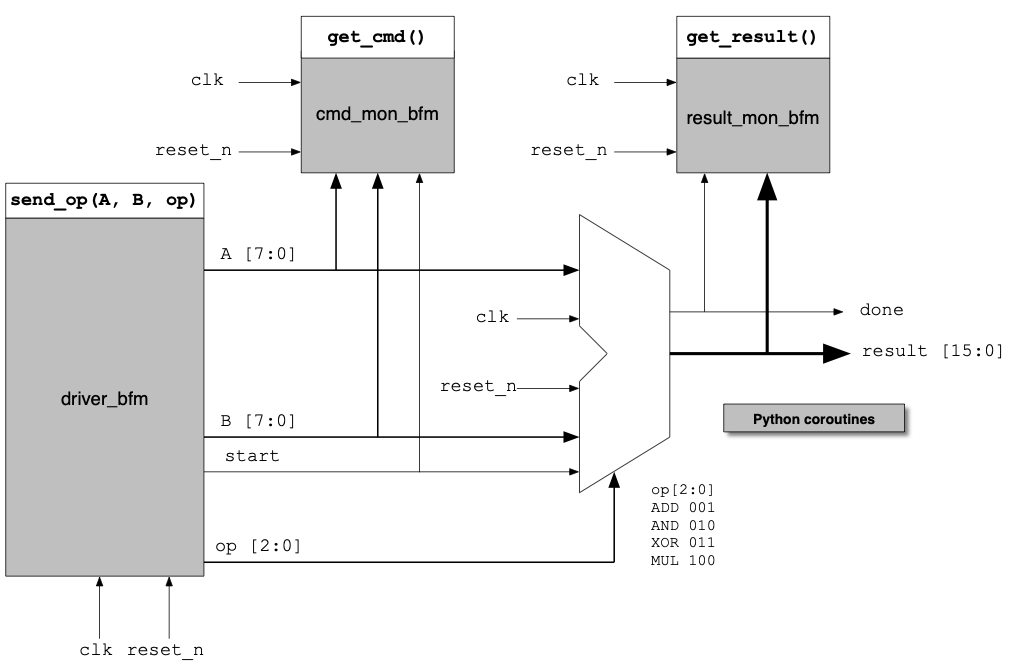
The example above shows three bus functional models (BFMs). A driver, a command monitor, and a result monitor. These provide three functions for our testbench software:
send_op(A, B, op)—Sends a command to the ALU and blocks if the ALU is busy.get_cmd()—Gets commands in the order they appeared at the TinyALU and blocks if there is none available.get_result()—Gets results in the order they appeared at the TinyALU.
We’ll create a Python class named TinyAluBfm that implements the BFMs. Before we show the code in Python, let’s look at the result monitor written in SystemVerilog. Let’s assume we have an interface named dut and a result_queue. We could write our SystemVerilog BFM like this:
task done_bfm();
   prev_done = 0;
   forever begin
       @(negedge clk)
       done = dut.done;
       if (done == 1 and prev_done == 0)
           result_queue.push_back(dut.result);
       prev_done = done;
   end
 endtask;
This task loops indefinitely and waits at the negative edge of the clock. At each clock it looks at done. If done is high and prev_done is low then we push dut.result into the queue.
How do we write this in cocotb?
The Result Monitor BFM
We’re going to create a bfm class that contains the BFMs and the associated queues and access functions. We import resources from cocotb and then start with a class declaration:
from cocotb.triggers import FallingEdge
from cocotb.queue import QueueEmpty, Queue
import cocotb
import enum
import random

class TinyAluBfm:
    def __init__(self, dut):
        self.dut = dut
        self.driver_queue = Queue(maxsize=1)
        self.cmd_mon_queue = Queue(maxsize=0)
        self.result_mon_queue = Queue(maxsize=0)
The TinyAluBfm above has three queues that will store data. Now we create the get_result() coroutine:
    async def get_result(self):
        result = await self.result_mon_queue.get()
        return result
That’s all there is to that. This coroutine returns the results in the order the TinyALU generated them, and blocks if the queue is empty.
Now we need to fill the queue using a BFM written with a coroutine. Notice that we were passed a dut object in the __init__() method. This object is analogous to a SystemVerilog interface. It gives us access to the DUT’s top -level signals. Now we can recreate the SystemVerilog result monitor in Python:
    async def result_mon_bfm(self):
        prev_done = 0
        while True:
            await FallingEdge(self.dut.clk)
            try:
                done = int(self.dut.done)
            except ValueError:
                done = 0

            if done == 1 and prev_done == 0:
                result = int(self.dut.result)
                self.result_mon_queue.put_nowait(result)
            prev_done = done
Here we see the same code as SystemVerilog. We loop forever and await FallingEdge(self.dut.clk). This is the same as @(negedge dut.clk). The FallingEdge coroutine came from cocotb which provides a variety of triggers such as Edge, RisingEdge, and FallingEdge. You can also ask cocotb to count a number of clocks as we’ll see below.
The TinyALU Driver BFM
We send commands to the TinyALU with the send_op() function and associated driving BFM.
    async def send_op(self, aa, bb, op):
        await self.driver_queue.put((aa, bb, op))
In this example send_op() is a coroutine because we’ll be calling it from a coroutine. If we were calling it from another Python thread then we’d make it a simple function. We put two operands an an operation into the driver_queue where the driver BFM will retrieve it.
Here is the driver BFM. As with the monitoring BFM we create a state machine and here we see a cocotb requirement. The coroutines cannot block, otherwise they hang the testbench and even the simulator. So, in this example we wait for the falling edge of the clock and try to get data from the queue with get_nowait(). If driver_queue is empty then get_nowait() raises a queue.Empty exception. We catch the exception with the except statement and execute a pass statement, which does nothing. Then we loop to the top and wait for the next clock edge.:
    async def driver_bfm(self):
        self.dut.start <= 0
        self.dut.A <= 0
        self.dut.B <= 0
        self.dut.op <= 0
        while True:
            await FallingEdge(self.dut.clk)
            if self.dut.start.value == 0 and self.dut.done.value == 0:
                try:
                    (aa, bb, op) = self.driver_queue.get_nowait()
                    self.dut.A = aa
                    self.dut.B = bb
                    self.dut.op = op
                    self.dut.start = 1
                except QueueEmpty:
                    pass
            elif self.dut.start == 1:
                if self.dut.done.value == 1:
                    self.dut.start = 0
If we get data to send to the TinyALU, we put it on the appropriate signals and raise the start signal. This state machine waits to see the done signal go high before lowering start.
The cocotb Test
Tests in cocotb are coroutines decorated with the @cocotb.test decorator. When we run a simulation with cocotb it searches any number of Python files for decorated functions and runs them as tests. Here is our TinyALU test. The test creates a TinyAluBfm object and uses it to start up the BFM coroutines and reset the DUT:
async def test_alu(dut):
    clock = Clock(dut.clk, 2, units="us")
    cocotb.fork(clock.start())
    bfm = TinyAluBfm(dut)
    await bfm.startup_bfms()
Launching the BFMs
The code above awaited teh startup_bfms()` coroutine. Here is how that coroutine reset the DUT and forked off the BFM coroutines.
    async def startup_bfms(self):
        await self.reset()
        cocotb.fork(self.driver_bfm())
        cocotb.fork(self.cmd_mon_bfm())
        cocotb.fork(self.result_mon_bfm())
Now the BFMs are running we can write a test. We wait for the falling edge of the clock, then we send `0xAA + 0x55 command to the TinyALU. The result is 0xFF. We check that our result was correct.
    await FallingEdge(dut.clk)
    await bfm.send_op(0xAA, 0x55, 1)
    await cocotb.triggers.ClockCycles(dut.clk, 5)
    cmd = await bfm.get_cmd()
    result = await bfm.get_result()
    print("cmd:", cmd)
    print("result:", result)
    assert result == 0xFF
We see the following in the output:
# cmd: (170, 85, 1)
# result: 255
# 19000.00ns INFO Test Passed: test_alu
Our BFM works!
Next Step
In this blog post we learned how to create a simple BFM with cocotb and create functions that deliver the data to testbench software. One can write a testbench from this point that builds upon these ideas.
However, this give us a reuse problem in that engineers will write widely different testbenches without a common methodology such as the UVM in the SystemVerilog world.
If only we had a UVM for Python . . . and it turns out that we do. pyuvm is a Python implementation of the UVM specification IEEE 1800.2 that can use cocotb to connect to a simulation. We’ll turn to pyuvm in the next blog post.
Comments
Leave a Reply
You must be logged in to post a comment.
Hello, thanks for introduction. Could you help share the source code of this example?
Ok, I got it in author’s github.