Drive engineering efficiency by merging Bill of Materials modifications from multiple changes!

Managing changes is essential to deliver any industry product to meet customer needs. A vast majority of product development efforts involve teamwork and therefore many changes!
In a perfect world, all change requests in the change process would arrive in sequential fashion and be implemented sequentially and quickly.
Unfortunately, this is often not the case in practice. Regularly, there are circumstances where a high priority change arrives while the implementation of a lower priority change is in progress. It is impractical to stop the partially completed low priority change to accommodate the higher priority change. For example, an engineering change may be in process while an emergency break-fix request is raised by manufacturing.
In short, you have separate change branches for a given item revision that are split. Then you start developing two different versions of one item in parallel.
This satisfies your needs and gives you numerous possibilities. You can create separate changes for separate needs, simply use it as you want!
At some point, you may want to merge these two parallel versions of the product together. What would you do with changes that affect the same products but are resolved differently?
Don’t worry. With Teamcenter Active Workspace 6.2, we’ve introduced change merge function to help you to put your separate changes together. You can now merge an unincorporated released change in the current in-progress product design. While doing so, you can review the differences between two assembly versions side-by-side. You can merge one or all of the changes from source change to target change.
What exactly is Change Merge?
Let’s imagine a very simple scenario where we have our last assembly revision as A, this is where the product gets utilized with Change1 and Change2, and each of them commits Revision B and C, respectively. At this point the scenario looks like below:

Merge function allows us to merge changes from one change to another. In our case, we want to include Change1 to Change2. You can be on the target change, which is Change2.
System will then give you the new merge command to execute.
How does Change Merge look?
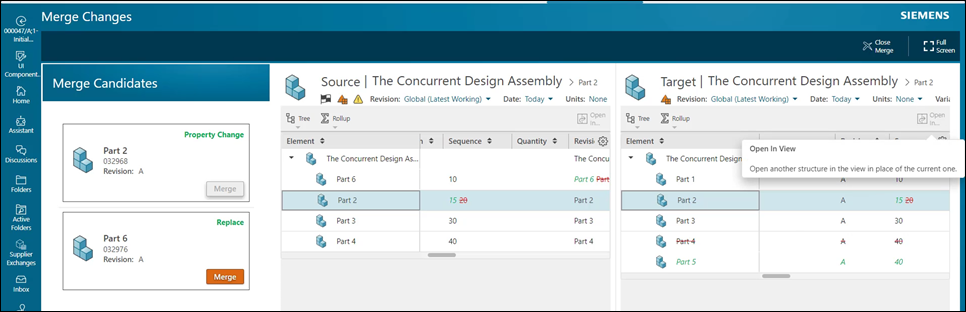
When you open the work-in-progress change, the change summary shows Merge status column with a merge required icon. You can then click it. This will display from the system both the in-progress change (Source, on the left) with the original change (Target, on the right).
You can quickly review the differences between two assembly versions side-by-side, the merge candidates and select one or all to incorporate into the Target change. The Target object panel reflects the combined changes while it’s Change Summary reflects the merged updates. Once all changes are complete for a given level, the Merge Status icon shows as Merge Complete.
As you see, it doesn’t matter if it’s 2 or 20 changes, the idea remains the same. That is merging the unincorporated changes! Merge changes in Teamcenter is a very beneficial feature for users wanting to branch out and then come back to the repository in a faster and easy way.
If this sounds like something you can use to streamline your business processes and improve your productivity, please reach out to your sales contact to learn more about this capability.
If you’re interested in more information, don’t miss our Change Management topics:
- Why You Should Consider Simple Change Management in Teamcenter?
- Digitize, standardize and optimize any PLM process with change
- Learn more about managing and executing product changes quickly, accurately, and comprehensively
- Customer Story: Mercury Marine cuts change time by 50% with product change management process
- On-Demand Webinar: Strategies for optimizing product innovation with engineering change management