Creating Custom Shape Springs in Solid Edge
The various types of springs used in the industry are:

• Cylindrical: All coils have the same diameter with a constant pitch.
• Conical, Telescopic or Tapered: Coil diameter decreases from one end of the spring to the other. These are often specified where the large end is meant to work in a bore and the small end is meant to work over a rod
• Barrel or Convex: Tapered so that coil diameter at both ends are smaller than the middle coil diameter helping the spring to be centered on a smaller diameter shaft.
• Hourglass or Concave: Tapered so that coil diameter at both ends are larger than the middle coil diameter to aid the spring to be centered on a larger diameter hole.
• Variable Pitch: With a varying amount of space between the coils. These can be cylindrical or conical in form.
• Garter: Which push or pull with radial pressure. These are wound around a circular axis.
• Tablet Spring is square/rectangle shape winded using stainless steel and mostly used in tablet or capsule blister packing machine in pharmaceutical industries.
Of these, the Helix ![]() or Helical Protrusion command in Solid Edge can be used to create the cylindrical, conical and variable pitch varieties. The workflow of this command typically begins with sketching an axis and a cross-section followed by specifying a combination of the axis length, turns and pitch.
or Helical Protrusion command in Solid Edge can be used to create the cylindrical, conical and variable pitch varieties. The workflow of this command typically begins with sketching an axis and a cross-section followed by specifying a combination of the axis length, turns and pitch.
The Taper can be specified as an angle or a pair of start and end radius. Also the pitch can be specified as a ratio or a value-pair of the start and end pitches. All these options are available under the Helix parameters dialog invoked from the Command bar’s More… button.

Another variation that can be done outside the helix dialog is a non-circular cross-section for the wire which can be drawn when creating the sketch. So it is easy to create a tapered spring with a square cross section.
The Garter, Barrel and Hourglass springs are used to minimize resonant surging and vibration and require a different approach to create in Solid Edge. These springs are also not created in standard size and fit but are custom made in order to be placed as per the design.
This article constitutes three hands-on tutorials to create:
1. A Garter spring, bent spring and a telephone cord in the Ordered modeling environment.
2. An Hourglass or concave spring using Synchronous modeling technique.
3. Tablet springs – technique to create the regular and tapered varieties.
Modeling a Garter Spring
 Start with a new part
  by clicking on the Solid Edge Application Button > New > Part.
On the Ribbon bar, take the Tools tab and from the Model group, select Ordered.
The feature PathFinder updates to reflect this.
Switch to the Home tab. An effortless way of doing this is by hovering the mouse over the ribbon bar and scrolling the wheel up.

Start Sketch  from the Sketch group and create a Circle
  of diameter 125 in the Top (xy) Base Reference Plane.Close the sketch
Again start sketching in one of the vertical Base Reference Planes – Right (yz) or Front (xz).
Draw a Line using the pierce point between the plane and the circle as the midpoint of the line. Apply a Smart Dimension  to the line equal to the nominal diameter of the spring.
 Switch to the Surfacing tab and start Swept
  from the Surfaces group.
Make sure ‘Select from Sketch’ is selected in the Create from list on the Command bar.
Pick the circle as the Path and the rectangle as the Cross-section when the surface starts appearing.
Don’t finish yet. Click the Sweep Options button on the Command bar and in the Twist area, specify Number of turns as 48. Also check Full merge and Curvature continuous options.
Click OK in the dialog and then Finish on the Command bar. A dense and twisted surface appears.
Start Derived Curve  from the Curves group and select the edge of the twisted surface to create a curve for the path of the Garter spring. Hide all reference planes and also the swept surface.

Create a Plane Normal to Curve  using the derived curve and place the plane at one of the highlighted keypoints on the curve.
Create a Circle  on the new plane and place the center of the circle on the pierce point between the plane and the curve and not anywhere else.
Start Swept Protrusion from the Solids group, Add > Sweep and use the circle along the twisted derived curve to create the Garter spring.
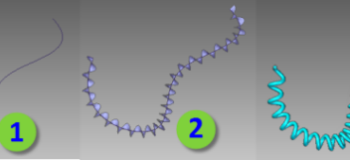
A free form coiled cable like a telephone cord can also be created by sweeping a temporary cross-section (a single line .i.e. an open section) along a Curve  and twisting it along the path of the curve as shown besides. An edge can then be derived
  from the twisted surface to form the path of the cable.

The cyan piece of cord shown above is created using a single curve used for the path curve along which a tiny line is first swept and twisted to create a curled surface whose edge is used to derive a curve which finally serves as the path for the cord.
Yet another application of this technique is bending a regular spring at a desired angle. This can be achieved by drawing the path of the spring as lines and arcs and using yet another small line to twist around the path to create the final path of the bent spring. A circle can then be swept along the curled path to create the bent spring as illustrated below.

The angle, the spring length, bend radius and diameter of the cross-section are fully parametric and thus the spring’s shape size and form can be easily controlled.
The possibilities are endless.
The next part of this tutorial illustrates creating Hourglass or concave spring, Barrel or convex spring, Tablet and tapered tablet springs.


