NX | Tips and Tricks | Upgrading to a new version
Our latest NX™ software Tips and Tricks video discusses two different ways you can update your system to the latest version of NX.
It is important to pay attention to new updates to ensure you get the most out of your experience in NX. Watch the video below to see strategies for upgrading both NX X and local traditional NX installs.
Which route is best for you
The first question to address before you update your system is ‘Which method fits best for you?’ In the Tips and Tricks video, two different strategies discuss upgrading NX. The first method explored is for upgrading your system when you have NX X, the Cloud SaaS installation, of NX.
The second half of the video targets upgrading NX from a traditional local install. When this process is complete, there’s no need to exit the app to begin the installation, and we can continue working in NX while the update downloads.
Upgrading with Siemens Software Center
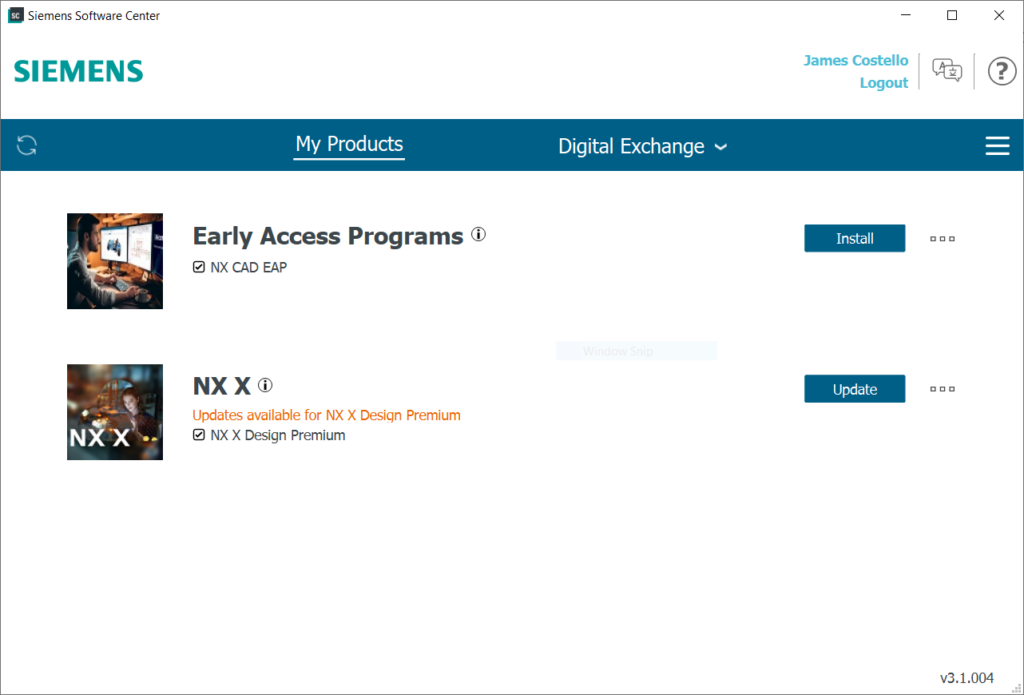
Siemens Software Center is an excellent place to perform updates for NX X. To open it within NX, we must go to the top of the screen and select the user profile circle. Next, choosing “Manage Install” will open Siemens Software Center, bringing up this window on the right.
From here, we have a few options to ensure the update goes smoothly. If we want to start upgrading to the new version immediately, we can select the Update button for NX X. Alternatively, if we wish to view installation options to control which version we update to, we can select the ellipses next to the Update button.
Software update settings
The second method explored in the video is upgrading a traditional local install of NX. To do this, the first thing we must do is set the proper software update settings. To access these settings, we need to open the Customer Defaults and look under the general section of the Gateway tab.
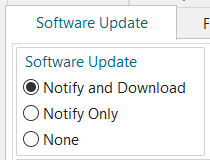
There are three different options to choose from to control software update notifications and automatic downloads:
Notify and Download – Sends notifications and automatically downloads new updates when available.
Notify Only – Notifies of new available updates, but does not automatically download.
None – No notifications are shown when new updates are available.
These settings can all be useful for different scenarios, but we recommend the Notify and Download option to receive the latest updates when they are released. Try these out to see what works best for your preferences and needs.
Beginning your local install
Starting an update on a local install is a simple process within NX. When updates are available, the upper right hand corner will display a cloud symbol as shown in the video. By selecting this option, a window will open prompting the download of the new update file. From here, there are still a few options.
By selecting yes, the download will begin. When this happens, you can continue working in NX, and you will receive a prompt to restart once the download finishes.
If you’re interested in any release notes, this middle option will open a document in your web browser containing relevant information regarding the latest updates.

If you’d like to delay your update to a more convenient time, selecting “no” will close the window. You can revisit this by selecting the cloud icon at any time if you change your mind.
Continue your journey with NX
Watch the Template Parts Tips and Tricks video here ▶️
Watch the NX Roles Tips and Tricks video here ▶️
Comments
Leave a Reply
You must be logged in to post a comment.



I am getting an error after updating my settings saying “The product is not on the main channel.” Any advice on how to fix this?