Technical Data Package | NX tips and tricks
Our NX™ software tips and tricks series continues. We’re excited to bring you the next installment into the series; how to effectively use Technical Data Packages (TDP) within your workflow. If this a series that interests you, be sure to check out the other entries into the series here.
As always, the star of the show will be our coffee machine, and how you can set up your data package ready for export as a PDF document. Let’s get started!
Before we start, what is a Technical Data Package?
The ability to create technical documentation for an assembly to share with suppliers and manufacturers. Technical Data Packages make it easier for key stakeholders to access 3D data, enhancing quality and laying the groundwork for improved collaboration throughout the supply chain
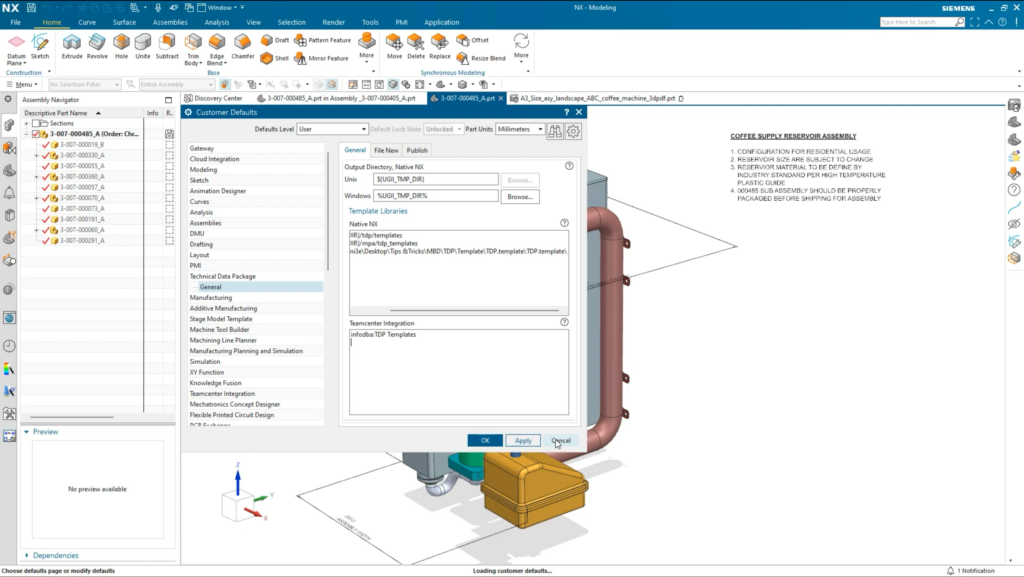
Mapping your TDP template libraries
There is a key step you need to complete to ensure that you’re ready to export your data package later on down the line; making sure you can access the existing technical data template libraries. Technical data template libraries contain all the elements you need to create your publishable documentation; everything from pages, viewports, specific texts, PDF form fields, images and tables are included.
There are a couple of ways that you can map your chosen template from the existing library;
- Select the native NX text box and type out the correct file path
- If you have a Teamcenter integration, you can map to the template libraries that are on Teamcenter.
REMEMBER
You can hit Apply or OK, but for the changes to take effect, you need to make sure your restart the NX application. Without this step, the template library won’t pull through, thus causing issues with your whole workflow.
Editing an existing template
Of course, the template that you have chosen from the library may well fit your needs, but what if it doesn’t? What if the template you have chosen isn’t quite what you desired, and you want to edit elements so that it is easier to read? Thankfully, NX comes equipped with the ability to edit a range of items in your documentation before exporting to a PDF.
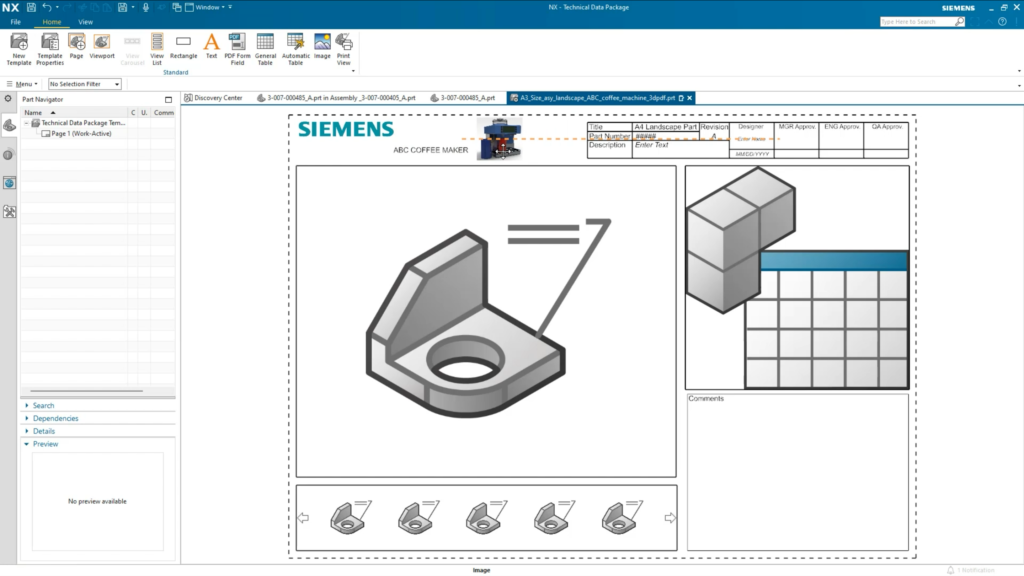
We understand that everyone’s’ needs are slightly different, so we’ve focused on control and customization for the elements you are adding to your Technical Data Package. We’ve built in functionality for you to change the text, as well as reposition it alongside the assembly image. Additionally, you can change the logo by selecting from pre-defined images, or upload your own. And finally, change the view port to your liking by clicking on it and dragging the corners in or out.
Exporting the data package to a PDF
At this stage, your Technical Data Package is ready to be exported to a PDF. The following steps are all things to prepare your document for the final export, and are things we’d advise not to overlook:
Open published PDF checkbox
This is a simple, but effective element we’ve added. When you tick this checkbox, the PDF will automatically open once the export is complete.
Text changes to the template
The text changes you’re making here are not based on the elements within your package, but more its characteristics. Here, you can change the part number, description, revision, design date and designer. These are really important elements to fill; if there are several iterations of your assembly, it’s a good idea to track the different revisions of the model to enable the ability to re-visit old design changes
REMEMBER
Don’t overlook the fact that data within your PDF will contain confidential information. We’d recommend checking the password box so that you can add a password for the PDF. It’s a simple step to add to ensure peace of mind when sharing your data
Viewing the Technical Data Package in Adobe Reader
So you’ve exported your Technical Data Package, what next? Well, there are some neat tricks you can use within Adobe Acrobat Reader to fully utilize your new Technical Data Package. Firstly, the viewport isn’t static; you can mode around the object. this is a really handy feature to gain a full understanding of the assembly you’re viewing. Perhaps there’s a specific angle that you want to show to a colleague of yours?
TOP TIP
There are pre-defined views in the port below the view port. You’ll be able to select these view ports with a single click, potentially saving time from trying to set your own view of the assembly.
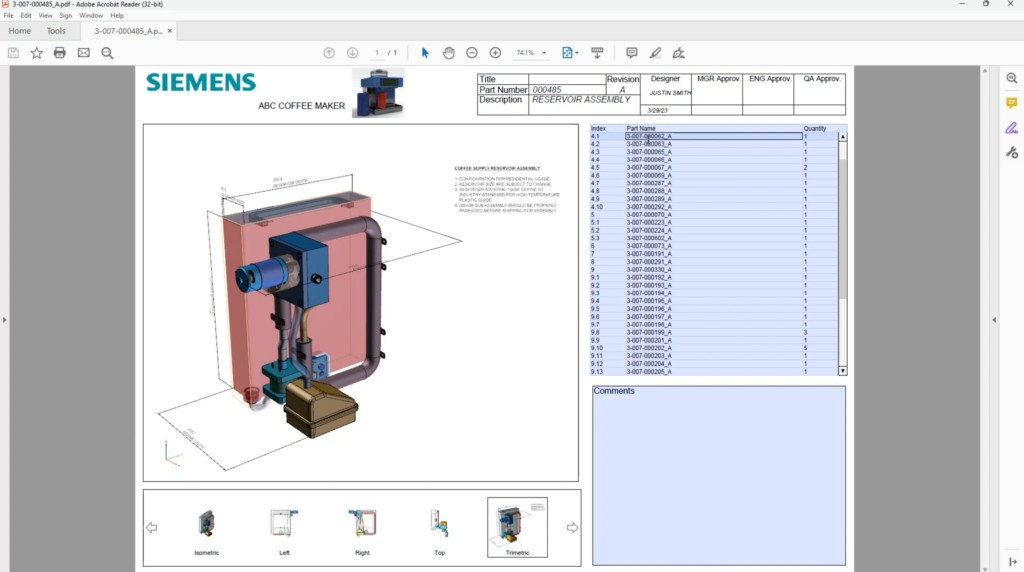
On top of this, there’s also the ability to click on the different components within your assembly. Once a component has been selected, it will be highlighted within the bill of materials – a handy tip if a colleague or stakeholder needs more information around the element in question
Continue your journey with NX
And that wraps up another entry into our tips and tricks series. Stay tuned for the next entry!
In the meantime, make sure you continue your journey with NX…
Technical Data Package | NX Tips and Tricks | | YouTube Video


Comments
Leave a Reply
You must be logged in to post a comment.
you really need to add a way to just select which components and or objects are exported into the pdf. I can’t exclude facet bodies. and we need to be able to select coordinate systems too. Like ones that I saved from the MCS dialog.