Understanding Keyshot Backgrounds
 As engineers and designers, it is sometimes tempting for us to discount the value of a pretty picture. You spend all of your time establishing the geometry and attributes of the product that few understand, and then someone swoops in, puts a pretty picture on it, and everyone says “Oh, yeah, I get it!”
There’s a reason for that. Pictures communicate. As much as we want to believe it’s so, people don’t always understand technical details, line drawings with transparent parts on top of one another, or detailed schematics. These are tools that we (engineers and designers) use to communicate with other engineers and designers. When we want to communicate with a broader audience, we need a different language. This is where we come to renderings.
When it comes to getting credit for what you have done, or making sure that non-technical managers in your sphere of influence understand what’s happening, renderings are a great way to make that happen. Renderings don’t have to take a long time to make, so you really don’t have to rely on someone else to do it. There are some simple things you can do to make renderings go much faster.
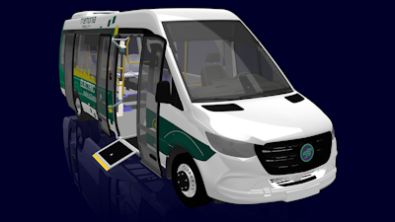
If it has been a while since you created a rendering, and all you’ve used is the Solid Edge ERA environment, it may be time for an update in your rendering skills. Lighting has changed. You  no longer have to rely on positioning lights and fiddling with settings as if you were setting up a photography studio. Natural lighting generally looks better, especially for us amateurs. Just imagine you could take a 360 degree image of the sky, or the walls and ceiling of the inside of a building. The light filtering through the clouds or windows can illuminate your rendering, just the way it does in the real world. Images that do this for you are called HDRI (high dynamic range image), and they just help you change lighting very quickly, and make it look better than if you had to set all the little bits yourself.
 You can search for “hdri” on the web, and download bunches of files for free to augment the ones that come with Keyshot. HDRI backgrounds can be used to light your rendering, but also as visible backgrounds to set your parts in, or reflective backgrounds – because parts with any reflectivity will look better if they have something to reflect other than just a solid color.
In Keyshot there are two sets of tabs, one on the left and one on the right. The set on the left is for libraries – collections of things you can choose from. One of the libraries is called Environments, and contains the hdri images, along with an Upload button at the bottom.
The Environments tab also shows up on the right, but this is where you set the projects specific settings. So you select the Office hdri on the left, and make adjustments to it on the right.
 On the Project side (right) Environment tab, there is a Background area where you can set what will be displayed behind the image of your CAD model. Lighting Environment setting means the hdri image environment will be displayed. Color allows you to assign a single color to be displayed behind the model. For many reasons, white is great for that. The Backplate Image option enables you to put a different image in the background. You can use a flat jpeg here instead of relying on the hdri to perform double duty as a background and a light source. Notice over on the left side Library, there is also a collection of backplate images, and the option to upload more.
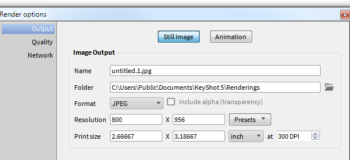
If you prefer a transparent background for your images, that option comes at the end of the process when you set the Output options. JPEG is the only available option in Keyshot that does not allow transparent background (also called alpha channel), so the transparent background option is next to the format selection.

Just a word about image formats. Most web publishing works better with PNG format. Print will probably prefer TIFF. Remember that high resolution looks good, but it also takes a long time to load. Some web authoring tools automatically create multiple resolutions of images, and give the highest when you click on the image. Also, the dpi (dots per inch) means nothing in web publishing. In web publishing, it’s all about the number of pixels, which equates to a certain file size.