Take the First Steps to Automation
This is an epilogue to the article Select and you are all Set which also provides a free macro that overcomes a limitation in the selected object count displayed in the Solid Edge Draft environment.
This post attempts to persuade users of Solid Edge to take the plunge into the wonderful world of Solid Edge automation using programming. The information that follows is for absolute beginners who have little or no programming experience. Those having basic knowledge of any programming language, even from high school days would have a head start.
Disclaimer:
1. Several facts and bits of information presented hereinafter may appear distorted or deviating from reality. This is like early grades in school when we were told the earth is round like a ball or sphere and later in the higher grades more details are revealed it being flatter at the poles and bulging at the equator.
In a similar fashion, few things are introduced in a simplified manner and details are later added to give a complete and correct picture.
2. Another point to note are the many places where information may appear to be presented with insufficient details. This is again like early stages of learning where we are told the Earth goes round the Sun in 365 days, called a year, and much later are more details revealed like there being some extra hours to it, leading to a the concept of a leap year. Similarly knowledge is build in gradual manner over this article.
The language used is Visual Basic.Net or simply VB.Net. The first step towards automating Solid Edge using VB.Net is to install VB.Net on your computer.

To do this,
1. Browse to http://www.visualstudio.com/downloads/download-visual-studio-vs
2. Click the DOWNLOADS tab.
3. Click 2010 Express tab link.
4. Expand the Visual Basic 2010 Express panel.
4. Click Install Now.
VB.Net Express is the free edition from Microsoft and is sufficient for our automation requirements with Solid Edge.
After installation is complete, start Visual Studio and select a new project from the menu File > New Project or from the New Project button on the toolbar.
This article takes you through the detailed process of re-creating the SelCount macro from the Select and you are all Set article.

In the ‘New Project’ dialog:
1. Select Visual Basic from the Templates area on the left.
These templates in notion are not much different from those in Solid Edge’s New dialog.
2. From the panel in the middle, select ‘Console Application’.
This is the project type using which the Solid Edge macro will be created and it won’t have a GUI i.e. a Graphical User Interface like dialog boxes, or buttons, text boxes, etc.
3. In the Name box, type SelCount.
4. Specify a location folder for the new macro using the Browse… button.
5. Make sure the check boxes for Create and Add are turned OFF in the New Project dialog.
Click OK and hold on.
Before you start exploring the various parts of the coding window or even start coding, launch Windows Explorer by pressing the Win+E keys and browse to the folder you specified for the new project.
Note that a new folder is created with the name ‘SelCount’ that was specified in step 3 above.
Open the SelCount folder and observe the various files and the sub-folder structure that is created by Visual Studio.

• You may perhaps not see the hidden .suo file or not even the extensions based on the settings for Windows Explorer.
• Module1.vb is the code file that you will write your program in.
• SelCount.vbproj is the project file – the macro project.
• SelCount.sln is the Solution file. Skip thinking about this file for now.
Open the bin folder and then the debug sub-folder. Note the SelCount.vshost.exe file. This is a executable file. After you have done coding for the macro another file called SelCount.exe will appear here.
Switch back to Visual Studio using Win+Tab or Ctrl+Tab.
The code window in the tab called Module1.vb is waiting with 4 lines of code already inserted.
 Before writing any code, it is necessary to build a reference link with Solid Edge so the program knows this macro is meant for use in Solid Edge. This is called adding a Reference to the Solid Edge Type Libraries.
These Type Libraries are similar to material libraries in Solid Edge in that they contain descriptions of the various functions features of Solid Edge.
Just as you use the materials from the material libraries along with their various properties like shininess, opacity, diffuse and ambient colors, etc., so you use the Type Libraries which are files that contains standard descriptions of exposed objects, properties and methods.
The word exposed is important here. Solid Edge exposes most, if not all, of its core functionality.
Examples of Solid Edge objects and its various properties and functions that are exposed are:
A Solid Edge Document: This should be viewed as an object.
Some of the properties of the Document object that you can access or manipulate using VB.Net are: Name of the document with full path – this is a property. The version of Solid Edge the document was last saved in – this is a property. Properties like Saved Date, Title, Author, Custom Properties, etc – these are properties. The document’s variables which are typically accessed from the Variable Table interactively. The document’s units of measurement – this again is a property.
Not just that, you can also programatically access and manipulate the bunch of objects selected by the user when your macro is running. This is known as a Selection Set. This is central to the SelCout macro you will develop today.
Some of the methods or functions that are exposed i.e. available for access/manipulation for a Document object are: Exporting the document to various formats – an action hence a function. Save or Save As the document – an action hence a function. Closing the document – an action hence a function. Print the document using the default printer – an action hence a function.
Most other objects are document specific. Sheets and Views are accessible in the DraftDocument, while Features are found only in Part and occurrences only in the Assemblies.
If you plan to write a Solid Edge macro that would access and manipulate objects in a Draft document it is necessary to add the type library called ‘Solid Edge Draft Type Library’.
For writing a macro to work in the Part environment, add the type library called ‘Solid Edge Part Type Library’. Similarly there is a library for the Assembly environment.
There are other objects like lines and circles, ribbon bar and buttons, command bar, variables, sensors, dimensions, groups, PMI, etc. which are common to all environments. For these it is enough to reference two libraries called Solid Edge Framework and the Solid Edge FrameworkSupport libraries.
![]()
The main Solid Edge application is also an object and has exposed i.e. manipulable properties like the Caption displayed in the title bar of Solid Edge – yes it can be manipulated too, the text in the PromptBar – this is what we are going to change today. The Solid Edge application which is an object has exposed functions or methods like ‘Quit’ using which we can actually exit Solid Edge from our macro – Fun ! isin’t it ? ![]()
To add a reference to the libraries into your SelCount project in Visual Studio, select Project > Add Reference… from the menu and take the COM tab in the Add Reference dialog.
Type S at the keyboard to quickly reach the Solid Edge libraries, then scroll some more and pick all items in the list that start with Solid Edge as shown in image. Click OK.
 Though we want to write a macro that would work only in the Draft environment, it will make NO harm if you reference all type libraries.
This is like writing an article on ‘A brief history of …whatever’ for which you walk into your local library and borrow couple books, then to the book store to purchase another couple books and finally from your friend borrow some more books. It does not matter how many books you refer, your article is not going to get any bigger or heavier than the actual stuff you have penned down.
similarly the file size of the executable or macro or the SelCount.exe file in the debug folder would still remain the same had you referenced just the Solid Edge Framework and the Draft libraries.
 Tip.
Tip.
If you are inclined a bit to get under the hood, check the various .TLB files in the
Solid Edge STXProgram folder. These are the Type Library files, though the actual Solid Edge functionality resides in the DLL files in the same folder.

To view a Solid Edge Type Library outside the Visual Studio environment, download a free Type Library viewer from OleWoo
Type Libray viewers can be very useful in developing Solid Edge macros, for example the one shown besides also has a search facility which can help you locate the API keyword quickly.
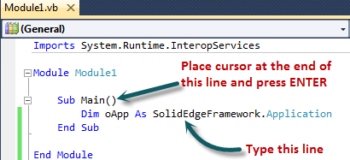
In your code window, press Ctrl+Home and type
Imports System.Runtime.InteropServices

Don’t worry too much about what the above Imports line means – just remember its going to help our Solid Edge macro actually connect to Solid Edge. This being the very first macro, it is best to avoid too much terminology in the early minutes.
The SelCount program won’t be doing any number crunching and would mostly appear in a more natural language format since we are using VB.Net which can be looked upon as an improved version of the Visual Basic language famous for its simplicity and usage of a natural language like syntax.
Steps to writing a macro:
1. The first step in writing the macro is to store various objects and access them in proper order.
2. The second step is to then acquire or read the various properties of the objects.
3. The third and final step is to display the properties at appropriate places.
The objective of the SelCount macro is to:
1. Count the number of objects selected by the user interactively.
2. In the Draft Environment.
3. In Solid Edge.
Work out the steps in a reverse way, determine what would you need first.
1. So, the first object to store is always Solid Edge.
2. Next object to store is the Draft Document.
3. Then store the objects selected by the user.
Finally just count the number of selected objects and display them in the Status bar or the PromptBar.
With the cursor placed between the two lines Sub Main and End Sub, type:
Dim oApp As SolidEdgeFramework.Application

where,
Dim originally (in BASIC) stood for Dimension i.e measurement in the computer memory and was used to define the dimensions of an array i.e. a collection of several values.
Nowadays Dim is used also for storing single values like:
Integers: Store number of features in a part.
Double or decimal numbers to store, say, the radius of an arc.
A String: of characters like a filename.
Objects: Solid Edge itself, a Part or Draft document, Features, Occurrences, Views and so on, as discussed earlier.
Boolean values: like True or False used to determine and specify if a feature is suppressed or un-suppressed.
Dim is used in combination with the word As which determines the type of value stored in memory.
This is similar to the handheld calculator which has keys like MS and MR which are used to store and retrieve values in the calculator’s single memory slot. In programming several values need to be stored, hence names are assigned to each memory slot.
The name of the value stored is called a variable and specified between the words Dim and As:
So Dim oApp As SolidEdgeFramework.Application means ‘store into a memory slot labelled oApp an object of type Solid Edge Application’.
Similarly, store a number, say the number of objects selected as an integer:
Dim iCount As Integer
The name of variable used is more of a convention.
It is recommended to use a single or three letter prefix as in oApp where the prefix letter is o and in case of an Integer use i as prefix. Using variable names like objApp or objSE or theApp or theEdge are also common. Similarly the variale used for storing integer numbers can take the form iCount, intCount, cntCount, nCount and so on. They all store a number.
What to read next:


Comments
Leave a Reply
You must be logged in to post a comment.
We can’t access part 2! I’m getting an error saying the certificate has expired
why 2nd part can’t be opened …