Solution Manager: Up Close and Personal
Last week, right at the buzzer (4:45 pm on Friday), Chris Dayton, the man at the levers behind the curtains of Live Rules, agreed to talk to me and answer my questions. Special thanks to Chris for his dedication making sure that I had what I needed to write some articles taking some of the mystery out of Live Rules and Solution Manager.
The main model used by the team estabishing the Solution Manager functionality was this block with a fillet and a hole concentric with the fillet. If it was good enough for them, it is good enough for me. It is simple, yet demonstrates all the functionality you need in this tool.
One of the things I want to do as a part of this article is to get some of the terminology straight, and get everybody using the same lingo, to the extent possible. The first step was to get Chris to straighten me out, and now I can pass all of that on to you. There are still some areas where I don’t think the terminology is really solidified yet, but we’ll keep moving through that. Just seeing that they had terms for some of these conditions helped me to understand this Live Rules process.
After finishing this article I realize there are a couple of tools that seem to still have multiple terms, like relax/suspend/suppress, and maybe a couple of others. Overall, getting definitive terminology established in the user’s lexicon is one of my goals.If you find me using ambiguous or incorrect terminology, please point it out.
Here are some of the terms that Chris helped me get straight:
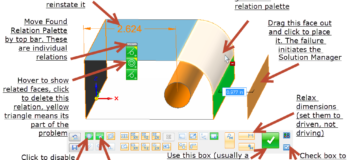
Select Set – I think most people get this one. When you make a change in Solid Edge, the selection of faces determines the design intent. That selection of faces is called the “select set”. You can select faces manually or through Live Rules. The faces you select manually become green. The faces selected for you automatically by Live Rules are identified in ways shown below.
Found Relations Palette – When you see a green box in the Live Rules interface, that means Live Rules has found some relations between faces. These are the assumed design intent. Those found relations are listed in a vertical toolbar called the Relations Palette. To see  those relations, you can right click on a face when the Solution Manager is open. Notice in the image above, the cursor is over the fillet face, and the palette of found relations shows up under the dimension.It contains two tangents, and a concentric, that are connected to that fillet face. If you hover or pause your mouse over those relation icons, Solid Edge shows you which faces they relate to. If you look even closer at the Relations Palette, you can see that two of the relations have yellow triangles. These two are involved in the present failure to move. So if you have to relax a found relation, it would be the concentric, since tangent relations should usually be kept.
The Palette shown in the image above shows only Found Relations, which are colored green. Persistent relations are shown in orange and PMI dimensions are blue, when shown.
You can see that the information in this graphical interface is several levels deep. It may not be obvious from looking at it, but there is a lot of information to be had just by hovering your mouse and right clicking. (Just be careful because sometimes if you hover the cursor too long before right clicking, you can get the Quick Pick instead of the Relation Palette.
The graphic below is kind of busy, but it outlines the tools available.

Tool Tips and Prompts – We all need a reminder now and then to always read all tool tips and prompts. After pausing with the cursor over a problem face, Solid Edge gives us both a PromptBar message and a tool tip. The tool tip is giving good advice first about how to turn off the constraint that is causing the error, and second on how to investigate the relationship options more thoroughly.
Chris also said that you should pay particular attention to the PromptBar and the tool tips while using Live Rules. There are nuggets of wisdom dispensed in those areas. Get in the habit. It will pay off.
Never turn off… – Never turn off the Tangent live rule, well, almost never. There may be times to turn it off, but they will be obvious, like when you really want to make a flat face non-tangent to a round. Other items might also fall into this “almost never” category, such as Keep Orthogonal to Base, which is the rule that keeps your parts square through changes.
First to turn off… – According to Chris, the Lock To Base Reference is the one rule that probably causes the most problems. You might not want to work with this turned off all the time, but it might be the first one you turn off when you get into trouble.
Hotkeys – One of the things that I noticed right away when I watched Chris actually use the Live Rules was that he wasn’t taking his cursor off the model. He was able to manipulate the Live Rules using the keyboard. While some of the shortcuts are pretty obscure, the more commonly used ones should be easy enough to use – C for Concentric, P for Coplanar, J for Relax Dimensions – ok, maybe you’ll need a cheat sheet taped to the side of your monitor for this so you don’t have to rely on pop-up tool-tips for the shortcuts. Anyway, just to say that hotkeys are really the way to go when you’re changing settings in Live Rules.
Relax/Suspend – A good bit of the power with Live Rules comes from knowing when to relax the rules. To relax or suspend specific Found Relations, you’ll have to use the Found Relations Palette (right click on orange face). To relax all Concentric relations, press C on the keyboard or click the Concentric button on the Live Rules interface. To relax all Dimensions, press J, or click the button. To relax Persistent Relations (relations you specifically assigned using Face Relations) , press N.
To get out of the Solution Manager, do any of the following:
- RMB click in space
- Double LMB in space
- Enter
- “Check”
- ESC
There are two additional color states that I didn’t mention last time. Just to review, we had:
- Transparent – faces not involved in the solution or problem at hand
- Green – select set
- Orange – failed to move
- Light Blue – solving correctly
- Teal – solving with relaxed constraints
- Black – grounded
The two additional colors are:
- Purple – rigid faces created by procedural features such as ribs, webs, patterns
- Red – Isolated – all constraints to this face have been turned off (relaxed, suspended, suppressed, set to driven,etc.) so it is no longer connected to other model faces.
Again, make use of the Live Rules Options in the upper right hand corner of the Live Rules interface. This serves as a legend to help you identify colors, or to change them if you feel the need to do so.
Summary:
The deeper you get into Live Rules and the Solution Manager,the more power (and the more complexity) you find. This adds to the idea that Live Rules is one of those tools where you want to start slow and build up to it. It may take you weeks or months of working on progressively more difficult models or edits to reach the point where you feel like you can use all of the available tools with confidence. Or you may never use some of the tools.
Look at Solution Manager as a diagnostic tool that enables you to find all the possible ways you can create the edit that you need. But the tricky part is that you have to cause it to fail first. This part of it may seem counter intuitive, but to get there, you really need to let go of your fear of failure. In fact, you must fail in order for this part of the software to work.