Solid Edge ST9 Interface Enhancements
ST9 has some new interface look and functionality. The part I like best is the tabbed design.


In this screen grab you can see three tabs for open documents right below the ribbon. You can already access open docs easily by using Ctrl-Tab, but that just goes through the list in a specific order. Using the tabs, you can select them out of order, and visualize which documents are open at any time.
Also, you can right click on the tabs and access even more controls for opening or closing windows.
You can also right click on the blank area next to the tabs to control the tabs like windows. This is for people who preferred the old window-based way of managing open documents.

On the right end of the tab area is a familiar X to enable you to close the current window/tab, and also a left and right arrow. These are for when there is an overflow of tabs that cannot all be shown on the screen at the same time, allowing you access to the hidden tabs.

Ribbon Color

Also with these screen captures, you can see that the ribbon background has changed a little. You can adjust this by going to the Application Menu > Settings > Options > Helpers > General > Application color scheme. The options are Light Gray, Dark Gray, Black, and White. The default is White, but I personally prefer the Dark Gray (shown below) because it uses color to distinguish between different areas of the interface.

High-resolution Monitors
Another bit of UI interface that you may or may not see, depending on your equipment is the support for high resolution monitors. You may remember that in my initial review of the Microsoft Surface Book, there  was some discussion about how tiny the icons and general interface become at 3000×2000 pixels. These settings in the Solid Edge Options > Helpers allow you to adjust the interface for your combination of resolution and eyesight. These features work with Windows 10, so you may need an OS upgrade to get the full effect of these improvements.
This adjustment will also account for gesture size.
Application Menu
The Solid Edge Application Menu now uses the “Backstage UI”, just like Microsoft Office 2013.
The new interface reflects the growing amount of information that you can access within the Application Menu, and offers an expanded list to help you sort out what you are looking for more easily.

As a part of the Application Menu, you might also have a look at some of the areas such as the Learn page. This helps organize the various areas for help and support (including the community and certification!)
Icons

You will see some new, attractive icons for Solid Edge documents. These will show up when you are not getting thumbnails in Windows Explorer.
You can cycle through the avialable icon sizes by using Ctrl-Scroll Wheel when in a Windows Explorer folder with Solid Edge documents (also works with other document types).
Style Palette
The Style Palette enables you to select colors for parts in assemblies very quickly and easily. This is a big improvement for anyone who messes with colors. I know a lot of people don’t but they might now because it is so much easier.
The Style Palette is the grid of colored circles in the Assembly Pathfinder area. Just activate it, and drag a color onto it. The color is applied at the assembly level, and in the case where more than one occurrence is in the assembly, Solid Edge will prompt you to select this occurrence or every occurrence.


The color is not applied to the part when you open the part in it’s own window. You still have to use the Part Painter for that. Part Painter has also received some enhancements with small preview swatches used wherever only color names used to be displayed.
The Style Palette looks and works like the same tool in KeyShot, and because it works in the assembly, it was probably intended to get properly colored models in to rendering quickly so you don’t have to do it in KeyShot. Whatever the reason, it’s a great tool, and will be a big time saver for people who color their models.
Last Command Used


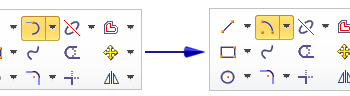
When you use a command from a drop down list, it is sometimes useful for the interface to remember the last command that you used in that list, and put that one at the top. ST9 now allows this. In the image to the right, the original command was Tangent arc, but then you used the Arc By Center Point, and now that command is on the top. This behavior is now controlled via Application Menu > Settings > Options > Helpers > Command > Last Used Command (in droplists) Stays On Top.
Summary
There are a few new things to get used to here. Nothing really earth-shattering on its own, but all of this is definitely useful, and helps keep Solid Edge in line with industry interface standards. Interface enhancements are always a little disruptive because they take some time to learn, but the improved productivity is worth it. Especially in the case of theTabbed interface, Style Palette and the Last Used Command.


