Right-Click Commands in Solid Edge Part 5 – OS Related
Solid Edge, when installed, creates a program menu entry under the folder called Siemens Solid Edge.

Right-clicking the main program menu item opens up a list of recent and pinned documents.
Also, several quick options to uninstall Solid Edge and to pin the program to the Start menu and the Windows taskbar become available.
When pinned to the taskbar, right-clicking once again reveals the recent and pinned documents and several more options. This is the same list available from within the Solid Edge.
Right-clicking the Solid Edge menu item in the taskbar right-click menu and selecting properties opens up a window from where you can know where Solid Edge is currently installed on your system.


Right-clicking on a file in the recent list lets you add it to the pinned list and also open it with Design Manager quickly.

 Note this option of opening with Design Manager will also appear when you right-click on Solid Edge in the Windows Explorer.
If the right-clicked document is an assembly, you can quickly run the Reports command without even starting Solid Edge. This is the same command available from the Tools ribbon bar – Assistants group.

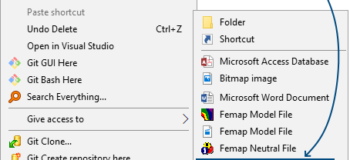
When you right-click an empty space in a folder in Windows Explorer and want to see a Solid Edge file type listed under the New sub-menu, some registry entries need to be added in the format below:

As seen in the illustration above, this will add a new sub-menu item as below:

<Registry Editing – Do at Your Own Risk>
Steps:
- Use notepad or any text editor.
- Copy-Paste the code below.
Windows Registry Editor Version 5.00[HKEY_CLASSES_ROOT.psm]
@=”sepsm”[HKEY_CLASSES_ROOT.psmShellNew]
“NullFile”=””[HKEY_CLASSES_ROOT.psmShellNew]
“FileName”=”E:\Program Files\Siemens\Solid Edge 2019\Template\ANSI Inch\ansi inch sheet metal.psm”[HKEY_CLASSES_ROOTsepsm]
@=”Solid Edge Sheetmetal File”
- Make sure you change the .psm extension in all 3 places as shown in bold above.
- Also, use double backslashes in the template path.
- Do not leave the template path blank – the sub-menu will not work.
- The description in the last line will appear in the sub-menu
- Save the file with .reg extension and make sure you do not end up with an extension .reg.txt
- Right-click the .reg file and select Merge – a warning will appear. Click OK.
- A message will appear saying it was successful.
- Now right-click on an empty space in Windows Explorer where you want to create a new Solid Edge file of the type you added to the New sub-menu.
</Registry Editing – Do at Your Own Risk>
There are several other registry techniques to add an option ‘Open with Solid Edge’ to files like IGES, STEP, SLDPRT, etc. but those can be easily found by searching on the forum.
Hope you are enjoying the series.
Taking hints from these articles, explore more and share them in the comments.
So right-click right away!
And also don’t forget to check out these other articles in the series:
Right-Click Options – Part Environment
Right-Click Options – Draft Environment
Right-Click Options – Assembly Environment
Right-Click Options – Solid Edge UI
Right-Click Options – OS Related
Tushar Suradkar
Join the Solid Edge User Group on Facebook: