Right-Click Commands in Solid Edge Part 3 – Draft
Right-clicking on a drawing view shows the context menu with the option to update just the right-clicked view. This is smarter and faster compared to the Update Views command on the ribbon which updates all views on all sheets in the drawing.
 The download page on the CADVertex website offers several free macros related to updating drawing views. Check them out:

Right-clicking a drawing view presents the Fit Drawing View command which zooms in to the drawing view to fit the screen, a good time-saver compared to Zoom Area around the view.
This command though does not work with multiple selected views. When you select multiple views and right-click on the selection, the selection is lost and only the right-clicked view is zoom fit.
The trick here is to keep the Control key pressed and double-click the right-mouse-button or RMB and then choose Fit Drawing View without losing the selection.

This, however, works when only drawing views are selected. If other objects like dimensions are included in the selection the right-click context menu does not appear at all.
 A free macro available on the CADVertex website called Zoom to Selection allows an easier zoom Fit to multiple views. In fact, the macro can zoom fit any number of selected objects of different type and you can mix drawing views with other objects in the selection as well.
The video below illustrates the trick and also shows the macro in action:
Another Example
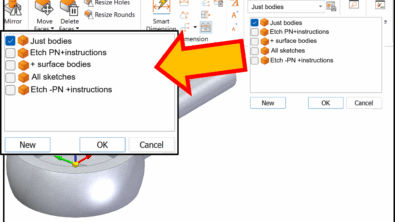
If you are using Solid Edge 2D primarily for sketching drawing views, checking and modifying the properties of objects is frequent. Right-clicking an object allows modifying its properties.
But in case of multiple selected objects selection is lost and only the right-clicked object’s properties are displayed. The trick is to Ctrl + Right-double-click on the selection as shown below:
Draw in View
The Draw in View option available from the right-click menu allows sketching additional 2D entities on the drawing view which then become tied to the view and move along with it. This can save the hassle of additionally selecting 2D objects which are simply drawn on top of a drawing view.
Convert to 2D View
The Convert to 2D View option, in AutoCAD terms, explodes the drawing view into individual 2D entities and the connection to the 3D model is lost.
This step cannot be undone.
Alignment Control
Deleting the alignment of a drawing view from the right-click menu makes the view freely movable, but fortunately, the alignment can be re-established using the Create Alignment option of the same right-click menu.
The Maintain alignment is a toggle which will remove the alignment temporarily.
Library Pane
In the side pane in the Draft environment, Library tab, right-clicking presents several options one of which is File Types as shown below:

Checking the AutoCAD options allows drag-dropping DWG and DXF files directly into the current sheet as a block.
Groups and Block Commands
By Right-Clicking in an empty space in the Library pane, you can enable the preview of blocks from the context menu.

As seen in the image above, Right-Clicking a block name in the side panel displays several unique options not available elsewhere.
And Right-Clicking a block directly on the drawing sheet also presents more options for the particular instance:

Similarly, Right-Clicking a group name in the Groups tab presents several unique options as shown in image below, which are not available elsewhere on the ribbon.

Another right-click command which is actually related to the Solid Edge UI is illustrated with a draft document in the video below.
Note that this technique is however not restricted to a Draft document but can be used with Part or Assembly files as well.
Copy Paste Editable Tables
There are more small and big places where the right-click menu can come in handy.
Right-clicking on a Parts List or a Hole Table gives options to Copy the contents of the tables, to the clipboard. This is different from the simple Copy option just above in the menu.

Whereas the Copy-Pasting pastes an image of the table or parts list, pasting after using the Copy Contents command in say Excel, pastes a neatly formatted and editable table in the cells.
This is a quick way to copy your Solid Edge tables to Excel for downstream use.
The following video shows this:
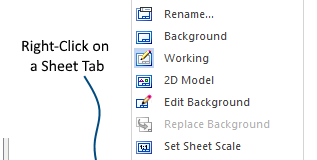
Sheet Tabs
Right-clicking on the sheet tab provides commands that cannot be started from anywhere else as seen below:

Right-Click in Dialog Boxes – Textboxes and Tables
Inside a Parts List properties dialog, say you wrongly added a property format string, and don’t know how to edit the formula, just right-click and select Undo.
Here’s a short video that shows several tricks in action:
Hope you are enjoying the series.
Taking hints from these articles, explore more and share them in the comments.
So right-click right away!
And also don’t forget to check out these other articles in the series:
Right-Click Options – Part Environment
Right-Click Options – Draft Environment
Right-Click Options – Assembly Environment
Right-Click Options – Solid Edge UI
Right-Click Options – OS Related
Tushar Suradkar
Join the Solid Edge User Group on Facebook: