It Looks Like Cheating, but Feels Oooh, Sooo Good: ST6 Synchronous Boolean
What is this, has Matt turned to writing bad country songs? Maybe a hedonist manifesto? No, it’s not any of that. It’s just a confession. Like most long-time history-based CAD users, I have an overactive conscience. I feel guilty when I take the easy way out. If your CAD program isn’t difficult to deal with, it must not be very good. Yeah, I’m the same guy who wrote the BrandX Bible, and I’ve been known to write history-based best practice rules like they were the 10 Commandments.
Letting go of all of this judgmentalism is difficult for history-based users who are so used to feeling guilty for just about anything that might constitute a crime against the unnecessarily harsh rules that your modeler inflicts on you. We have this need to feel that things can’t be right unless they were hard. You need to let go a little. Loosen up some, and get a little synchronous mojo.
Synchronous Boolean functions can be used in multi-body parts as well, but in this article I’m going to focus on the application in assemblies. Itwas added in ST6. I didn’t really pay much attention to it at first because it looked like an old SolidWorks feature.
The Boolean functions are of course Union, Subtract, Intersect, and Split. I didn’t think they were much of a big deal until I heard Bob Mileti going off about them somewhere. At first I said “Bah, excitable Italians! We had that in ‘Works last century.” And that much was true, but what I wasn’t getting was that this wasn’t really the same thing. This was all the chocolate with none of the calories. All of the sin, without any guilt. It’s a feature between parts in an assembly without any in-context relationships to maintain. And yes, in case you’re wondering, that is something to get excited about.
Let’s look at this motor assembly we’ve worked with a few times. There are a lot of opportunities here to fix things, if you’ve had a look at it. The engine cover part runs into the block casting in a couple of places, and gives us a chance to subtract one part from the other.
Here’s how you make the magic happen:
- In the assembly, right click on the part you want to add the feature to and select Edit
- On the Ribbon, go to Home > Solids > and under the Add Body icon, click the dropdown arrow and select Subtract
- Follow the Prompt Bar, and select the main body of the Engine Cover part, right click to accept to make this the part to subtract from (Target).
- Select the Block Casting part as the part to subtract (Tool), and right click. Done.
 Now you can (save the assembly first, and then ) open the Engine Cover part and edit it independent of everything else. So you can make a gap around the places where the Block Casting intersect.
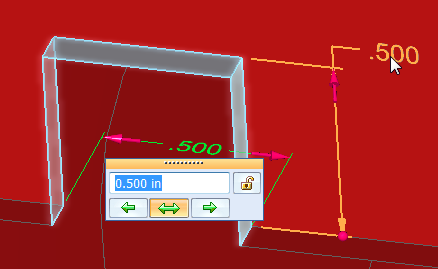
One thing you might ask is if you can use the steering wheel to change the offset distance. Well, no. Not that I know of. You can’t just pull on an arrow and make all 3 faces of this slot offset. That might be a good enhancement request, though.
You can make the offset type edit happen with dimensions, though. Notice the way the red arrows are situated, and remember that double arrows mean symmetric change, and single arrow means change just in that direction.
Now I can hear all you haters out there saying “yeah, but now you’ve got this dead feature that isn’t related to anything,” and I’ve got two responses to that:
- Yes, and isn’t it beautiful? I can make it related to something in the assembly when I need to make a change relative to something else, but I don’t have to “pay the taxes” on that (incur rebuild overhead) until I need it.
- Solid Edge still has all of those history-based features that work just like the old-fashioned ones in SolidWorks. We call them InterPart, and they work in a similar way with the external relations and only update with the assembly.
 So if you really do want a part feature driven by something in the assembly, you can always use the traditional InterPart (in-context) type history-based tools to do that. Or you can create guilt-free features, and use all of the power of Synchronous to decide the design intent at the time you make the change.
The ability to use either method is the real beauty here. One method is the way you are accustomed to working with features in order where you establish your design intent up front, and the other way is a more freeing way to work where you establish your design intent when you need it (no crystal ball or decoder ring needed). Geometry is geometry. You don’t get extra points for setting up complicated schemes that just make it more difficult than it needs to be.


Comments