How to use SEPartX.ocx in ASP.NET web application?
As we all know SEPartX.ocx is a control which can be used in stand alone application. But very few users are aware that SEPartX.ocx can also be used in web based application.
Follow these steps to use SEPartX.ocx control in an ASP.NET application.
1. Launch the Microsoft Visual Studio 2013 IDE using for e.g. Start -> All Programs -> Visual Studio 2013 -> Visual Studio 2013.
2. After starting Visual Studio create a new ASP.NET Web Application project in Visual Basic .NET using below steps.
a) On the “FILE” menu, click New, and then click Project.

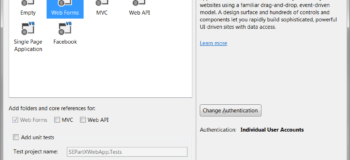
(b) On the “New ASP.NET Project” dialog, click “Web Forms” as shown below.

(c) On the “New Project” dialog, click/expand “Installed”, “Templates”, “Other Languages”, “Visual Basic”
(d) Click/Select “ASP.NET Web Forms Application” Template.
(e) Type the “SEPartXWebApp” Project Name string in the “Name:” field of the “New Project” dialog. This “SEPartXWebApp” will be automatically used and updated in the “Solution name:” field of the “New Project” dialog.
(f) Use the “Browse…” button in front of the “Location:” field of the “New Project” dialog and select the folder to store the Project for e.g. “E:SEPartXWebAppDemo”.
(g) Check the “Create directory for solution” checkbox (if not already checked) on the “New Project” dialog and click the “OK” button of the dialog.

3) You will now have an default Web Form “Default.aspx” displayed in the Microsoft Visual Studio IDE. The HTML version of the page will be automatically displayed to you, if not, click the “Source” button near the lower left corner of the Design window.
4) Replace all the existing code in the “Default.aspx” with the following code:
<%@ Page SmartNavigation=”true” Language=”vb” AutoEventWireup=”false” CodeBehind=”Default.aspx.vb” Inherits=”SEPartXWebApp.WebForm1″ %><!DOCTYPE HTML PUBLIC “-//W3C//DTD HTML 4.0 Transitional//EN”>
<html xmlns=”http://www.w3.org/1999/xhtml”>
<head id=”Head1″ runat=”server”>
<title>SEPartX Viewer Control</title>
</head>
<body>
<form id=”form1″ runat=”server”>
<div>
<asp:Label ID=”lblSEPartxView” runat=”server”></asp:Label>
</div>
</form>
</body>
</html>
5) Click On the “VIEW” menu, select “Code” OR use the keyboard shortcut (Ctrl+Alt+0) so that the “Default.aspx.vb” code window is displayed in the Microsoft Visual Studio IDE.
6) Replace all the existing code in the “Default.aspx.vb” with the following code.
Imports SystemPublic Class WebForm1
Inherits System.Web.UI.PageProtected Sub Page_Load(ByVal sender As Object, ByVal e As System.EventArgs) Handles Me.Load
‘ Store the filename to be displayed in the SEPartX ActiveX Control in strFilename variable
Dim strFilename As String = “C:\TestPartCP.par”Try
‘ Check if the filename exists. If true call the ViewInputFile procedure to display the
‘ file in the SEPartX ActiveX Control, else display appropriate error message to the user
‘ that the file doe not exist.
If My.Computer.FileSystem.FileExists(strFilename) = True Then
ViewInputFile(strFilename)
Else
MsgBox(“The file : ” & strFilename & ” does not exist. Please set a valid filename.”)
End IfCatch ex As Exception
‘do nothing
End Try
End SubPublic Sub ViewInputFile(ByVal strFilename As String)
‘ Create the OBJECT tag with the various attributes for the SEPartX ActiveX Control and
‘ set it to the label’s TEXT property i.e. lblSEPartxView.Text
lblSEPartxView.Text = ” <OBJECT id=’separtx’ style=’LEFT:10px; WIDTH:100%; TOP:10px; HEIGHT:100%’ ”
lblSEPartxView.Text += “align=’middle’ classid=’clsid:E03935A5-FBAD-11D0-8AC7-0800362FB302′ VIEWASTEXT >”
lblSEPartxView.Text += “<PARAM NAME=’BackColor’ VALUE=’14466712′>” ‘ set the default 3D fileype color
lblSEPartxView.Text += “<PARAM NAME=’BackColor2D’ VALUE=’12632256′>” ‘ set the default 2D fileype color
lblSEPartxView.Text += “<PARAM NAME=’BorderStyle’ VALUE=’0′>” ‘ set the border style
lblSEPartxView.Text += “<PARAM NAME=’PartFile’ VALUE='” & strFilename & “‘>” ‘ set the filename
lblSEPartxView.Text += “<PARAM NAME=’ViewType’ VALUE=’iso’>” ‘ set the view projection type
lblSEPartxView.Text += “<PARAM NAME=’MouseAction’ VALUE=’none’>” ‘ set the mouse dynamics operation
lblSEPartxView.Text += “<PARAM NAME=’ViewPerspective’ VALUE=’0′>” ‘ set the flag which indicates if file is to be displayed in perspective projection or not
lblSEPartxView.Text += “<PARAM NAME=’ShowToolbar’ VALUE=’1′>” ‘ set the flag indicating if the toolbar is displayed or not
lblSEPartxView.Text += “</OBJECT>”End Sub
End Class
7) Modify the value of the strFilename String variable to point to the valid file on your machine which you want view in the SEPartX ActiveX Control for e.g. as below:
Dim strFilename As String = “C:\TestPartCP.par“
8) Click On the “BUILD” menu, select “Build Solution” OR use the keyboard shortcut (F7) to build the “SEPartXWebApp” Project.
9) Click On the “DEBUG” menu, select “Start Debugging” OR use the keyboard shortcut (F5) to run/execute the “SEPartXWebApp” Project. This will display webpage with the SEPartX.ocx ActiveX control displaying the User specified file.
10) You can modify the value of the strFilename String variable if you want to view a different file in the SEPartX ActiveX Control.
If you could not use SEPartX.ocx in web based application then you can give a try now.