Design for 3D Printing

Parts is not always Parts. Most engineers and designers are familiar with certain manufacturing processes and the special considerations you have to use when designing parts for those processes. Like sheet metal, where bends stretch and thin out the material. Or plastic parts that require draft to remove the part from the mold and shrink once they’re out.
3D printing is a manufacturing process just like any other. There are several variations on what we have come to know generically as “3D print”, such as SLS, SLA, Fused Deposition, you have processes that self-support and require cleanup and those that don’t. Before you buy a machine or even send a part out to be prototyped, you have to be sure to understand the advantages and limitations of the specific process and material you are getting into. If you listen too much to the overly-enthusiastic media coverage you read about this process, they would have you believe that anything you can design in CAD you can just send to your printer and Voila! it comes out just like you imagined!
There are liquid, powder, and continuous thread materials, and materials deposited directly, fused with heat, UV, or laser sintered. Some materials are better at color, fine texture, mechanical strength, water properties, and so on. Some processes leave a lot of extra material that has to somehow be removed, and some require you to build supports for undercut areas of the part.
In some cases, the 3D printer’s software will do some pretty trick edits for you, such as coring out big solid chunks and replacing it with a lattice, or adding support under unsupported areas. Of course you cannot core out hollow areas for any of the powder or liquid processes when the enclosed area does not have a way to remove the excess media. In cases like this, you would have to change the design slightly to accommodate the process, or maybe drill a hole in the part to get the excess powder or fluid out.
Just as an example, let’s say that you wanted to 3D print a pair of human legs on a system that puts down a layer of powder and then laser sinters the powder. When you are done, you will either have a leg that is solid, which wastes a lot of very expensive material, or you have a wall thickness around the outer surface of the skin with a lot of un-sintered powder inside that you can’t get out.
The automatic lattice works great for systems that laydown a molten bead of material or uses an ink-jet type process to build up a 3D model.

Also, you have to consider the orientation of your model with respect to the machine’s platen. Say you want to print a scaled down model of a fossil dinosaur skull. The lowest point of the skull will be the jaw, but the top of the skull would have to be printed with nothing to hold it up. Some systems solve this by printing a support system from a water soluble material that can be easily removed from the finished model.

And there are other things to worry about. Material thickness is not a concern in the digital world, but when you enter reality, you’d better make sure you’ve got it right. Surfaced models have to be water tight, or the computer doesn’t know which side to make solid. It’s easy to lose track of scale in the computer, and each printer has a max footprint and a minimum tolerance that they can handle.
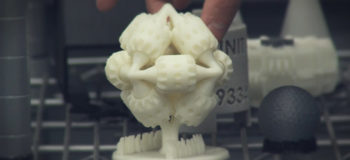
On the other hand, there are a lot of things you can do with 3d print techniques that you can’t do with normal manufacturing methods. For example, worrying about undercuts and draft on plastic parts becomes a thing of the past. You don’t have to worry about constant thickness or flattenability for sheet metal parts created in rapid prototype. Undercuts or sharp inside corners on machined parts are no longer such a headache. Threads are an issue in most type of manufacturing, but in 3D print, they are easy as pie. Also, and maybe most unbelievably, you can create assemblies of parts in rapid prototyping. You can make stuff that’s impossible to assemble any other way. This gearbox shown below is one of the examples that printer vendors often create and hand out as a sample of the amazing stuff you can do.

Plus, you can go from point cloud data to a print, which means that you’re not limited to printing stuff that you can make in CAD. Now you are able to use data from 3D graphic art software like 3DSmax, Mudbox, modo, or many other digital sculpting packages.
So just remember that 3D print isn’t magic, it’s a process like anything else, and it has requirements to get good results. Also remember that when you go from a 3D print to another manufacturing process, you may have to undo your prototype adjustments and apply another set of adjustments for the new process.
There are more and more printers out there, so you are going to be seeing more and more data to go along with those printers.