A QuickStart Guide to Using the Mouse

Ability to use the mouse interactively makes your Solid Edge apps appear cool. By facilitating object picking followed by executing the business logic also frees you from using the ugly workaround of combing through a select set to check if the right object type was picked.
This post is a QuickStart Guide on integrating the mouse in your Solid Edge apps and focuses on the most common steps accompanied with easy-to-understand code snippets. Lets begin with the declarations:
1. Foremost is one for the Solid Edge Application:
Dim seApp As SolidEdgeFramework.Application = Nothing
2. And two more for the mouse
Dim seCommand As SolidEdgeFramework.Command = Nothing

Dim seMouse As SolidEdgeFramework.Mouse = Nothing
Say you want to filter out Dimensions when user is moving the mouse in a Draft document.
Here’s the sequence of function calls that follow:
seApp = System.Runtime.InterServices.Marshal.GetActiveObject(“SolidEdge.Application”)
seCommand = seApp.CreateCommand(SolidEdgeConstants.seCmdFlag.seNoDeactivate)seCommand.Start()
seMouse = seCommand.MouseseMouse.LocateMode = 1
When specifying the LocateMode,
1 implies simple click locate
2 implies quick pick locate which is multi-select dialog where applicable
3 implies no locate which is used to receive mouse events without performing any locate.
seMouse.EnabledMove = True

seMouse.AddToLocateFilter(SolidEdgeConstants.seLocateFilterConstants.seLocateDrivingDimension)
The seLocateFilterConstants enumerates about 70 different Solid Edge objects that you can filter out in various environments like Part, Draft, Sheetmetal and Assembly.
Further, it is also highly recommended that you display a message in the Solid Edge prompt bar. For this the StausBar property can be used:
seApp.StatusBar = “Select a Driving Dimension”

This helps the user know that your app or Solid Edge who seem to be doing nothing are actually waiting for a dimension to be selected using the mouse.
The most important expectation from enabling and setting up the mouse command is to have a specific type of object filtered out when clicked. This is accomplished using the MouseClick event in conjunction with AddHandler which uses the address of a function you write.
The mouse uses a Delegate Event Model in which you have the freedom to handle specific event as per your requirement. This involves using a hidden class which is suffixed with _Event, in this case – MouseClick
AddHandler seMouse.MouseClick, AddressOf mouse_MouseClick
This method should have a signature compatible with the delegate DISEMouseEvents_MouseClick EventHandler
which looks like:
Private Sub mouse_MouseClick(ByVal sButton As Short, ByVal sShift As Short, ByVal dX As Double, ByVal dY As Double, ByVal dZ As Double, ByVal pWindowDispatch As Object, ByVal lKeyPointType As Integer, ByVal pGraphicDispatch As Object)

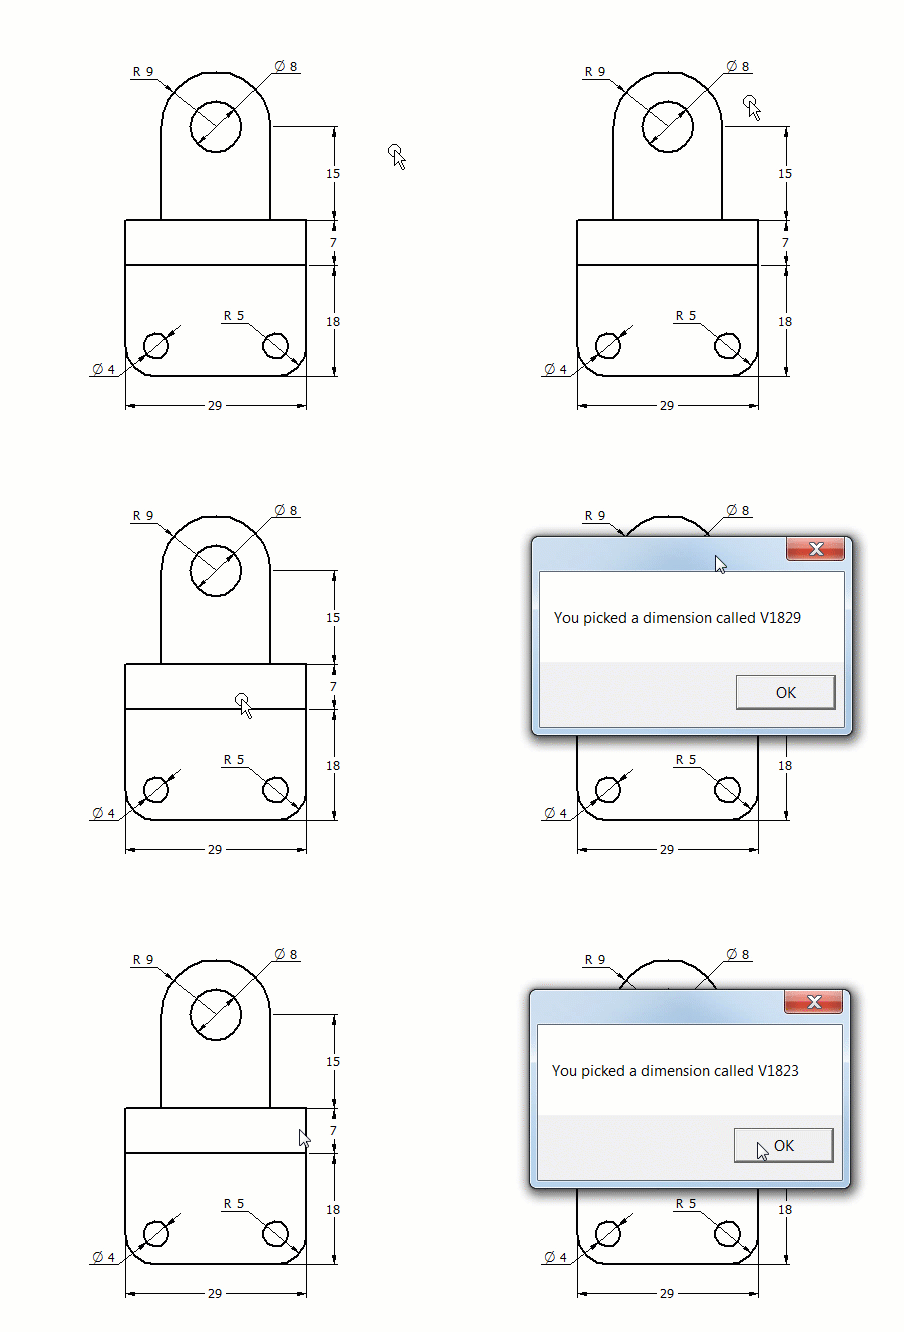
    System.Windows.Forms.MessageBox.Show(“You picked a dimension called ” & pGraphicDispatch.DisplayName.ToString)

End Sub
The pGraphicDispatch is the Solid Edge object of interest and in the present case is a Dimension, specifically a driving dimension which was picked by the user. The DisplayName for the picked Dimension is displayed as an example.

Also, it is a good practice to include a routine to carry out tasks when the mouse command has terminated. This happens when the user has selected the Select tool on the ribbon or in the radial menu or by simply pressing the <ESC> key to cancel the selection. In either case, you may want to perform some clean up as below:
AddHandler seCommand.Terminate, AddressOf Mouse_TerminatePrivate Sub Mouse_Terminate()
Marshal.ReleaseComObject(seCommand)
Marshal.ReleaseComObject(seMouse)
End Sub
With this I have touched upon the bare bones needed to integrate the mouse into a Solid Edge App. But by no means is this a complete reference. Treat it only as a QuickStart guide.
A full blown application that demonstrates all possible methods and properties of the mouse object is available in the CustomMouseEvents folder where Solid Edge is installed. This application is an ideal place to explore further. Happy clicking !!


