Automation in the Draft Environment: Layer Handling
For those who have done some LISP programming for old generation CAD programs, coding was fun. LISP punched lots of power in few keywords or lines. Moreover the commands could be issued to the CAD program in the same way as done interactively.
The downside was the cryptic syntax and un-intuitive bug fixing methods where the user relied more on his gut feeling to determine if a line of code would work. The humble Notepad was a programmer’s most trusted friend.
The advent of a new wave of 3D CAD programs in late 90’s turned a new leaf as also new programming techniques evolved viz. .Net which came with development kits (SDK) equipped with color-coded syntax, modern debugging tools, etc. One such member of the .Net family is VB.Net
The most appealing feature of VB.Net is the natural language syntax and this article shows how to build a layer purging utility using VB.Net in the Solid Edge Draft environment. The dictionary meaning of Purge is to get rid of unwanted stuff. Lets understand this in the context of layers.
Create a Draft document with several layers  created using the New Layer button
 Note that layer icons with a red mark
  have objects drawn on them – hence cannot be deleted.
Layer with a pencil mark  is the active layer and also cannot be deleted.
The remaining layers which are empty are redundant and can be deleted. I have not been able to determine how much of an overhead these empty layers are on the file size, but getting rid of them has been a popular idea over years and in a built-in command in 2D-only CAD programs, most notably AutoCAD.
 Switch to Visual Studio if it is already open and create a new Console Application since this program needs no user interaction.
Since this macro would run in just the Draft environment, adding references to just the SolidEdgeFrameWork, SolidEdgeFrameWorkSupport, Draft and Constants libraries would suffice.
Refer some previous articles in the Automation series to see how to add Solid Edge references to a project in Visual Studio.
Your few initial lines of code would look like these:
Imports System.Runtime.InteropServicesModule Module1
Sub Main()
Dim oApp As SolidEdgeFramework.Application = Marshal.GetActiveObject(“SolidEdge.Application”)Dim oDoc As SolidEdgeDraft.DraftDocument = oApp.ActiveDocument
End SubEnd Module
To these, add the Layers object as below:

Note that the layers being addressed are only the ones in the currently active sheet unlike in AutoCAD where all layers belong to the drawing document.
This is followed by running a For Each loop which goes door-to-door each layer and checks if it is empty and simply deletes it. So simple and in a natural language syntax that needs no further explanation:
Sub Main()
Dim oApp As SolidEdgeFramework.Application = Marshal.GetActiveObject(“SolidEdge.Application”)Dim oDoc As SolidEdgeDraft.DraftDocument = oApp.ActiveDocument
Dim oLayers As SolidEdgeFramework.Layers = oDoc.ActiveSheet.Layers
For Each oLayer As SolidEdgeFramework.Layer In oLayers
If oLayer.IsEmpty Then
oLayer.Delete()
End If
Next
End Sub
The line for deleting the layer can as well be written:

Such natural language syntax has lured several generations of casual users of CAD and Office program equally into taking up VB programming.
‘Play’ the program by pressing F5 or the Run (Start Debugging)  icon. Such features fade the distinction between a sophisticated programming tool and your music player. Programming has never been so easy and fun. Don’t you agree ?
The program would run into an error for it just checks if the layer is empty and not if the layer is active. If you too have created the layers casually as shown in image earlier in the article, Layer5 is the active layer but is not empty.
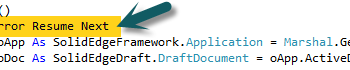
To rectify. either create a sketch on this layer or add the following line at the beginning of the code:

This sure is a quick-and-dirty way of fixing the code but a useful feature of VB is you want to quickly get up-and-running with your little macro.
This leaves plenty of room to explore more on the VB and the Solid Edge fronts and make the utility more robust and less error prone.
For now, build the macro and the exe will be lying in the BinDebug folder where you saved the project. Share it with your colleagues and flaunt your programming skills for you just added a new command to Solid Edge !
~ Tushar Suradkar


Comments