3D Printing is as easy as…Printing
If you like to tinker with stuff and build small projects, chances are you’ve needed some sort of custom enclosure. My most recent endeavor is to build a remote control sailboat. The boat has to be wireless, offer control over steering and sail trimming, and of course built from scratch. Being an Arduino guru, I’ve just built the transmitter and receiver but putting my work of art into a simple black box will not be acceptable. To showcase my design, I just built a custom case and printed it on one of those fancy new 3D printers. We have a printer on loan from BEETHEFIRST https://beeverycreative.com, and I thought I would share my first printing experience in 3 steps:
Step 1: model what you want
My case had to be a sleek hand-held unit with a knob for steering, have push buttons to trim the main sail in or out, and hold the circuit board and battery. My first step was to model the circuit board, switches and battery so I could use that as a guide to create the case. Once this “super part” was modeled I started creating an overall case, I used protrusions, surfaces, cutouts, blending, and a thin-wall to get a sleek shape that encased the circuit board. With the case and circuit board in an assembly, I could check for interferences and adjust the case as needed.

I then divided the case part into the top and bottom so I could add different features in the interior to hold the guts. To ensure my standoffs and such matched the circuit board exactly; I added circuit board to both the top and bottom as an inter-part copy. This gave me faces to design to. Any changes to the placement of the circuit board would be updated in the inter-part copy, hence interior features would update, and since the top and bottom were part copies of the case part, any changes to the overall shape would be reflected in them as well.

One benefit of 3D printing is they don’t require drafted faces, so you are free from having to model them. I also didn’t have to account for any shrinkage in the final part or sink issues around mounting bosses or stiffening ribs. I also added a lip and groove in the mating surfaces of the top and bottom to keep the parts from sliding around. A small gap was added between the lip and groove to avoid any snap fit issues.
Step 2: Print the part
To print, I only had to save my top and bottom to an STL file then open them in the BEETHEFIRST software. The software is pretty smart and auto orients the part to fit the printer platform, and adds the supports and raft automatically. The software lets you scale your part and has a few other options, but I basically took the defaults out of the box.

My first printed part had some minor issues—by default the fill density is set low to reduce material but left hollow spots in my screw mounting bosses—they snapped off on first usage. For my second print, I increased the density to 100% and the problem went away. I also made some design changes, namely connecting mounting screw bosses and ribs. Connecting these features ensued both would be more rigid, and they are. The printer was able to capture all the design detail from the small rounds in the interior features to the mating lip and groove. For a home/professional 3D printer, I was pleased by the results. The part shown took 4 hours to print, but the bulk of the time was spent laying down the supports (not shown). The surface quality isn’t “glass smooth” but for less than a dollar I can’t complain.

Step 3 clean up your room.
Given my parts swoopy shape, the printer had to create a bunch of supports to preserve the shape during printing. This meant some scraping and sanding to remove the flash-like residue. Not a big deal and nothing some 220 grit wet sanding couldn’t fix. I spend around 15 min sanding the outside of each part. I’ll probably not go as far as filling holes with body filler and painting as I want to preserve my home-made look—but a smooth finish would be nice. After the sanding was complete I mounted my circuit board and switches.

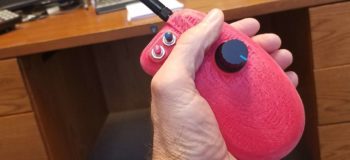
Check out the completed transmitter control for my sailboat. Everything fit perfectly and the top mates exactly with the bottom. I’ll have to say for a few hours of work I have a very professional and custom case for my remote. I was amazed at how much time I didn’t have to spend on the whole process. My advice to others is go for gusto and design what you want. Get the desired shape you want and modeling all the features such as holes, mounting bosses, mating lip and groove, etc. It’s well worth it in the long run to have everything fit perfectly.