Assembly PathFinder Part 2: Tools and Techniques

In the previous article, we dealt mostly with settings and symbols that you use with the PathFinder. Here we will look at the available tools and techniques that you can use to manage  and edit the parts in your assembly.
The RMB Menu
The first item is the RMB menu. The image to the right was taken from the top level RMB (right clicking on the name of the assembly at the top of the PathFinder). Collapse can also be achieved by double clicking the name of the assembly. Double clicking a part in the PathFinder edits it in place.
Show Only doesn’t really make any sense at the top level, it acts as a duplicate of Show All. But Show Only is highly useful when used with parts, subassemblies, or selections of parts within the assembly.
Show/Hide Component is one that took me a while to appreciate, shown below:

This enables you to control items within the component without opening the component directly or even expanding it in the PathFinder.
Scroll To and Zoom To are complimentary tools. Scroll finds a part in the PathFinder from the graphics window, and Zoom does the reverse. Both are very handy.
 The More menu item brings up some of Art Patrick’s favorite tools: the mini file management ditties – Replace Part… These were added a couple of releases ago and really cover the range of what you need to do with files in the assembly when adding or swapping out parts. If you haven’t used these, have a look through them, and I’m sure you’ll find reason to use them soon.
Activation in Solid Edge is similar to Lightweight/Resolved in another package I’m familiar with. It took me a little while to figure that out, so if you came from the same place, well, now you know.
The Group tool is essentially a custom folder. You can put it where you want it and put what you want into it. It’s particularly useful for long lists of hardware that might otherwise clutter your nice, neatly organized PathFinder.
 Simplified/Adjustable menu option brings up a sub-menu that allows you to use simplified versions of parts and assemblies to reduce the load on your system caused by large assemblies. Setting up simplified parts and subassemblies is a separate process, and something to talk about another time.
Adjustable parts update to reflect moved components. They will not flex as you move other parts, but will update as soon as the move is completed. Parts that would fall into this category would be Ujoint boots, wires, hoses, springs. This blog has addressed adjustable parts and adjustable assemblies in previous articles, which you may want to check out if you are interested in those topics.
Of the remaining RMB menu items, the Create Drawing and File Properties are the ones that I use the most. It’s very convenient to be able to access tools like this without the need to open the part file itself.
General PathFinder Operations
I’ve heard that in general, it’s best to click on the PathFinder icon rather than the name of the part when performing operations on parts in the assembly PathFinder. This may have to do with transparency settings and video driver stability, and it’s not necessarily something that can be pointed to, it’s just that things tend to work better when you work from icons rather than text.
One of the things in particular that you might do is to reorder the parts in the PathFinder to get them organized. Remember you can create and use Groups to group parts. Groups and reordering can be used together. While you cannot reorder multiple parts at one time, you can put mutliple parts into a group, and reorder the group, then dissolve (ungroup) the group.
 You can’t transfer parts between assemblies using drag-and-drop operations in the PathFinder, but you can use the Transfer and Disperse functions in the Home>Modify area.
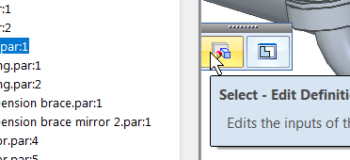
Also, you might find it useful that when you select a part from the PathFinder, the Edit Definition and Edit in Place tools become available right next to the PathFinder.

Of course F2 (or RMB menu) is used to rename items in the PathFinder. Parts can be renamed in this way, but it should be noted that the file is not renamed, just the name of the part in the PathFinder.


Comments