NX | Tips and Tricks | Revising a Design

Our latest NX™ software Tips and Tricks video discusses how you can revise your designs when you are working with Teamcenter inside of NX.
Data items in Teamcenter are called objects. An object describes a part, design, document or other entity stored in your system. We can create new revisions of existing objects using NX.
Where to start when revising a design
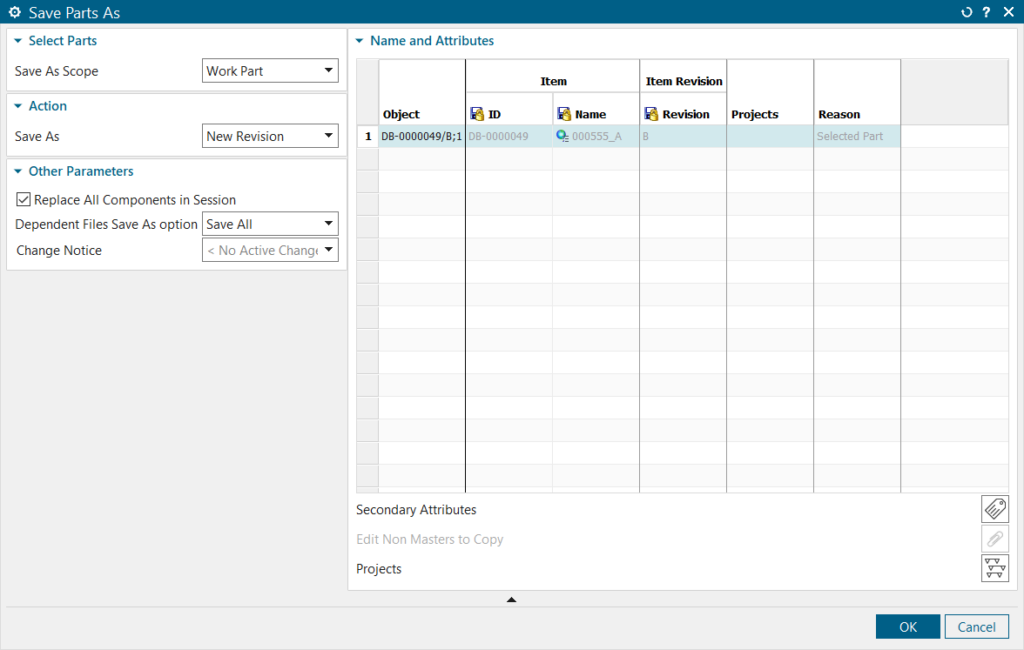
To begin revising our design, we want to first start with properly saving our part. To do this, we can navigate to the “Save as” prompt, found under the “File” tab. With this selected, a large dialog window will open, containing important customizable parameters and settings for saving our part, design, or document. Among these customizable parameters, we have the ability to choose if our file is saved as a new item or revision, control the overall scope of our save, and opt if we would like to save dependent files. Lets take a deeper dive into what some of these parameters are, and what each option controls for the output of our design.
Item vs. Revision
In product lifecycle management (PLM), keeping track of data changes is crucial. In Teamcenter, two key concepts make this happen: items and revisions. Items hold all the important stuff like parts and documents, while revisions track changes to these items over time. Understanding these basics is key to making PLM work smoothly and keeping everyone on the same page.
In Teamcenter, items are fundamental units for data management. They cover parts, assemblies, documents, or any relevant data. Each item holds crucial details about its identity, properties, relationships, and attachments. These attachments range from CAD models to manufacturing instructions. Items are essentially the central hub for all relevant data in Teamcenter, ensuring a unified source of truth. They represent the core components of managed products or projects, making it easier to track and retrieve essential information efficiently.

Revisions in Teamcenter help to trace the evolution of items over time, marking specific versions or iterations within the system. They capture the state of an item at various points in its lifecycle, documenting changes such as design modifications or specification updates. With each change, new revisions are created to record these alterations while preserving the item’s historical journey.
Revisions are distinguished by a revision ID and can use different naming schemes to differentiate and track among different iterations. They maintain a direct link to their parent items, facilitating smooth navigation and enabling a thorough review of an item’s entire revision history.
This structured approach promotes transparency and accountability throughout the product lifecycle management process, encouraging effective collaboration and decision-making.
Key parameters to check
In addition to the item vs. revision decision, there are a few other important parameters, including the ability to replace all components in your session, save dependent files, and the option to include a change notice.
In Teamcenter, when you perform a “Save As” to create a new revision of an item, the option to “replace all components in session” allows you to replace all instances of referenced components within the assembly with their latest revisions. When you choose to opt in, Teamcenter will update the assembly to include the latest revisions of all its components, ensuring that the new revision reflects the latest versions of each part or sub-assembly.
The “Dependent Files Save As option” allows you to control how dependent files are handled when the “Save As” operation is performed. Dependent files are files that are associated with the main item being saved, such as drawings, documents, and other related files. The choice between including or excluding files depends on your specific requirements. Including dependent files ensures that all related data is preserved and accessible with the new revision, while excluding them can be be useful for creating simplified versions or reducing storage space.
And the last parameter on the left-hand side is an option to include change notices with your new revision. Change notices are used to formally document and manage changes to product data, processes, and other aspects of the product lifecycle. Overall, they play a crucial role in managing changes effectively, ensuring that changes are properly documented, reviewed, approved, and implemented in a controlled manner.
Other areas to keep in mind
Along with the primary settings along the left-side, there are a few additional options to explore in the bottom-right of the “Save As” window. Here, we can explore secondary attributes, edit non-masters to copy, and choose if our new revision is included in any existing projects we have already been working on.
Specifically, in this Tips and Tricks video we looked into the “Edit Non-Masters to Copy” option. In complex assemblies, it’s common to have multiple instances of the same component, each representing different revisions or versions. By selecting this option, we can make modifications to non-master components without altering the original master data. This functionality is particularly useful for making temporary adjustments or conducting analyses within specific contexts without impacting the overall design integrity.


