How to Build a Pergola with Catchbook

Pergolas come in many shapes and sizes, but one thing you’ll notice is that they certainly don’t come cheap! A pergola can run you anywhere from $1,000 up to as much as $6,000 depending on the type of material used and the size of the structure. With a little bit of elbow grease, a couple days’ work, and some helpful instructions courtesy of the internet, you can build your own for a fraction of the cost.
Today, we’ll show you how to use Catchbook to build your own pergola custom made to fit your home. Please keep in mind this project is complex, definitely not for the faint of heart when it comes to DIY and getting your hands dirty. The cost is also relatively high compared to other DIY projects, despite being less than the store-bought versions on the market. However, the transformation your yard will undergo is well worth the initial cost and effort!
A pergola acts as a focal point for your yard, creating a beautiful space under which to gather and relax, or if smaller in size, a pergola can be a covered archway for a door, garage, or even garden path. This architectural element from the Italian Renaissance era adds visual interest and structural style to any home or garden.
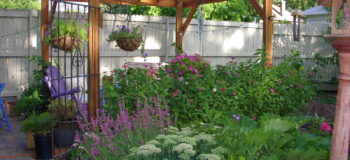
You can leave the rafters plain for a minimalist look or add climbing vines for an added touch of greenery to provide shade during those hot summer months. Bear in mind that if you do opt for greenery, it typically requires a lot of upkeep and regular trimming. Great for gardeners! Not so great for anyone who, like me, lacks a green thumb. ![]()

Let’s get started. For this project, it will definitely help if you have some prior experience with building things from scratch. You will, of course, need Catchbook to sketch out the plans for your design, as well as to capture any dimensions and measurements you need. Catchbook makes it easy to get quick, accurate sketches down and update your design plans on the fly as things change. Say you decide you want your pergola to cover a bit larger of an area than you had originally intended… no problem! Simply select the geometry you want to move and tap and drag to adjust.
You can even import a picture of your yard to use as the background of your sketch, so you can see what your finished pergola will look like in its natural environment. Be sure to set the image as a trace image. This will pin your image in place and increase the transparency, so you can easily draw over it.
You will also need some gravel, fast-drying cement, lag bolts, an assortment of tools, a post hole digger, galvanized deck screws, and pressure-treated boards. The size of the boards will depend on how large you want the final design to be, and you can easily modify the size in Catchbook as stated earlier. Pressure treated wood is wood that has been treated with chemical preservatives to protect from termites and other insects as well as decay.
Planning Your Pergola Project
To start, select the area in which you would like to build your pergola. The site should be flat and level; this is VERY important to maintain the structural integrity of the pergola. If the site is not flat and level, however, you can grade the area with hard tamping and soil removal. The example shown here is built on soil, but you could build a pergola on stone or cement as well, such as over a patio.

With your site chosen, you are ready to begin, right? Well, almost! There is one last step, and it may be the most important since it concerns safety. Call your local gas and utilities companies to survey the land to ensure you won’t run into any gas or power lines. Check with your city for required permits and building codes you must follow.
Now is the time to mockup a plan. Measure everything out, and use Catchbook on your smartphone or tablet to quickly sketch out your yard (or wherever you plan to build the pergola). Create and edit dimensions to ensure your drawing is to scale (Note: Catchbook Drawing is required for this!) Once that is done, you can start sketching a design plan for the pergola itself. Draw different views if you would like to see your design from the top, sides, and front. Once your plans are in place and you’re satisfied, it’s time to get to work.

First, dig post holes to set up the basic frame of the pergola.
Use your Catchbook sketch and recorded measurements to mark where each hole should go. You can verify that your measurements are correct by measuring diagonally from corner to corner. The measurements should both be the same, and if not, you will have to reposition the holes and try again.
Tips for Determining Hole Size:
Your post holes should never be less than 10 inches (25 cm) in diameter, so as to accommodate a standard 4 x 4 pole. For larger poles, the hole should be even wider. In terms of depth, you will want the hole to be about as deep as ¼ of the length of the pole itself. The depth ensures the poles will stay securely in the ground. No one wants their pergola to come crashing down in particularly high winds! City building codes usually contain this kind information and recommended dimensions for the area.
Second, you will need to set the posts.
Insert the posts into the holes, taking care to position them so as to be level and plumb. You will want to use a 3-foot level or longer toSecure the posts in place with either stakes or bracing. Prepare the fast-drying cement according to the package instructions, and fill each hole to within an inch (2.5 cm) from the top to allow for expansion with temperature changes. Let set for 24-48 hours.

Third, prepare the joists and rafters for installation.
Use the time you wait for the cement to fully harden to get the joists and rafters ready. Joists attach to the posts and create a frame to support the rafters, while rafters run horizontally and vertically across the top of the pergola to form a covering. You can buy wood precut to the dimensions you need –usually any home improvement store will cut the boards for you when you purchase them—or you can do this step yourself.

Once the boards are assembled, you have the option to cut decorative ends on the joists and rafters. You can really get creative here to imbue them with a bit of your personal taste and style. Choose a design and sketch it up in Catchbook. Export the finished design as an image (Catchbook Publishing is required!) and send it via email to print. Cut out the design and use the paper as a guide to trace the design onto each board. Then, using a jigsaw, cut the edge of each board. Sand smooth.
With your joists and rafters ready to go, it’s time to begin the next step: installation.
Fourth, install the joists and rafters to finish building your pergola.
Before you begin the installation process, it’s a good idea to double check that each post is the same height. Measure from the ground up, and use a level across the top. Once that is done, start by installing the joists first. Remember, these support the rafters.
 Inner and outer joists can be used for extra support for larger pergola structures.
Joists will be mounted to all 4 posts to form a frame. Larger structures may require extra support, so an inner and outer beam may be necessary. Position each joist using the level and secure in place with clamps. These will hold the beams in position while you drill holes and attach with screws. Measure the overhang on each end of the joist to ensure it is even. Attach each joist with two 4 inch (10 cm) screws per post and then use 3 inch (7.6 cm) bolts to permanently secure in place
Lay the rafters across the joists so that they are evenly spaced about 1 foot (30.5 cm) apart. Measure the overhang of each rafter prior to securing, taking care to make sure they are all even. Then fasten each in place with two 5 inch (12.7 cm) galvanized deck screws.
Now you can add a nice garden bench, an outdoor table, even a fire pit. Decorate your pergola with climbing vines or other greenery, or even some flowy curtains for warmer months.
