Mastering Designcenter X NX Essentials: How to insert a part into an assembly like a pro

Ever wondered why your part keeps sneaking in as a body instead of a component? Or why drag-and-drop feels like a distant dream? Don’t worry—you’re about to master the art of inserting parts into assemblies with confidence and speed using Designcenter X NX Essentials, or the web editing tools found in all Designcenter X NX tiers.
Because everything runs in the browser, there’s nothing extra to install—and updates arrive automatically as part of supported NX releases.
Before you begin
Before beginning, make sure a few basics are covered:
- Your assembly is open.
- The Assembly tab is active. > Trust us—this is critical. If you’re on the Part tab, things can go wrong quickly.
Step 1: Open the place component command
Click Place Component on the toolbar.
Pro tip: The dialog opens to the Current Project tab by default, which is usually your fastest path to relevant components. Because it’s browser‑based, the component library loads instantly without blocking your NX session.
Step 2: Access the component library
Navigate to the Library tab or use the side tabs to browse the available catalogs.
- Current Project → fastest access to parts already tied to your work
- Library → broader browsing across standard components
Want speed? Stick with Current Project unless you know you need something new.
Step 3: Select your component
Locate your part—bolt, washer, bracket, or whatever your heart desires—and click to select it.
Pro tip: Drag‑and‑drop isn’t supported yet. For now, click is king.
Step 4: Position like a boss
Use the Place Component dialog to fine‑tune placement:
- Rotate with axis controls or shortcuts (Alt + Z / X / Y)
- Reset orientation if things look funky
- Zoom and pan for accuracy
- Click to place using origins, faces, or edges
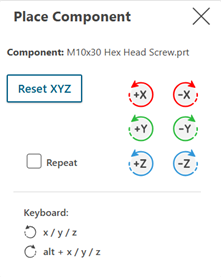
Placement is auto‑accepted on click, so aim carefully.
Step 5: Repeat as needed
Need multiple instances of the same component?
- Click Repeat to place additional copies
Future dream: Ctrl + drag to copy—not here yet, but we’re hopeful.
Step 6: Fine-tune orientation
Once placed, adjust orientation as needed:
- Snap when it works
- Rotate manually when it doesn’t
- Use the steering wheel or assembly constraints for precision
If snapping feels unreliable, don’t fight it—manual control gives you consistency.
Step 7: Wrap it up
When you’re done placing components:
- Exit the command
- Or keep the momentum going and select another part
Thanks to the browser‑based design, switching parts and libraries feel quick and responsive.
Bottom Line
With the right workflow you can insert components cleanly and predictably using Designcenter X NX Essentials or web editing. No surprises. No accidental bodies. Just fast, browser‑based component placement.
Learn more about Designcenter X NX Essentials
Try Designcenter X NX Essentials today.
Explore the future of design with a flexible, browser-based solution that moves as fast as your ideas.
Learn more about Designcenter
Designcenter X NX is the leading, next-generation mechanical engineering solution that delivers advanced 3D design capabilities to the Designcenter portfolio. Seamlessly integrating across disciplines, including electrical and electronic systems, to enable more iterations and utilize the latest manufacturing and simulation methods to ensure you build the richest, most comprehensive digital twin of your product and ultimately deliver the best designs to market faster.