The Process of 3D Printing
If you haven’t seen my previous posts on this topic, they are here, here, and here.
Now that I have some experience with 3D Printing, I can lay out the process in more detail. First, let’s talk about some basic design considerations:
- Abrupt changes in geometry should be avoided – If you read my previous post on the insulin pump holder, you saw the bottom of the holder had a very rough surface because the design went quickly from vertical walls to the horizontal floor. I could have avoided that by making the floor area smaller and chamfering the internal wall segments. I could have also split the design up into two sections and glued them together after printing.
- Orientation of model to build space is important – Again referencing the insulin pump holder, I had to print it upside down so the clip could be printed. If I had oriented it the other way, the clip would not have any support to hold it in place during the printing process.
- Support structure may be necessary – Even with the best orientation, it may be necessary to build a support structure. The software can do this automatically, or you can design your own.
- Layer thickness – Follow your manufacturer’s guidelines, but thicker layers will take less time (and look rougher) while thinner layers will take more time (but look better). There are min/max limits for layer thickness, depending on the machine, nozzle size, and material being extruded.
- Machine setup is important – The only times I had trouble with getting my printed objects to stay attached to the bed was when the bed was not level. Run the bed leveling routine before each print, and that headache is gone.
- Elmer’s Stick Glue (purple) – It does a great job of helping the first layer of ABS to stick to the platen.
The Skirt, the Brim, and the Raft

The Process
The general process I use to create 3D prints is this:
- Design the object in Solid Edge
- Save the file as *.stl
- Open the file in Cura (or whatever slicing engine you choose)
- Orient the model in the build space (Cura also has tools for scaling and positioning)
- Set the parameters (layer thickness, material type, skirt/brim/raft)
- Send the G-code file to the printer
- Once printed, peel the design off the platen (a harder task than it appears!)
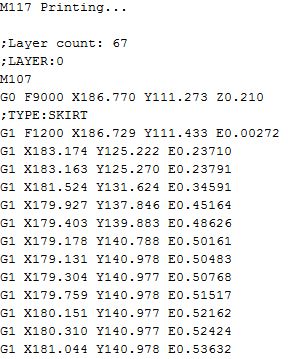
A sample of auto-created G-code:

If you have spent any time with CNC machines, the G-code file is very readable. A typical file has X/Y/Z motion, plus F for feedrates, and E for extrusion speed. There are some unique G-codes for warming the bed and the extruder, but it really is very straightforward.