The Best Table in the House
Solid Edge Draft environment has a dedicated group on the Home tab of the ribbon bar to host the various Table objects that can be created.
• Parts List.
• Bend Table.
• Family of Parts Table.
• Table.
• Hole Table.
• Block Table.
Of these, except the vanilla Table all other derive their data from various objects on the draft sheet such as views or blocks. The Table command stands out in that it allows creation of a user-defined table with a riot of formatting options.
Select Table form the Parts List drop button in the Table group of the ribbon bar. An overwhelmingly large dialog with several tabs greets you. The sheer number of tabs gives an indication of the wide range of options that are available for data entry and formatting. Prepare yourself to marvel at the many things you can do with the table even without the detailed properties dialog. Ignore all tabs for now and hit OK.

A small table outline attaches to the cursor. Click on the sheet to place it.
Apparently, there’s nothing much to the table except the default column headers 1 and 2. Also by default two rows are available for entering data. The gems reveal as you delve deeper.
Grayish circular handles appear near the column headers which you can drag to resize the column width and that of the table itself.

Double click the table and it enters a neat looking spreadsheet style data entry mode.
Now you can click each of the column headers and change them. Also you will be able to click in the empty data cells and enter some text.
A little floating toolbar also promptly appears in this mode with lists and buttons for changing the font type and size, various text formatting options like Bold, Italics, Underline and also the horizontal alignment. An alternative way of placing the Table on invoking the Table command is to quickly check ON the box for ‘Fill the end of the table with blank rows’ on the General tab and then place the Table on the sheet.

This option still limits the number of rows for data entry but gives a good preview of the space that the table will occupy on the sheet.
Click the Properties button on the Command Bar to start exploring the innumerable options for formatting the table.
On the General tab is another setting to specify the height of the table in terms of the number of rows or the absolute value in drawing units.
Skip to the Title tab and note the title text you added on the table directly by double-clicking earlier is now listed. The most amazing feature is having multiple lines of titles for the table.
The Title tab has buttons to add and delete titles to the table. This is not same as a lengthy title split over multiple lines due to wrapping of text. Each title is placed on its own row in the Table.
The Title can be placed either at the top (header) or bottom (footer) of the table.

Similarly, column headers can also have multiple rows. Enter the Columns tab and you are presented a mind-boggling number of settings to tweak that only the Solid Edge Options dialog can rival. Select a column from the list on the left and click the Number of rows spinner to add more rows to the column header section.

Click OK in the Table Properties dialog and double-click the Table on the sheet. Note the extra row added for the column. Drag across the two cells to select them in gray and click the Merge Cells which is the last tool on the floating toolbar.
Similarly a cell can be merged with another cell vertically above it using either the check boxes in the Table Properties dialog or directly from the context toolbar on the sheet.

Still in the Columns tab, click the button for Format Cells… which brings up another dialog to change the alignment and orientation. the most prominent setting is the vertical orientation.
The tab of utmost interest would be the Data tab. Now is the time to stuff the table with all the data it is meant to display.
This tab allows direct entry of data into the cells, and at the same time allows adding several columns and rows to the table in one shot.

It is also possible to format just one data column by selecting its header and then applying various formatting options like font type, size, etc. This can be useful to make a distinction between a primary column and the rest of the columns in the table.
You can also move rows up and down in order using the respective buttons and as if this wasn’t enough the right-click or context menu on the table also provides a Search and Replace facility with all features studded in the small dialog similar to a full fledged word editing or spreadsheet program.

Further if you have some data lying in Excel, simply copy the range, then right-click in the appropriate cell in the Data tab of the Table Properties dialog and select Paste from the context menu.
Solid Edge won’t complain about any column or row size mismatch but simply paste what is best possible. If you select cells with data, it will be overwritten – no questions asked, though it would have been nice if Solid Edge added rows automatically when say I have copied 5 rows from Excel and pasted them in the last row of the Table. What Solid Edge currently does is paste only the first row since only one row is available for inserting. This means I have to prepare the table in Solid Edge in advance for accomodating 5 more rows by manually inserting the required number of rows before pasting the Excel data.
There are still more tabs one each for Sorting and Groups, but let’s save these for another day.
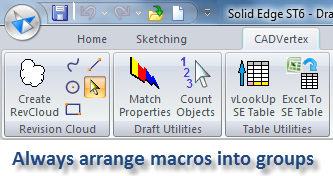
Coming back to Data tab, the two macros attached with this article do more than just copy-pasting. There are two macros attached with this article:
1. ExcelToSeTable
2. vLookUpSeTable
The ExcelToSeTable macro converts a selected range of cells in Excel into a full-fledged Table in Solid Edge in a single click. Here’s an example:

To use the macro,
1. Keep both Excel and Solid Edge open.
2. Select the range of cells in Excel including the column headers by dragging over them.
3. Switch to Solid Edge and execute the macro from its button on the ribbon.
 Notes:
• There is no limit to the number of rows and columns in Excel to select.
• The first row will always be used as the header.
• The sheet name in Excel will be used as the title of the table.
Details on how to add the macro to the ribbon bar button follows after the description of the second macro.
The other macro attached is vLookUpSeTable which adds the VLOOKUP intelligence to a Solid Edge table. To use this macro:
1. Select the table you want to lookup in Solid Edge.
2. Start the macro from the ribbon bar button.
3. You will be prompted to specify a value from the first column to lookup.

4. After specifying a value, click OK and the macro displays the corresponding values from the same row.
5. The results of lookup can be optionally copied to the clipboard so it can be used further.
Note: To better understand vLookUp read this article.
To assign the macro to a button on the ribbon bar in the Draft environment, follow these steps:
1. Right-click on an existing button on the ribbon to display the context menu.
2. Select Customize the Ribbon from the menu.
3. In the Customize dialog, the Ribbon tab should be active.
4. Click the New Tab button.
 5. This inserts a New Tab node to the tree on the right.
6. Select the New Tab and press F2 to rename it to your name or your company name or even your pet’s name will do.
7. Similarly rename the Group node.
8. Select the Tab node.
9. At the top on the left side, pull down the list called Choose commands from:
10. At the bottom side of the dialog, click Browse…
11. Pick the ExcelToSeTable.exe
12. Pick the ExcelToSeTable.exe again in the left-side list in the Customize dialog.
13. Click Add >>

14. Use the Move Up or Move Down buttons to place the button in proper order.
15. Similarly add the button for the vLookUpSeTable macro.
16. If you have also extracted the images ExcelToSeTable.PNG and vLookUpSeTable.PNG in the same folder as the EXE, the icons will be picked up automatically and displayed on the buttons.
Note: If you want your own icon, make a 32 x 32 PNG file using MS Paint. ICO and BMP files should also work.

Check everything appears fine and the macros work properly. Both macros should guide you with most commons mistakes that could be made viz. Solid Edge or Excel not running, not selecting a table, not selecting enough rows or columns in Excel, etc.
In case of any other error encountered, kindly report in the comments section below. Also if you see any enhancements that could be made to the macros which would be useful, feel free to provide a feedback in the comments below.
See the ZIP attachment with this post below for the macros and the PNG file. After extracting, the files to be renamed from .ex_ to .exe.