ST6: Synchronous Delete
 Let’s say that you imported a part from SolidWorks. Maybe that part looks like this to the right. The part has lots of rounds on it. If you are used to working with history-based modelers, getting a model with all the edges rounded usually means that you’re going to waste a lot of time trying to get rid of those rounds. If the faces are drafted, that’s even worse, because your extrudes aren’t going to line up right. If you’re really good, (and super patient) you can break the model down into surfaces and extend and trim the faces to get your corners back.
Well, Solid Edge Synchronous Technology gives you better tools than that. In the first place, you can edit a lot of imported models, even with draft and rounds in place. But in the cases where you can’t, getting rid of rounds in Edge is so much easier than in your outdated straight history-based modeler. Have a look at this.
You want to make some changes to this model, but you want to make the changes without the rounds. Maybe you read one of my earlier blog articles, and you decided you wanted to make edits to the overall model using Synchronous, but apply the rounds as Ordered features at the end (which, in my opinion, is totally the way to go). In any case, we need some scenario here where you want to remove the rounds from this model. We’re going to use a function called Synchronous Delete.
Synchronous Delete just means that you select geometry, and press Delete on the keyboard. In this case we will be deleting rounds. Let’s start down near the bottom. You might want to refresh your memory on the “CAD Geek Terminology” section of the blog post link mentioned above. As we delete the faces of the rounds, the adjacent faces are going to extend until they intersect – just the reverse of when you create rounds in the first place, where the adjacent faces are trimmed back to fit the round. Anyway, let’s just try it and see what happens.

See what happened? It got rid of only part of the round. This is the part of Synchronous Delete that is new in ST6. If Solid Edge had not capped off the end of the round, then the delete may have failed. In a competing history-based modeler, this would have failed or sent you into a surface model, depending on your settings.
Granted, this may not be what you are really looking for, but dealing with functions failing for reasons you don’t understand is not cool. With this intermediate step, you can go ahead and select some more faces to get rid of the rounds that you need to be rid of.

 Now that whole round feature has been removed cleanly, without fussing with failed features or surface models. Let’s do a little more.
In the image to the right, I’ve just selected three faces of a round I want to get rid of. Again, the left side of the selection would cause a similar function in your old-fashioned history-based modeler to fail, while the right side of the selection would cause it to throw you into a surface model. Solid Edge can find an intermediate solution that allows you to keep working in a solid model.
The geometry that it leaves isn’t anything that you would want to

keep, but it does allow you to keep on working.
In the next step, I’ll select the faces of the remaining parts of the round and use the Synchronous Delete to get rid of them.

This is a really clean method for getting rid of rounds on imported models. But you can also use the same method for native Solid Edge files. If you have built a model with Ordered rounds, you can use history-based methods (deleting or editing round features from the tree), but for any Synchronous rounds on a part, the Synchronous Delete in ST6 is doing a little topological magic in the background to keep you productive.

But wait! It gets even better!
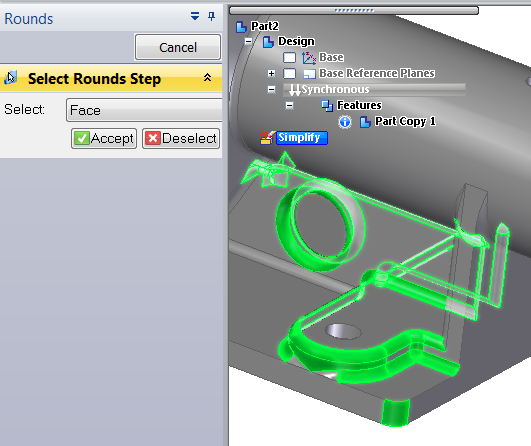
Your round-reducing rampage might be needed because you are creating a Simplified model for FEA, or a large assembly. The Simplified mode is found on the Tools tab, in the Model group. When you switch to the Simplified mode, you get some additional tools to help you select and delete rounds, making it even faster. On the Home tab, the Modify group contains the features shown below.

With the Delete Rounds function in Simplified mode, I can box select rounds, and Solid Edge will delete them for me.

This, as you can imagine, is extremely helpful. The selection in the image to the right was made by dragging a box.
Clicking Accept (or just right mouse button clicking) adds a Delete Round feature under the Simplify collector, and allows you to move on to another box selection for deleting more rounds.
This kind of functionality is pretty exciting, if you’ve ever had to deal with imported models, you know this is golden. Next time you have to wrangle an imported part, just remember Synchronous Delete and Delete Rounds in Simplified mode. It’s even better than working in the native modeler.
PS: I’ve attached the original part in *.SLDPRT format (in a zipped folder), so you can import it for yourself and have fun with the rounds.


Comments