Live Rules and the Solution Manager
In the last article you got a good primer for how some of the simple functions of Live Rules work. I made a mistake and corrected it where I was talking about the colors of the squares on the Live Rules interface. The red squares are rules that were turned off, but would have affected the outcome if they had been turned on. Orange are rules that are on, but do not affect the outcome. Green are of course rules that are turned on and are having an effect.
Rather than talking about some of the more complex rules, today I want to talk about the Solution Manager. Live Rules has evolved over time, and the Solution Manager is one of the areas where there have been a lot of changes from earlier versions. At one point this was called “Advanced Live Rules”. You can think of the Solution Manager as a set of options for possible solutions, depending on which controls you select – dimensions, relations, or rules.

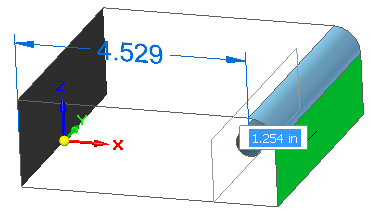
The Solution Manager is the box on the lower right. Here’s an example. If you move the selected face of this block with a round on it, the edit fails because you are giving the system conflicting information. You can see a tip shows up that might help you resolve the issue.

If you click the mouse to place the face, or enter in a number, the Solution Manager  automatically activates, and you get the image shown to the right.
To me, this is another case where the Solid Edge interface is great for people who use it a lot, but not always ideal for new users. The legend shows up on the right, but it just shows the possible colors, it doesn’t tell you what they mean. The four colored boxes in the icon at the upper right of the Live Rules interface calls up a real legend, where you can reassign colors,  and get the meaning of the colors in words.
So the green face was the original selection, and the orange face is the change that failed, and the orange fillet and hole also would have moved, but failed. The black face is grounded (probably because of the Lock to Base Reference Live Rule), and the light blue face is one that worked correctly.
There are several possible solutions. Let’s try to name them:
- The dimension changes to match the Steering Wheel change
- The hole loses concentricity with the fillet
- The entire block moves off of the origin
This is the real beauty of being flexible with design intent. In a history-based system, you’d have to go back and edit the original model to get each one of these possible outcomes, but with Synchronous Technology, you just make the decision right here when you need it.
Now I’m going to get off topic a little bit here and tease SolidWorks users some. SolidWorks users, and I know because I was one of them, have become increasingly “error-phobic” over the years. The SolidWorks software has even started showing fewer and fewer errors, to the point of sometimes not showing errors even when they exist, because the company is aware of how much anxiety those errors cause users.When the users see an error, they kind of panic, because it could mean hours of pointless rework of all those relationships in the tree.
This Solid Edge interface with the Solution Manager is one that will probably cause SolidWorks users to panic initially. Solution Manager requires that you lean into the failure- in fact, the Solution Manager doesn’t work until something fails. In Solid Edge, the fact that an edit fails doesn’t mean that you’re going to have to go back and fix a bunch of stuff. It just means that the software notices that you have given it too many instructions, and it is going to ask you which ones are really important. That’s all it is, and that’s what the Solution Manager does.
 So in the case shown above, you can just click on any of the errors, and the software will make that work. For example, if you click on the dimension, then the dimension becomes driven instead of driving, and that solves everything. To make it fail again, just click the dimension again, and it goes back to the way that it was, allowing you to try again.
 With the next try, click on the fillet face. This breaks the Concentric Live Rule, and it also solves the whole problem, but in a different way. Notice that now there are two new colors – Red and Teal. Red means that the face is isolated – its not touching any of the moving faces. Teal means that it is now working because something was “relaxed”. In this case it was the Concentric Live Rule that was relaxed.
There are other solutions that are pretty unlikely, like maybe you wanted to break tangency between the selected face and the fillet, or maybe you wanted to angle the selected face, or move the block off the origin. You could achieve each of those results (using Lift option, turning off Parallel, and turning off Lock To Base Reference Live Rules, respectively) if you wanted to, but the software recognizes them as less common options.
Does stuff like this take a little practice? Yes. But once you see how it works, applying it is pretty simple. How long did it take you to learn how to fully control parent-child history-based modeling? My experience with writing and teaching people about that is that a lot of people remain confused about manipulating parent/child relations after years of actual experience. Just think if you were able to completely ignore parent/child relations! You make the decision about how changes work at the time of the change, not at the time of modeling. You don’t need to see into the future to build a model you can change or into the past to change a model you built.
Live Rules, are they scary? Only until you understand them. And even then, the Solution Manager is always there to help bail you out, and allow you to do “what if” scenarios on which relations, dimensions or rules to relax in order to get to the solution you want to see. You no longer have to be afraid of your CAD software.

Comments