User Dialogues in FEMAP API (Part 2)
User Dialogues in FEMAP API Part 2
In Part 1 of this blog, we created a user dialogue that allows for data to be entered/selected. In Part 2, we will capture the data entered/selected and use the responses in a basic program.
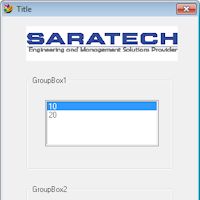
A slightly modified version of the UI from part 1 is shown below:


The dialogue is initialized by the statement rc=Dialog(dlg). Rc stands for return code and captures the value returned by the dialogue. A value of -1 means Ok was selected in the dialogue while a value of 0 means cancel was selected. The Select Case structure allows the input from the UI to be used to structure the program. We see these values as criteria for the first two cases. Within the Ok/Cancel Select case there multiple sub select case situations which make different events occur. The first subcase prints out the value of Lisbox1. The next case checks to see if CheckBox1 is checked. When Checkbox 1 is checked, the value entered in TextBox1 is printed. The Select Case structure can be confusing at first, but is relatively straightforward after seeing it in use.
Example Input/Output